Today we are going to take a look at the Microsoft Azure Elastic SAN.
Introduction
“Azure Elastic SAN is a unique cloud-native and fully managed storage area network (SAN) service. Combining SAN-like capabilities with the benefits of being a cloud-native service, Azure Elastic SAN offers a massively scalable, cost-effective, high-performance, and resilient storage solution. It can connect to a variety of Azure compute services, enabling you to seamlessly transition your SAN data estate to the cloud without having to refactor your application architectures.”
Azure Elastic SAN provides a storage solution that is highly scalable, cost-effective, high-performing, and resilient. It caters to various storage needs, whether you're migrating your on-premises SAN to the cloud or creating your application directly in the cloud.
As Azure Elastic SAN is still in the preview stage, as of 28/05/2023, it is important to note that its features
and functionality may change before it reaches production. Microsoft continues to actively gather feedback from users and refine the offering to ensure a seamless experience when it finally becomes
generally available. Request access to the Preview by filling out this form. This feature should not be used for production workloads until General Availability (GA).

A Storage Area Network (SAN) typically comprises one or more physical appliances equipped with multiple drive bays, which are used to create volumes – it is considered a high-performance and low-latency connectivity
storage solution.
The benefits of a SAN are:
- Grow storage footprint independent of Compute
- Low latency and high storage throughput
- Cost efficient with massive scale.
- Built for databases and IOPS-intensive applications.
- Supports large virtualization deployments.
Introducing Azure Elastic SAN.

With the Azure Elastic SAN, we can the elasticity of the Microsoft Azure block storage systems, to supply expandable block storage capabilities to workloads via iSCSI (Internet Small Computer Systems Interface), or services such as Azure Kubernetes Services through Azure Container Storage.
When looking at some of the benefits of an Azure Elastic SAN, over a traditional SAN, we will delve into several
common user stories around SAN provisioning and capacity management, with key differences around time to deployment and skills required.

Architecture and Components
The Azure Elastic SAN consists of 3 layers:

The Elastic SAN
The Elastic SAN itself, the Elastic SAN consists of the control plane, where you create and manage your Volume Groups from. The Elastic SAN is where the resources are provisioned, and the Cost Management takes place (i.e., Tags on the Elastic SAN resource).
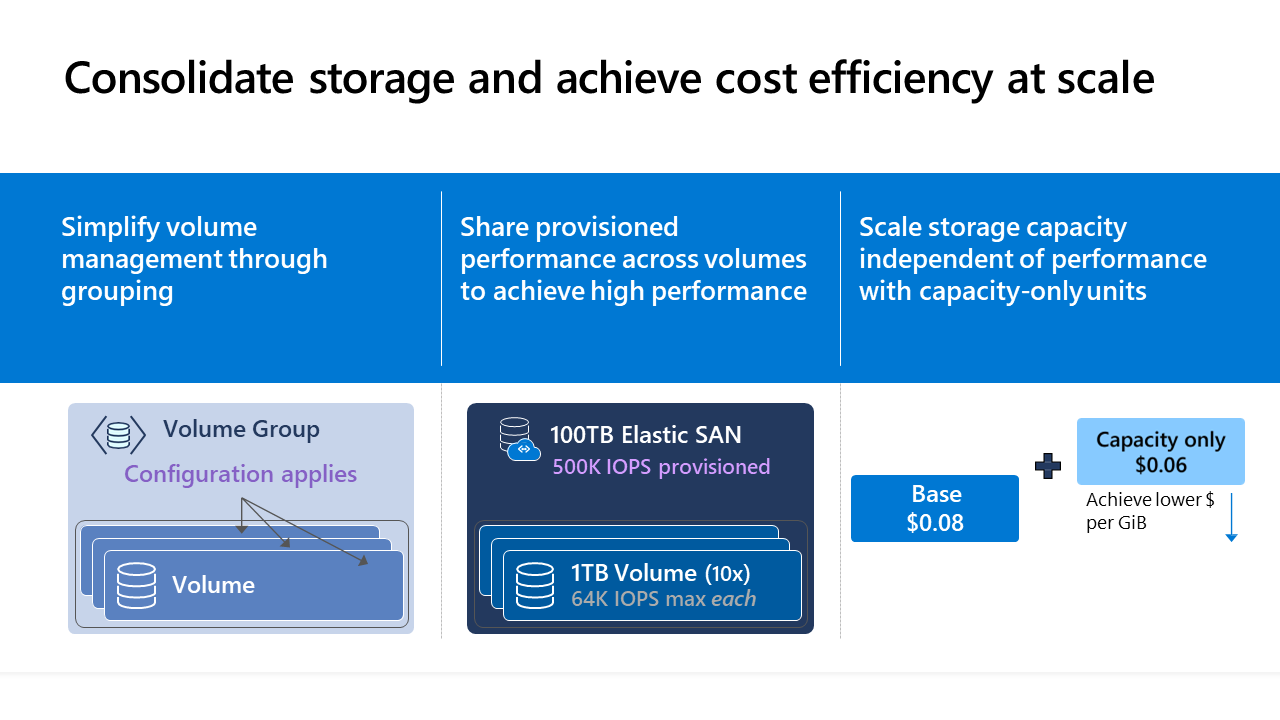
Volume Group
An Azure Elastic SAN can have up to 20 volume groups, the volume group is where your security, encryption, and data protection configurations get applied.
The volume group is where your Network Security rule and service endpoints are applied. Any settings or configurations applied to a volume group, such as virtual network rules, are inherited by any volumes associated with that volume group.

Volume
The volume in an Azure Elastic SAN is the actual storage, that gets delivered and mapped to your workload or service.
Multiple volumes can be a part of a single-volume group, or separate groups – depending on requirements, such as accessibility across different virtual networks.

You partition the SAN's storage capacity into individual volumes. These individual volumes can be mounted to your clients with iSCSI. The name of your volume is part of their iSCSI IQD

Deployment and Configuration
Now that we know what Azure Elastic SAN is, let's deploy it using the Azure Portal.
At the time of this article, the Azure Elastic SAN is only available in specific regions – and whether the SAN is capable of ZRS or LRS storage redundancy. As I am based in New Zealand, the closest region at this time to me is Australia East, this region only supports LRS so this is what I will be configuring.
If you haven’t already – as part of Public Preview, your Azure subscription needs to be enabled to provision Azure Elastic SAN.
Deployment
- Login to the Microsoft Azure portal
- In the search box at the top of the portal, type in Elastic SAN, and navigate to the Elastic SAN resource page.
- Click Create Elastic SAN

- I will create a new Resource Group named: AzureElasticSAN-dev-rg
- I will name my Azure Elastic SAN: azelasticsan_aue
(Name has to be between 3 to 24 characters in length, and may only contain
lowercase letters, numbers, hyphens, and underscores (hyphens and underscores
must be surrounded by letters or numbers).

- Now we need to specify the base and capacity size, the base size will determine what your iOPS and throughput your SAN will support. It’s cheaper to go with, a lower Base size, and higher additional storage – but it will affect your IOPS and bandwidth. These values can be changed later (start with a minimum and increase as needed, as you can’t downsize) – I will set my Base as the minimum of 1 TB and add size of 1TB.

- Click Next
- This is where we can create a volume group, click + Create volume group
- The volume group will be used to contain our volumes, I will name a volume group as demo
- I will then allow the volume group, to connect to my DevBox virtual network and set up a service endpoint, on my devbox subnet

- Click Create, and finally Review + Create to create your Azure Elastic SAN.
- Configuration
Now that we have an Azure Elastic SAN, it’s now time to add some volumes. We can partition the SAN's total storage into individual volumes, used for block storage.
A volume can only be part of one volume group, but you can have multiple volumes, across multiple volume groups – that equals the total size of the SAN (in my example 2 TB, the 1 TB Base size, and 1 TB additional capacity), however unlike the SAN – a volume can be Gigabytes in size.
A volume cannot be higher than the total allocated capacity assigned to the SAN.
Remember when you create a new Volume, you can increase the size later (but you can’t downsize the volume).
The volume name is part of your volume's iSCSI Qualified Name and can't be changed once deployed.

- To create a new Volume, let's navigate to our Azure Elastic SAN.
- Click on Volumes (under SAN Management)
- Click Create a volume.
- We are going to give the volume a name, in this example I will go with: vol1
- For the size, I will select 500GB.
- Click Save
- Once the volume has been created, we can see the volume and the assigned volume group, including the size of the volume and the remaining capacity of the SAN.
Connect
Now that the SAN, Volume Group, and Volume have been setup – it’s time to connect to the storage.
In my demo environment, I have a Volume Group, assigned to a storage service endpoint on my devbox virtual network and subnet, so I will connect to the SAN through a Windows Server 2022 server, that is attached to the same virtual network.
Following this guide will set up a single path, for more production scenarios to achieve higher IOPS and throughput, and configure mulipathing using the Microsoft document ‘here’.
- To connect, we need to navigate to our volume, lets navigate to our Azure Elastic SAN.
- Click Volumes
- Click your volume, you want to connect to and select Connect.
- Microsoft Azure, gives us the PowerShell/Bash cmdlets to run on Windows and Linux. Copy the scripts, we will need to run both.
- Login to your Windows Server that you want to
connect to the volume. If this is a new Windows Server, that hasn’t been configured to iSCSI – you will need to start the iSCSI Initiator service and set it to Automatic start.
- Open a PowerShell prompt as Administrator and run the Add Target command, you should have ‘Operation completed successfully’.
- Then run the login to target script.

- Once completed, you can confirm your connectivity, by opening up Server Manager and launching iSCSI Initiator, you should see 'Connected'.

- Now that your iSCSI target has been mapped – lets create a volume we can actually use!
- Right Click your Start Menu and click Disk Management
- You should see an Unallocated Disk

- The unallocated disk here, is our 500GB Azure Elastic SAN volume, it’s time to initialize it, right click and select Create New Simple Volume, I will go through the defaults and now I have a new drive I can use within Windows

Now that we have provisioned the Azure Elastic SAN, and connected to it, let’s take a high-level look at the scalability and performance.
For performance, I ran a single threaded test on my 500GB iSCSI target using Diskspd, using the following parameters:
.\diskspd.exe - d60 - W15 - C15 - c128M - t4 - o4 - b8k - L - r - Sh - w50 f: \disk - speed - test.dat
The output was:
Total IO:
- I/Os: 109,541
- I/O per second: 1,825.30
Read IO:
- I/Os: 54,547
- I/O per second: 908.93
Write IO:
- I/Os: 54,994
- I/O per second: 916.38
The output does not directly provide the exact IOPS (Input/Output Operations Per Second) value, but we can calculate it based on the total number of I/Os and the test duration.
To calculate the overall IOPS, divide the total number of I/Os by the test duration:
- Total IOPS: 109,541 I/Os / 60 seconds = 1,825.68 IOPS
Similarly, you can calculate the read and write IOPS:
- Read
IOPS: 54,547 I/Os / 60 seconds = 909.12 IOPS
- Write
IOPS: 54,994 I/Os / 60 seconds = 916.57 IOPS
Therefore, based on the given Diskspd output, the SAN is performing approximately 1,825 IOPS in total, with 909 IOPS for reads and 917 IOPS for writes.
Note: This was a very basic test, running on a Windows Server 2022 Azure Virtual Machine (Standard D4s v3 (4 vcpus, 16 GiB memory)), single threaded.
At the time I ran this test – the IOPS limit of the SAN was 5000, and bandwidth was 80. I highly encourage you to run your own tests. This was more intended as a baseline for reference.

Pathping, reported 0 hops for DNS resolution, this Virtual Machine is in another Availability Zone from the SAN.

In terms of Scalability, a few things to note:
- You cannot increase the volume size, while an active session (i.e., in use by a workload) is in use.
- You can increase the Base and Additional size of the SAN, while sessions are in use.
- The Additional size of the Azure Elastic SAN has to be less than the Base size (for example, you cannot have an Azure Elastic SAN with a Base size of 3, and an Additional size of 4).
Data Protection and Redundancy
At the moment, Azure Elastic SAN, only supports specific regions and configurations, for example in Australia East, the Azure Elastic SAN only supports LRS, so the volumes sit within a single datacenter, replicated across 3 storage stacks.
")
LRS is still decent in terms of resiliency but for those who are use to cross SAN replication - I expect, we will see ZRS start to become common place, as this service is rolled out.
")
At the time of this writing, there is no Azure Backup Support, I expect this capacity to be released closer to GA (Generally Available).
For day to day operations, I was able to enable the Volume Shadow Copies, which allowed me to go back to previous versions of files and folders.
Security and Compliance
Other than the usual filesystem permissions, you can use with your filesystems across Windows and Linux on the Azure Elastic SAN, there are built-in roles that can be leveraged for Azure Elastic SAN management.
Assigning least privilege operations or creating your own custom role is possible with Azure Elastic SAN, and roles such as Volume Group Owner will be key to how the SAN is architectured for an organisation.
| Name | Description |
|---|
| Elastic SAN Owner | Allows for full access to all resources under Azure Elastic SAN including changing network security policies to unblock data path access. |
| Elastic SAN Reader | Allows for control path read access to Azure Elastic SAN |
| Elastic SAN Volume Group Owner | Allows for full access to a volume group in Azure Elastic SAN including changing network security policies to unblock data path access. |
All data stored in an Elastic SAN is encrypted at rest using Azure storage service encryption (SSE). Storage service encryption works similarly to BitLocker on Windows: data is encrypted beneath the file system level. SSE protects your data and to helps you meet your organizational security and compliance commitments. Data stored in Elastic SAN is encrypted with Microsoft-managed keys, that are rotated frequently.
Integration with Azure Services
At the moment, Azure Elastic SAN supports, Service Endpoints only, Private endpoints are not yet available, but enabling service endpoints on subnet/s was easily done.
Connectivity to Windows and Linux machines, will be done through native iSCSI protocols, as the Azure Portal displayed when attempting to connect.
At the time of this writing, Azure Container Storage – connecting to Azure Kubernetes Service, can be leveraged by Azure Elastic SAN (Azure Container Storage is also in Public Preview).

Cost and Pricing
The Azure Elastic SAN is charged by the amount you provision based on units:
- Base unit
- Capacity-only unit
They are designed to offer a simple bulk provisioning experience while also providing flexibility to expand your data footprint.
The Base unit has a capacity of 5000 IOPs and a throughput of 80 MBps per TiB.
The Capacity only unit, on the other hand, allows you to provision capacity only without provisioning performance at a lower cost.
As a result, you can cost-effectively scale performance while migrating workloads from on-premises to Azure.
The total price of Azure Elastic SAN depends on the base and capacity scale unit (LRS and ZRS dependent).
Elastic SAN will need to be provisioned with at least one base unit of 1TiB. It is also important to note that the SAN-provisioned resources are shared by all volume groups and volumes.

Tips
I will cover a few titbits, I found in my discovery.
- Authentication Failure – if you get ‘Authentication
Failure’, when attempting to connect to your iSCSI target (Azure Elastic SAN Volume), from your Windows or Linux workload, make sure that the Volume Group has had the Service Endpoint enabled for the subnet and virtual network you are connecting from, by default all traffic is denied to the Azure Elastic SAN – this includes traffic from other subnets, the storage endpoint needs to be enabled on the subnet that hosts your virtual machines.
- Persistent Login - When connecting to the iSCSI target (the Volume) this is a once off session, if your system is rebooted, the volume won’t automatically remap. You can set a Persistent Login, by replacing ‘LoginTarget’
in your iscsicli command to: PersistentLoginTarget (for example: iscsicli PersistentLoginTarget iqn.2023-05.net.windows.core.blob.ElasticSan.es-rsip05eo4sx0:vol1 t es-rsip05eo4sx0.z40.blob.storage.azure.net 3260 Root\ISCSIPRT\0000_0 -1 * * * * * * * * * * * 0), then the next time you reboot your Windows server, the volume will be automatically mounted.
Updates and New Features
As this is a Private Preview service, there will be updates on functionality and features that I have gone through today and may have missed.


 `
`


