Turn on a Azure Virtual Machine using Azure Automation
Turning off a Virtual Machine in Microsoft Azure on a schedule can quickly be done using the built-in Shutdown controls in the Virtual Machine blade (part of Azure Lab Services, but not a requirement), but what about starting it?
You have a few options, Logic Apps, PowerShell, Functions and Runbooks; most of the time, these will run on a standard 7 AM to 5 PM Monday to Friday schedule (meaning the Virtual Machine is off during off-peak hours and weekends, reducing compute cost).
This works fine for most scenarios, but what happens if a Bank or Public Holiday falls during the week? With the normal schedule, your Virtual Machine starts.
Because all your users are on Holiday, it wastes money while you and your users drink snicker cocktails at the beach?
This is where using a third party timezone API like 'AbstractApi' comes in handy; incorporating a lookup to check if it's a Public Holiday before starting that Virtual Machine can help reduce unnecessary costs.
Virtual Machines in Microsoft Azure have different states and, depending on what state the Virtual Machine is in, will determine whether you get billed or not (for the Compute, storage and network adapters are still billed).
| Power state | Description | Billing |
|---|---|---|
| Starting | Virtual Machine is powering up. | Billed |
| Running | Virtual Machine is fully up. This is the standard working state. | Billed |
| Stopping | This is a transitional state between running and stopped. | Billed |
| Stopped | The Virtual Machine is allocated on a host but not running. Also called PoweredOff state or Stopped (Allocated). This can be result of invoking the PowerOff API operation or invoking shutdown from within the guest OS. The Stopped state may also be observed briefly during VM creation or while starting a VM from Deallocated state. | Billed |
| Deallocating | This is the transitional state between running and deallocated. | Not billed |
| Deallocated | The Virtual Machine has released the lease on the underlying hardware and is completely powered off. This state is also referred to as Stopped (Deallocated). | Not billed |
I have written a base runbook that does precisely that, every time the runbook runs, it checks if it is a public Holiday. If it is - then the Virtual Machine isn't started; if it isn't, then the virtual machine is started.
Overview
Today, we are going to set up an Azure Automation runbook, triggered by a scheduled will go through the following steps:
- On a schedule (7 AM, it will trigger an Azure Automation runbook)
- The Azure Automation runbook will do a lookup to an external API, in this case, AbstractApi.
- The runbook will check the date and detect if it falls on a Public Holiday; if it is a Public Holiday, it will exit the Azure Automation runbook; if it is a standard workday, it will start the Virtual Machine.
To do this, we need a few resources.
- Azure Automation Account
- Azure Automation runbook (I will supply a PowerShell runbook below)
- AbstractAPI API Key
And, of course, 'Contributor' rights to the Microsoft Azure subscription to create the resources and the schedule, along with setting up the System Managed identity to grant the Azure Automation account access to start the Virtual Machine.
We will set up this from scratch using the Azure Portal and use an already created PowerShell Azure Automation runbook.
Deploy Start VM Solution
Setup Azure Automation Account
Create Azure Automation Account
First, we need an Azure Automation resource.
- Log into the Microsoft Azure Portal.
- Click + Create a resource.
- Type in automation
- Select Create under Automation, and select Automation.

- Select your subscription
- Select your Resource Group or Create one if you don't already have one (I recommend placing your automation resources in an Azure Management or Automation resource group, this will also contain your Runbooks)
- Select your region

- Select Next
- Make sure: System assigned is selected for Managed identities (this will be required for giving your automation account permissions to deallocate your Virtual Machine, but it can be enabled later if you already have an Azure Automation account).
- Click Next
- Leave Network connectivity as default (Public access)
- Click Next
- Enter in appropriate tags

- Click Review + Create
- After validation has passed, select Create
Configure System Identity
Now that we have our Azure Automation account, its time to set up the System Managed Identity and grant it the following roles:
- Virtual Machine Contributor (to deallocate the Virtual Machine)
You can set up a custom role to be least privileged and use that instead. But in this article, we will stick to the built-in roles.
- Log into the Microsoft Azure Portal.
- Navigate to your Azure Automation account
- Click on: Identity
- Make sure that the System assigned toggle is: On and click Azure role assignments.

- Click + Add role assignments
- Select the Subscription (make sure this subscription matches the same subscription your Virtual Machines are in)
- Select Role: Virtual Machine Contributor
- Click Save
- Click Refresh (it may take a few seconds to update the Portal, so if it is blank - give it 10 seconds and try again).
- You have now set up the System Managed identity and granted it the roles necessary to execute the automation.
Setup Abstract API Key
Now we need to create an API key, which will be used in the runbook to start the Virtual Machine, the API key will allow connections to the Abstract API to retrieve public Holliday information.
- Create an Abstract API account
- Log in to the newly created account
- On the left-hand navigation bar, click on Holidays

- Click on 'Try it out
- Copy the API key

- Copy the API key, as we will need it for the next steps.
Import Runbook
Now that the modules have been imported into your Azure Automation account, it is time to import the Azure Automation runbook.
- Log into the Microsoft Azure Portal.
- Navigate to your Azure Automation account
- Click on Runbooks
- Click + Create a runbook
- Specify a name (i.e. Start-AzureVirtualMachine)
- Select Runbook type of PowerShell
- A select Runtime version of: 5.1 (7.1 works as well).
- Type in a Description that explains the runbook (this isn't mandatory, but like Tags is recommended, this is an opportunity to indicate to others what it is for and who set it up)
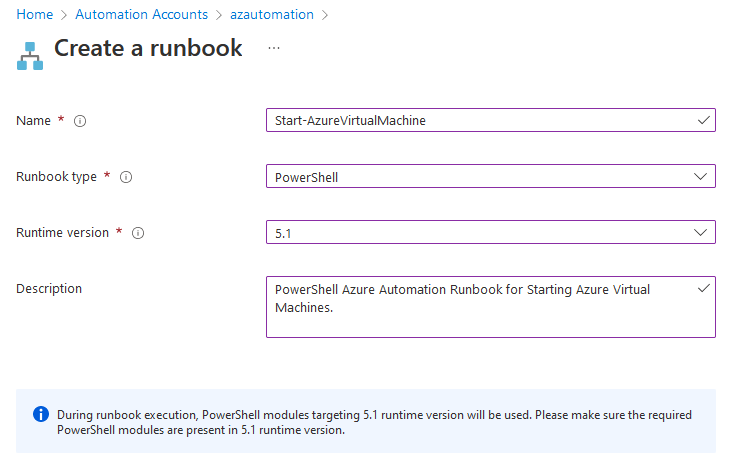
- Click Create
- Now you will be greeted with a blank edit pane; paste in the Runbook from below:
#requires -Version 3.0 -Modules Az.Accounts, Az.Resources
<#
    .SYNOPSIS
    PowerShell Azure Automation Runbook for Starting/Stopping Virtual Machines.
    .AUTHOR
    Luke Murray (https://github.com/lukemurraynz/)
    .VERSION
    1.0 - 28/04/22 - script versioned to '1.0'.
    .DESCRIPTION
    1. The script first checks if today is a holiday by making a call to the Abstract API.
    The Abstract API returns a JSON object containing the holiday name and (optional) description.
    The script checks if the name property is null. If it is not null, the script displays a message indicating that today is a holiday.
    If the name property is null, the script displays a message indicating that today is not a holiday.
    2. The script then checks if the virtual machine is running or not. If it is running, the script will stop the virtual machine.
    If it is not running, the script will start the virtual machine, depending on the Shutdown tag value
#>

Param(
  [Parameter(Mandatory = $true)]
  [String]
  $TagName,
  [Parameter(Mandatory = $true)]

  [String]
  $TagValue,
  [Parameter(Mandatory = $true)]
  [Boolean]
  $Shutdown
)

$CountryCode = 'NZ'

$tDate =(Get-Date).ToUniversalTime()
$tz = [System.TimeZoneInfo]::FindSystemTimeZoneById("New Zealand Standard Time")
$Date  = [System.TimeZoneInfo]::ConvertTimeFromUtc($tDate, $tz)


$API = Get-AutomationVariable -Name AbstractApiKey
$Holiday = Invoke-WebRequest -Uri ('https://holidays.abstractapi.com/v1/?api_key={0}&country={1}&year={2}&month={3}&day={4}' -f $API, $CountryCode, $Date.Year, $Date.Month, $Date.Day)

$Holidays = $Holiday.Content
$Holidays = $Holidays | ConvertFrom-Json

IF ($null -ne $Holidays.name)
{
  Write-Output -InputObject ("Today is a holiday. The Holiday today is: {0}. The Azure Virtual Machine won't be started." -f $Holidays.name)
}
ELSE
{
  Write-Output -Message 'No holiday today. The Virtual Machine will be started.'

  # Ensures you do not inherit an AzContext in your runbook
  Disable-AzContextAutosave -Scope Process
  # Connect to Azure with system-assigned managed identity (Azure Automation account, which has been given VM Start permissions)
  $AzureContext = (Connect-AzAccount -Identity).context
  Write-Output -InputObject $AzureContext
  # set and store context
  $AzureContext = Set-AzContext -SubscriptionName $AzureContext.Subscription -DefaultProfile $AzureContext
  Write-Output -InputObject $AzureContext

  $vms = Get-AzResource -TagName $TagName -TagValue $TagValue | Where-Object -FilterScript {
    $_.ResourceType -like 'Microsoft.Compute/virtualMachines'
  }

  Foreach ($vm in $vms)
  {
    if ($Shutdown -eq $true)
    {
      Write-Output -InputObject "Stopping $($vm.Name)"
      Stop-AzVM -Name $vm.Name -ResourceGroupName $vm.ResourceGroupName -Force
    }
    else
    {
      Write-Output -InputObject "Starting $($vm.Name)"
      Start-AzVM -Name $vm.Name -ResourceGroupName $vm.ResourceGroupName
    }
  }
}
- Change the country code to align with your own country. You can use the IP geolocation API in Abstract API to do a live test, which will give you your country code. Feel free to amend the Write-Output messages to make sense for your environment.
- Click Save

- Click Publish (so the runbook is actually in production and can be used)
- You can select View or Edit at any stage, but you have now imported the Azure Automation runbook!
Setup Variables
Now that the Azure runbook has been imported, we need to set up the variables, which include the API key.
- Log into the Microsoft Azure Portal.
- Navigate to your Azure Automation account
- Click Variables
- Click + Add a variable
- Create a Variable named: AbstractApiKey (this needs to match the variable name as part of the 'Get-AutomationVariable' cmdlet).
- Enter in a description
- Select String
- Enter in the API key you retrieved earlier from Abstract API.
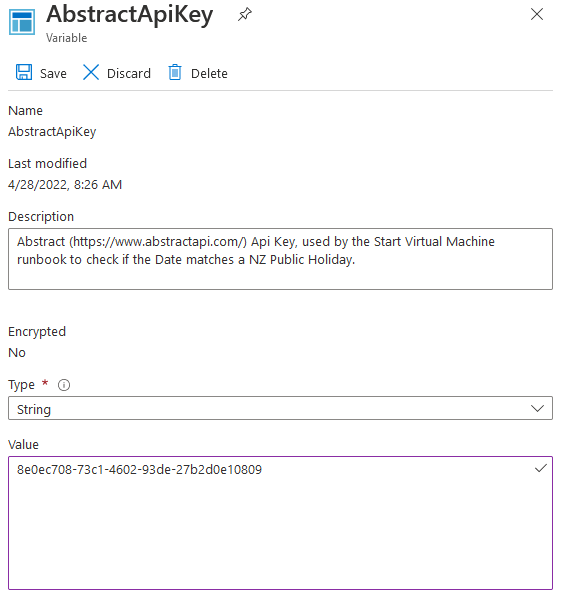
- Click Save
Setup Schedule
Now that the variables have been set up, we need to set up the schedule. This is the schedule that will be used to start the Virtual Machine. In the example below we are going to use a Standard Monday -> Friday work week, but adjust the time and date for when you need to start the virtual machine up.
- Log into the Microsoft Azure Portal.
- Navigate to your Azure Automation account
- Click Schedule
- Click + Add a schedule
- Type in a name for the schedule (ie Azure Virtual Machine - Start).
- Type in a Description
- Select the Start Date to match when you want to start the Schedule (ie first Monday of the week).
- Select your Timezone, so that the script runs on the right time/date which makes your timezone.
- For Recurrance, specify: Recurring
- Set it to Recur every: 1 Day
- Check Monday, Tuesday, Wednesday, Thursday, and Friday
- Leave Saturday and Sunday unchecked.
- Click Create
- Now that the Schedule has been created, we need to bind it to a Runbook
- On the Automation account blade, click on Runbooks
- Click on your 'Start Azure Virtual Machine' runbook
- Select Schedules
- Click Add a Schedule
- Press: Link a schedule to your runbook
- Select your newly created Schedule
- For the Tag Name, select Shutdown
- For the Tag Value name, Select Yes
- For Shutdown, select false
- Click Ok
- Your schedule has now been configured and the runbook will run the next time it matches your scheduled date and time.
Configure Tags
The runbook is written, so it doesn't need to be adjusted for future machines and making changes on the fly, this relies on each Virtual Machine that you want started to be started using the Runbook to be tagged.
- Log into the Microsoft Azure Portal.
- Navigate to your Azure Virtual Machine
- Click Tags
- Add the following tag:
| Tag Key | Tag Value |
|---|---|
| Shutdown | Yes |
Congratulations, the next time your schedule triggers, every runbook with the Shutdown tag will be started, according to your schedule, and workday. If it's a Public Holiday or a Weekend, the Virtual Machine will remain off - saving cost.