The Azure Point to Site VPN will take the DNS servers from the Virtual Network, that the Gateway is peering into by default, but due to VNET Peering or custom configuration if you may want to point this to custom DNS servers.
To do this, you need to edit the 'azurevpnconfig.xml' file and reimport the VPN connection.
Open: azurevpnconfig.xml in your favourite editor (ie Visual Studio Code or Notepad)
Underneath the (which you can also change, as this is the name that users will see in Windows) add: < clientconfig>.
For example:
  <name>Luke's Azure Point to Site VPN</name>
  <clientconfig>
 <!-- need to specify always on = true for the VPN to connect automatically -->
 <AlwaysOn>true</AlwaysOn>
  <!-- Add custom DNS Servers -->
           <dnsservers>
             <dnsserver>10.100.1.1</dnsserver>
             <dnsserver>10.100.1.2</dnsserver>
         </dnsservers>
<!-- Add custom DNS suffixes -->
          <dnssuffixes>
          <dnssuffix>.luke.geek.nz</dnssuffix>
    </dnssuffixes>
</clientconfig>
Save your azurevpnconfig.xml and import it into the Azure VPN client.
Once the VPN has been re-established your Custom DNS settings and suffxies should take effect.
If you included the this will reconnect automatically, after your first connection and after computer reboots.
With over 70+ Microsoft Azure regions across the globe and new regions popping up all the time (for example new New Zealand North region coming in 2023)!
Migrating resources between regions is something that you may want to consider. Let's look at migrating workloads between them, by using Azure Resource Mover.
Azure Resource Mover helps you to move Azure resources between Azure regions, offering a single pane of glass to migrate different resource types, such as Virtual Machines or Azure SQL databases from a single portal without having to know how to migrate the individual underlying resources, or trying to work out the dependencies for each resource.
Let’s start with why would you migrate resources between regions? Common scenarios include:
Taking advantage of new Azure region expansions to be closer to customers and reduce latency (such as migrating from Australia East to New Zealand North).
Increasing availability and resilience by moving to Azure Availability Zones, from regions that don’t currently support it.
Meeting data residential and compliance requirements.
Consolidating workloads for mergers and acquisitions.
The cost of resources in one region may also be cheaper than in another.
Whatever your reason, moving your applications from Point A to Point B is often no easy task. Here are common reasons why:
Moving resources can pose a risk of an outage.
Workloads are often made up of multiple services, each requiring its own method and tools to move.
Interdependencies are often not understood.
Testing and rollback of these complex scenarios can be daunting.
So, what are the benefits of using Azure Resource Mover?
So, what are some of the benefits that Azure Resource Mover offers us?
The ability to plan with ease, reducing the time and complexity of your move.
Streamline your move process by identifying dependencies.
Plan and test your move multiple times.
Stage your move as part of scheduled downtime.
Azure Resource Mover helps you orchestrate seamlessly with a consistent experience across common Azure resources:
Move multiple resources through a single pane of glass.
Reduce manual touchpoints, which could increase the change of services being missed.
Reduce overall time for your move from months to weeks or days* (based on the service and data being consumed).
Azure Resource Mover helps you move with confidence by planning, testing, and moving related resources together and validating and testing your move before final commitment (by testing your migrated services, while having the peace of mind that your source resources are left intact until you commit to the migration).
So to recap, Azure Resource Mover offers you a unified experience to move multiple resource types across regions while validating dependencies between services and giving you the flexibility to adjust resources such as the Names, SKUs and Availability Zones during the migration to the destination region.
The currently supported resources (as of July 2022) are:
Azure Virtual Machines
Azure SQL Database
Azure Virtual Network
SQL elastic pools
Azure Load balancer
Public IP
Resource group
Network security group
Network interfaces
Azure Availability Sets
And Azure Storage account region replication support is scheduled in the next 6-9 months to be released so the storage account migration should be ready by the time the NZ North comes live.
The first step is to select the resources you´d like to transfer! A tip is to just pick the Virtual Machine object if you are migrating Virtual Machines, the dependencies will be identified by the Azure Resource Mover service itself!
The dependency check will be performed, identifying that you need to move other resources along with your virtual machine (Resource Group, NIC, Managed Disks etc.)
Start the preparation. This step initiates the preparation while creating a resource group with a dedicated Storage Account and a Recovery Services Vault to perform the move. The prepare step also creates the underlying ARM template deployments for the destination region.
Move initiation starts the process of transferring the resources to the target region. Certain dependencies should be 'committed' before preparation can be initiated, on other resources. If your resource is stateless such as a Network interface, a new ARM deployment will occur, but if your machine is stateful such as a Virtual Machine, Azure Site Recovery will start to copy the disk of your source machine to the target region. ATTENTION! Resources might be temporarily not available – perform these steps out of business hours
Commit your move or discard the move! Depending on if you want to complete the move process you can decide whether you want to keep or remove the replicated resources in the destination region.
Delete the source is the cleanup step required to remove the source resources from the region you have transferred from to finish your migration.
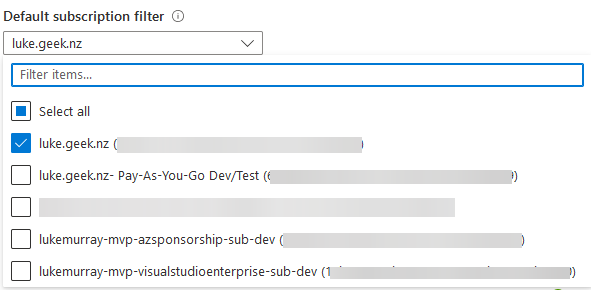
We've all been there! In the Azure portal, looking for a resource or subscription and cannot find it! Once permissions are ruled out, you are left with the Portal itself, and the filter.
You may see a checkbox or message like the below:
Show only subscriptions selected in the global subscriptions filter.
This is because the Microsoft Azure portal has a default filter, which is very handy in hiding subscriptions and resources you don't want to see or use all the time.
Click on 'Settings' on the top right-hand navigation bar
Toggle Advanced Filters
Click Continue to reload the Azure Portal, your Global subscription filter will be changed to an advanced filter.
Click Modify Advanced filters
Click + Create a filter
Here you have the ability to create a filter or filters, to help match your requirements. You can create filters based on subscription ID and subscription name.
Filter Type
Operator
Value
Note
Subscription ID
==
Subscription ID array
Equal
Subscription name
!=
Subscription ID array
Does not Equal
Subscription state
contains
String
Contains
!contains
String
Does not Contain
startswith
String
Starts with
!startswith
String
Does not start with
endswith
String
Ends with
!endswith
String
Does not end with
Subscription State
Description
Activate/Enabled
Your Azure subscription is active. You can use the subscription to deploy new resources and manage existing ones.
Deleted
Your Azure subscription has been deleted along with all underlying resources/data.
Disabled
Your Azure subscription is disabled and can no longer be used to create or manage Azure resources. While in this state, your virtual machines are de-allocated, temporary IP addresses are freed, storage is read-only and other services are disabled.
Expired
Your Azure subscription is expired because it was canceled. You can reactivate an expired subscription.
Past Due
Your Azure subscription has an outstanding payment pending. Your subscription is still active but failure to pay the dues may result in subscription being disabled.
Warned
Your Azure subscription is in a warned state and will be disabled shortly if the warning reason isn't addressed. A subscription may be in warned state if its past due, canceled by user, or if the subscription has expired.
Using the logic above, we can easily create filters based on the state of a subscription and name, an example is, creating a filter that displays all subscriptions with 'dev' in its name:
You can only have one Filter displayed at once in the Azure Portal, but you can easily switch between them, by clicking Activate, next to the filter name.
If you wish to disable Advanced Filters, and go back to the Global Filter, you can deselect the Toggle for Advanced Filters.
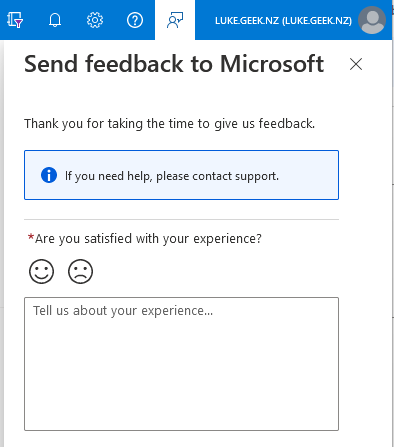
On the last note, Microsoft has made it easy to create Feedback, that will get fed back to the Azure Portal and product teams straight in the Microsoft Azure Portal, if you ever see anything that may need changing, or a link out of date don't hesitate to send your feedback to Microsoft, by pressing the little Feedback button on the top right of your navigation bar.
The Microsoft Azure portal is in development all the time and is now built with Azure Resource Graph capabilities, it is very easy not to try and see new functionality, so I recommend you keep your eyes out and try new features.
The Microsoft Azure Portal displays a list of Recent resources (whether they are subscriptions or Resources) you have accessed, usually when you first log in to the portal itself.
This capability makes it quick to access resources you use the most often, but sometimes you may want to view the resources in a list for easy access or clear the recent resources (ie if you are going to do a presentation) - this is how you can do it.
The Azure portal has a service called: Recent, to access it.
You will be taken to the Recent Resources view, where you can select Clear to clear your Recent Resources, or you can view all your recent resources for easy access.
You may be attempting to deploy an Azure Landing Zone, such as the Enterprise Scale Landing Zone and receive the following error:
You don’t have authorization to perform action 'Microsoft.Resources/deployments/validate/action'.
This is because by default, even if you have Owner right on an Azure subscription, and are a Global Administer, you are unable to assign rights at the root '/' tenant level, to be able to create new Management Groups and move subscriptions between them.
However, users who have the Global Microsoft Entra ID role can elevate rights to do this. There are a few steps to enabling this, including using Azure PowerShell to assign rights.
With an account with Global Administrator rights, do the following:
Sign in to the Azure Portal
Open Microsoft Entra ID
Click Properties
Toggle the 'Access management for Azure resources' to 'Yes'
Click Save
Open PowerShell
Run:
Connect-AzAccount
Login with your account, and make sure you are in the correct directory (if you aren't you can use Connect-Az Account - tenantid 'tenantidhere').
Type:
Get-AzADUser
Copy the ID of the user you are logged in as, and run the following (replace the ObjectId to match the ID of your user):
Give Microsoft Entra ID 10-15 minutes to replicate the Azure AD changes, log out and back in and you should now be able to deploy the Landing Zone.
Note: Remember to go back and change the toggle to 'Allow management of Azure resources' to 'No', or all Global Administrators of Microsoft Entra ID will be able to manage all Azure resources.
Once the Landing Zone is deployed, you should also remove your role assignment at the root level by running: