Create Custom Roles for Microsoft Azure

· 12 min read

Microsoft Azure uses Role's to define who can access what - Role-Based Access Control (RBAC).

You may be familiar with some of the more common ones, such as:

  • Owner
  • Contributor
  • Reader

Behind the scenes, each role is a separate grouping of permissions that determine what level of permissions someone or something has in Azure; these permissions are usually in the form of:

  • Read
  • Write
  • Delete
  • Action

Each role can be assigned to a specific Resource, Subscription, Management Group or Resource Group through an 'Assignment' (you assign a role if you give someone Contributor rights to a Resource Group, for example).

These permissions can be manipulated and custom roles created.

Why would you use custom roles you ask? As usual - it depends!

Custom Roles can give people or objects JUST the right amount of permissions to do what they need to do, nothing more and nothing less, an example of this is maybe you are onboarding a support partner, if they are will only be supporting your Logic Apps, WebApps and Backups, you may not want them to be able to log support cases for your Azure resources; instead of attempting to mash several roles together that may give more or fewer rights than you need, you can create a custom role that specifically gives them what they need, you can then increase or decrease the permissions as needed, however, if a built-in role already exists for what you want. There is no need to reinvent the wheel, so use it!

I will run through a few things to help arm you understand and build your own Custom Roles, primarily using PowerShell.

Install the Azure PowerShell Modules

As a pre-requisite for the following, you need to install the Azure (Az) PowerShell Module. You can skip this section if you already have the PowerShell modules installed.

  1. Open Windows PowerShell

  2. Type in:

    Set-ExecutionPolicy -ExecutionPolicy RemoteSigned -Scope CurrentUser
    Install-Module -Name Az -Scope CurrentUser -Repository PSGallery -Force
  3. If you have issues installing the Azure PowerShell module - see the Microsoft documentation directly: Install the Azure Az PowerShell module.

  4. Once you have the Azure PowerShell module installed, you can connect to your Azure subscription using the little snippet below:

    #Prompts for Azure credentials 
    Connect-AzAccount
    #Prompts Window allowing you to select which Azure Subscription to connect to
    $subscriptionName = (Get-AzSubscription) | Out-GridView -Title 'Select Azure Subscription' -PassThru | Set-AzContext -SubscriptionName $subscriptionName

Export Built-in Azure Roles

One of the best ways to learn about how an Azure Role is put together is to look at the currently existing roles.

  1. The following PowerShell command will list all current Azure roles:

    Get-AzRoleDefinition
  2. For a more human-readable view that lists the Built-in Azure roles and their descriptions, you can filter it by:

    Get-AzRoleDefinition | Select-Object Name, Description
  3. As you can see in the screenshot below, there are many various roles, from EventGrid Contributor to AgFood Platform Service and more! At the time of this article, there were 276 built-in roles.

  4. Azure Builtin Roles

  5. Now that we have successfully been able to pull a list of the existing roles, we will now export them as JSON files to take a proper look at them.

  6. The PowerShell script below will create a few folders on your computer as a base to work from (feel free to change the folders to suit your folder structure or access rights).

    • c:\Temp
    • c:\Temp\AzureRoles
    • C:\Temp\AzureRoles\BuiltinExports\
    • C:\Temp\AzureRoles\CustomRoles
  7. Once the folders have been created, it will Get the Azure Role definitions and export them into JSON into the BuiltinExports folder to be reviewed.

    New-Item -ItemType Directory -Path c:\Temp -Force
    New-Item -ItemType Directory -Path c:\Temp\AzureRoles -Force
    New-Item -ItemType Directory -Path c:\Temp\AzureRoles\BuiltInExports -Force
    New-Item -ItemType Directory -Path c:\Temp\AzureRoles\CustomRoles -Force

    $a = Get-AzRoleDefinition

    Foreach ($role in $a)
    {
    $name = $role.Name
    Get-AzRoleDefinition -Name ($role).Name | ConvertTo-Json | Out-File c:\Temp\AzureRoles\BuiltInExports\$name.json
    }
  8. Once completed, you should now see the JSON files below:

  9. Azure Role - JSON files

Although you can use Notepad, I recommend using Visual Studio Codeto read these files. This is because Visual Studio Code will help with the syntax as well.

Review Built-in Azure Roles

If you open one of the roles, I will open the Azure Digital Twins Data Owner role; however, it doesn't matter.

You should see the following fields:

  • Name
  • Id
  • IsCustom
  • Description
  • Actions
  • NotActions
  • DataActions
  • NotDataActions
  • AssignableScopes

These fields make up your Role.

Azure Role - JSON

  • The Name field is pretty self-explanatory - this is the name of the Azure Role and what you see in the Azure Portal, under Access control (IAM).

  • Azure Portal - Role

  • The same is true for the: Description field.

    These are essential fields as they should tell the users what resource or resources the role is for and what type of access is granted.

  • The IsCustom field is used to determine if the Azure Role is a custom made policy or not; any user-created Role will be set to True, while any In-Built role will be False.

  • The Actions field is used to determine what management operations can be performed. However, the Azure Digital Twins role doesn't have any (as it is mainly Data Action based) if we look at another Role such as the: Azure Kubernetes Service RBAC Admin role:

    • ""Microsoft.Authorization/*/read",
    • "Microsoft.Insights/alertRules/*",
    • "Microsoft.Resources/deployments/write",

    You can see that it has the rights to Read the permissions, create and delete any Alert rules and update resources.

  • The NotActions field is used to exclude anything from the Allowed actions

  • The DataActions field allows you to determine what data operations can be performed. Usually, these are sub-resource tasks, where management or higher-level operations are performed in the Actions field, more specific resource actions are performed in the DataActions field.

    The NotDataActions field is used to exclude anything from the Allowed actions in the DataActions

To help get a feel of the differences with the Actions, here is a list of Actions and DataActions for the Azure Kubernetes Service RBAC Admin role:

  • Azure Custom Role - JSON
  • And finally, the AssignableScopes is used to specify where the role will be available for assignment, whether it can be assigned at a subscription or resource group or management group level. You will notice that most if not all built-in Azure Roles have an Assignable scope of "/" - this means that it can be assigned everywhere (Subscriptions, Resource Groups, Management Groups etc.).

Review Azure Provider Namespaces

You may have noticed that each Action has a provider. In the example of a Virtual Machine, the provider is Microsoft.Compute.

  1. To get a list of all current Providers, run the following command:

    Get-AzProviderOperation | Select-Object ProviderNamespace -Unique

    At the time of writing, there are 198 current Providers! So that's 198 providers or overall buckets of resources that has permissions over.

  2. We can drill into a provider a bit further to check out current Operations:

    Get-AzProviderOperation -Name Microsoft.Compute/*
  3. This displays a list of all providers within the Microsoft.Compute namespace, such as (but definitely not limited to):

    1. Virtual machines
    2. Virtual Machine Scale Sets
    3. Locations
    4. Disks
    5. Cloud Services
  4. If we wanted to drill into the Virtual Machines providers a bit more, we could filter it like:

    Get-AzProviderOperation -Name Microsoft.Compute/virtualMachines/*
  5. Here we can finally see the available actions, and for example, the following Action will allow you to Read the VM sizes available to a Virtual Machine:

  • Operation: Microsoft.Compute/virtualMachines/vmSizes/read
  • operation name: Lists Available Virtual Machine Sizes
  • ProviderNamespace: Microsoft Compute
  • ResourceName: Virtual Machine Size
  • Description: Lists available sizes the virtual machine can be updated to
  • IsDataAction : False
  1. You can use the PowerShell script below to export all the Providers and their Operations to a CSV for review:

    $Providers = Get-AzProviderOperation

    $results = @()

    ForEach ($Provider in $Providers) {


    $results += [pscustomobject]@{
    'Provider NameSpace' = $Provider.ProviderNamespace
    Description = $Provider.Description
    'Operation Name' = $Provider.OperationName
    Operation = $Provider.Operation
    ResourceName = $Provider.ResourceName


    }

    }

    $results | Export-csv c:\temp\AzureRBACPermissions.csv -NoTypeInformation

Using the namespace, providers and actions, you should now be able to see the power behind Role-based access control and how granular you can get.

Add a Custom Role using PowerShell

Now that we understand how to navigate the Namespaces and Built-In Roles available in Microsoft Azure using PowerShell, now we will create one.

I have created a base template to help you start.

This base template has the following fields that the majority of most custom roles will use:

  • Name
  • IsCustom
  • Description
  • Actions
  • AssignableScopes (make sure you put in the of your Azure subscription, you are assigning the role to.)
  1. Edit these fields (apart from IsCustom, which you should leave as True) as you need.
CustomRoleTemplate.json

{
"properties": {
"roleName": "Custom Role - Template",
"IsCustom": true,
"description": "This is a Template for creating Custom Roles.",
"assignableScopes": [
"/subscriptions/<SubscriptionID>"
],
"permissions": [
{
"actions": [
"Microsoft.Support/register/action",
"Microsoft.Support/checkNameAvailability/action",
"Microsoft.Support/operationresults/read",
"Microsoft.Support/operationsstatus/read",
"Microsoft.Support/operations/read",
"Microsoft.Support/services/read",
"Microsoft.Support/services/problemClassifications/read",
"Microsoft.Support/supportTickets/read",
"Microsoft.Support/supportTickets/write",
"Microsoft.Resources/subscriptions/resourceGroups/read",
"Microsoft.Resources/subscriptions/resourcegroups/resources/read"
],
"notActions": [],
"dataActions": [],
"notDataActions": []
}
]
}
}

This Custom Role - Template allows you to read the name of all Resource Groups in a subscription and open a Microsoft Support case.

In my example, I am going to add a new role called:

  • LukeGeek-WebApp Deployment-RW

This role will allow users to Deploy and modify Azure WebApps, among other things!

LukeGeekWebDeployment-RW.json

{
"properties": {
"roleName": "Custom Role - Template",
"description": "This is a Template for creating Custom Roles.",
"IsCustom": true,
"assignableScopes": [
"/subscriptions/<SubscriptionID>"
],
"permissions": [
{
"actions": [
"Microsoft.Support/register/action",
"Microsoft.Support/checkNameAvailability/action",
"Microsoft.Support/operationresults/read",
"Microsoft.Support/operationsstatus/read",
"Microsoft.Support/operations/read",
"Microsoft.Support/services/read",
"Microsoft.Support/services/problemClassifications/read",
"Microsoft.Support/supportTickets/read",
"Microsoft.Support/supportTickets/write",
"Microsoft.Resources/subscriptions/resourceGroups/read",
"Microsoft.Resources/subscriptions/resourcegroups/resources/read"
],
"notActions": [],
"dataActions": [],
"notDataActions": []
}
]
}
}

  1. To add the Custom Role to Azure, I will run the following PowerShell command:

    New-AzRoleDefinition -InputFile "C:\\temp\\AzureRoles\\CustomRoles\\LukeGeek-WebApp Deployment-RW.json" -Verbose

Your new Custom Role has now been uploaded to Azure and can be selected for an assignment.

Add a Custom Role using the Azure Portal

Now that we have been through and investigated the Azure roles and their providers and actions, instead of using PowerShell to look through and create manually, you can use the Azure Portal!

Gasp! Why didn't you tell me earlier about this, Luke?

Well, fellow Azure administrator, I found it easier to look at PowerShell and JSON to explain how the Custom Roles were made, vs staring at the Azure Portal and to be honest, really just because! Like most things in IT there are multiple ways something can be done!

  1. Log in to the Azure Portal
  2. Navigate to your Subscription
  3. Click on Access Control (IAM) on the left-hand side blade
  4. Click on Add
  5. Click on Add Custom Role
  6. Type in the Role Name, for example, WebAdmin-RO
  7. Type in a clear description so that you can remember what this role is used for in a year!
  8. For Baseline permissions, select: Start from Scratch
  9. Click Next
  10. Click Add Permissions
  11. If you want, you can select: Download all permissions to review the providers and actions (very similar to the Get-AzProviderOperation PowerShell command).Azure Portal - Create Custom Role
  12. As you should see, all the Namespace providers are listed with the Actions/Permissions that you can do.
  13. In my example, I am going to search for Microsoft Web Apps
  14. Select all 'Read' operations (remember to look at Data Actions as well, there may be resource level actions you might want to allow or exclude)
  15. Click Add
  16. Azure Portal - Create Custom Role
  17. Review the permissions and click Next
  18. Select your assignable scope (where the Role will be allowed so that you can assign it)
  19. Click Next
  20. You can review and download the JSON for backup later (this is handy if you are going to Automate the creation of roles in the future and want a base to start from)
  21. Click Next
  22. Click Create to create your Custom Role!
  23. Azure Portal - Create Custom Role

Assign a Custom Role using the Azure Portal

Now that you have created your Custom Role - it is time to assign it! So it is actually in use.

  1. Log in to the Azure Portal
  2. Navigate to your Subscription or Resource Group you want to delegate this role to
  3. Click on Access Control (IAM)
  4. Click Add
  5. Click on Role Assignment
  6. Under the 'Role' dropdown, select your Custom Role.
  7. Azure Portal - Add Role Assignments
  8. Now you can select the Azure AD Group/User or Service Principal you want to assign the role to and click Save.
  9. Congratulations, you have now assigned your Custom role!

Assign a Custom Role using PowerShell

You can assign Custom Role's using PowerShell. To do this, you need a few things such as the Object ID, Assignable Scope IDs etc., instead of rehashing it, this Microsoft article does an excellent job of running through the process.

Add a shortcut to the Azure Virtual Desktop Web Client to the Microsoft 365 waffle

· 3 min read

If you are like me, you use the application launchers in the Microsoft 365 waffle daily, if not hourly! Then having it as a single pane of glass to access all your applications is a no-brainer!

That includes access to the Azure Virtual Desktop Web client! In addition, Microsoft has given us the ability to add Custom App Launchers for applications that are accessible to a URL to the Launchers in the waffle!

Create custom tiles that will appear in the All apps section of the Office 365 app launcher for all of your users. Users can pin the custom tiles directly to their app launcher for quick access.

You can add much more than the Azure Virtual Desktop web client to help improve your user's experience, but this quick guide will focus on adding the Azure Virtual Desktop Web Client.

M365 Waffle

  1. Open the Microsoft 365 Admin Panel
  2. Expand Settings
  3. Click on Org Settings
  4. Select Organisation Profile
  5. Click on Custom app launcher tiles

M365 - Organisation Profile

  1. Click + Add a custom title.
  2. Please type in the name of your Desktop; in my example, it is Contoso Desktop.
  3. For the URL of the website, type in: https://rdweb.wvd.microsoft.com/arm/webclient/index.html
  4. Type in a URL of the icon you want the App Launcher to have (Make sure this is a location that you have access to and can manage (i.e. even sitting on your website or Azure Storage account as long as it's publically available)).
  5. Add a description (such as Contoso Desktop, used for Line of Business Applications)
  6. M365 - Custom App Launcher
  7. Click Save
  8. M365 - Custom App Launcher
  9. Log out of your Admin account and log into an account with an Exchange license attached to it. It may take some time for the Custom App Launcher to display.
  10. Once the Custom App Launcher has displayed, your users can pin it to the launcher, so it is always right on top.
  11. Click on your Azure Virtual Desktop launcher, and you should be redirected to the Azure Virtual Desktop Web client!
  12. M365 Waffle - App Launcher

Just some notes on additional testing:

  • I attempted copying the Azure Virtual Desktop RDP file (C:\Users\%UserAccount%\AppData\Local\rdclientwpf) to my website to access directly however received an error, even opening up the RDP file directly failed, to test the Remote Desktop client.
  • I had some success opening that RDP up with the Remote Desktop application directly using 'Open With' C:\Users\%UserAccount%\AppData\Local\Apps\Remote Desktop\msrdcw.exe, instead of the default Remote Desktop Connection client locally.
  • This will add it for all M365 users, if you want to restrict it to Users/Groups, I would look at testing and creating an App Registration.

At this stage, having a launcher to the Web Client is the best bet vs a shortcut directly to the RDP file as you don't have to worry about users having the Remote Desktop agent installed when working remotely.

Start VM on Connect for Azure Virtual Desktop

· 7 min read

One of the models of Cloud governance and cost in Microsoft Azure is 'Pay As You Go', ie. Pay for what you need when you need it.

The Azure Resource Manager fabrics allow you to scale up and down resources when you need it, whether built-in to the Azure portal or through various other automation mechanisms.

For Azure Virtual Desktop, this means ensuring that session hosts (Virtual Machines) are available for users to connect to consume their services when they need it the most, whether first thing in the morning or late hours of the evening.

One of the technologies that can help with this is: Start VM on Connect(Start VM on Connect allows users to start the virtual machine from a deallocated state).

You no longer need to create a Custom Role for Start VM on Connect - a built-in role now exists named: Desktop Virtualization Power On Contributor - once that role is assigned to the Azure Virtual Desktop application, you can skip straight to Configure

  • Imagine a 9 AM -> 5 PM Monday to Friday business; during the day, Azure Virtual Desktop is available, however anything out of these hours (through Scheduled Shutdowns or Azure Automation Runbooks etc.), the session hosts are shut down to reduce operational costs.
  • A business user gets some urgent work on Saturday morning and then tries to connect to Azure Virtual Desktop resources to complete the work; because they were turned off outside of business hours, they can't connect and then have to ring IT support to get resources started (the alternative would be to leave Virtual Machines running, which may or may not be needed).
  • Using 'Start Virtual Machine on Connect', the moment that the user attempts to connect a Virtual Machine is started.
  • Then it allows the users to log in and do their work without a call to IT, overall saving money, as the hosts are only started when they are first needed. The feature will also only turn on additional VMs (if available) when the first VM reaches the session limit.

This is a host-level setting, so setting 'Start VM on Connect' will affect all session hosts in the host pool. Therefore, you cannot target specific Virtual Machines in a session host at this stage. This is now supported for both Personal and Pooled session hosts!

As of 03/07/21 (NZ date format - DD/MM/YY): The Start VM on Connect feature is currently in public preview. This preview version is provided without a service level agreement, and it's not recommended for production workloads. Certain features might not be supported or might have constrained capabilities. For more information, see Supplemental Terms of Use for Microsoft Azure Previews.

Follow the guide below to implement; the Microsoft documentation is pretty good but hoping this might fill in a few gaps for people.

Create a Custom Role for "Windows Virtual Desktop"

For the "Windows Virtual Desktop" service principal (this should already exist, it is an inbuilt SPN created by the Azure infrastructure, it is currently called Windows Virtual Desktop but expect this name to be updated in the future) to have the ability to Start a Virtual Machine, we first need to give it rights. You could give it Contributor or Virtual Machine Contributor rights but want to go with the least privileged to create a custom role.

  1. Log in to the Azure Portal
  2. Navigate to the Subscription (you can only currently create custom roles at a subscription level) that your session hosts exist in
  3. Look for the Subscription ID (copy this, we will need it later on, usually found on the Overview window of the Subscription)
  4. Download the AVD-StartVMOnConnect JSON file below and save it to a location you can edit.
AVD-StartVMOnConnect.json
{
"properties": {
"roleName": "AVD-StartVMOnConnect",
"description": "Custom role, designed to allow 'Windows/Azure Virtual Desktop' rights to Start session hosts.",
"assignableScopes": [
"/subscriptions/<SubscriptionID>"
],
"permissions": [
{
"actions": [
"Microsoft.Compute/virtualMachines/start/action",
"Microsoft.Compute/virtualMachines/read"
],
"notActions": [],
"dataActions": [],
"notDataActions": []
}
]
}
}

  1. Open up the JSON file (this is the Custom Role we are creating, as you can see, we are only allowing the ability to Read a Virtual Machine and Start it)

  2. Replace the: with your subscription ID, created earlier and save the JSON file.

  3. AVD-StartVMOnConnect Custom Role.

  4. Click on Access Control (IAM) on the left-hand side blade

  5. Click Add

  6. Click Add Custom Role

  7. AVD-StartVMOnConnect Custom Role

  8. Name your Custom Role Name something meaningful, for example, AVD-StartVMOnConnect.

  9. Add a meaningful Description; for example, mine is:

    Created: 03/07/21

    Created by: Luke Murray

    Created for: Custom role, designed to allow 'Windows/Azure Virtual Desktop' rights to Start session hosts.

  10. For: Baseline permissions, select Start from JSON

    Select the JSON file you downloaded and edited earlier

  11. AVD-StartVMOnConnect Custom Role

  12. Click on Next

  13. Verify the permissions are as below (if they aren't, you may need the redownload or check the JSON file for syntax issues - I recommend downloading Visual Studio Code):

  14. AVD-StartVMOnConnect Custom Role

  15. Click Next

  16. We used the subscription property to select the assignable scope (i.e. the scope is where this role will be available for you to assign access to), but now using the Azure Portal, we can select a specific Resource Group to limit the roles access, please be careful with doing this, especially if you are planning on expanding out your Azure Virtual Desktop infrastructure in the future as you may forget that this role may not be available in other resource groups. I am going to leave mine at the Subscription level and click Next

  17. Here we can verify and save the changed JSON file (if you want for future reference) and click Next to review your configuration.

  18. Click Create to create your Custom Role!

  19. AVD-StartVMOnConnect Custom Role

Assign your Custom Role

Now that you have created your custom role for Azure Virtual Desktop, it is now time to assign it, and this is where you can assign and lock down the role; in my case, I only have one Resource Group where my session hosts sit in, so going to assign it a Resource Group level, but feel free to assign this at a subscription level.

  1. Log in to the Azure Portal
  2. Navigate to the Resource Group (or Subscription) that has your Azure Virtual Desktop session hosts
  3. Click on Access Control (IAM) in the left-hand side blade
  4. Click on + Add
  5. Click on Add role assignment
  6. Select the Role you created earlier (i.e. AVD-StartVMOnConnect)
  7. Specify the 'Windows Virtual Desktop' service principal and select Save
  8. AVD-StartVMOnConnect Custom Role
  9. If you want, you can click on Role Assignments to verify your role has been assigned:
  10. AVD-StartVMOnConnect Custom Role

Configure Start VM on Connect

  1. Log in to the Azure Portal
  2. Navigate to your Host Pool
  3. Click on Properties
  4. Select 'Yes' to Start VM on Connect
  5. Click Save
  6. Azure Virtual Desktop - Start VM on Connect
  7. Congratulations, you have now set up Azure Virtual Desktop - Start VM on Connect; next time someone connects to a turned-off Azure Virtual Desktop session host, the Virtual Machines will now automatically start the users will get a prompt like below:
  8. Azure Virtual Desktop - Start VM on Connect
  9. Azure Virtual Desktop - Start VM on Connect
  10. Before finally prompting for their login credentials!

Azure Virtual Desktop Optimisations

· 14 min read

If you are running Azure Virtual Desktop, you want to get the most performance and stability out of them as possible, to reduce cost and increase user experience.

These are a few recommended policies and optimisations to apply to your Azure Virtual Desktop setup. These are in no particular order; they are just recommendations.

Configure Timezone Redirection

Timezone redirection will allow you to pass through the time from the local device to the Azure Virtual Desktop host. This is useful to keep the consistent time between the device you are connecting from and the session host, and by default, the timezone in Azure is UTC.

  1. On a server with the Group Policy Management Console is installed for managing your Azure Virtual Desktop farm, open the Group Policy Management Console.
  2. Expand your domain and Group Policy Objects.
  3. Right-click the GPO that you created for the group policy settings and select Edit.
  4. In the Group Policy Management Editor, navigate to Computer Configuration > Policies > Administrative Templates > Windows Components > Remote Desktop Services > Remote Desktop Session Host > Device and Resource Redirection.
  5. Enable the setting Allow time zone redirection.
  6. Close the Group Policy Management console; as this is a Computer-based policy, it may take up to 90 minutes to take effect unless the session hosts are restarted to force it to pick up the policy sooner.

Configure Session Time Limit Policies

You can use this policy to specify the maximum amount of time that a disconnected session remains active on the server. By default, Remote Desktop Services allows users to disconnect from a Remote Desktop Services session without logging off and ending the session. Unfortunately, this means that sessions users sessions may remain open for an extended period of time, taking up usable resources.

When configuring these, take into consideration a users normal work time, the time they have for lunch etc., the sweet spot to disconnect their session is not during their lunch break, but after they have finished for the day, usually 8-12 hours is recommended, but is dependant on how Azure Virtual Desktop is used.

  1. On a server with the Group Policy Management Console is installed for managing your Azure Virtual Desktop farm, open the Group Policy Management Console.
  2. Expand your domain and Group Policy Objects.
  3. Right-click the GPO that you created for the group policy settings and select Edit.
  4. In the Group Policy Management Editor, navigate to Computer Configuration > Policies > Administrative Templates > Windows Components > Remote Desktop Services > Remote Desktop Session Host > Session Time Limits.
  5. Configure the below settings per your organisation policies:
  • Set time limit for active but idle Remote Desktop Services sessions
  • This policy allows you to specify the maximum amount of time that an active Remote Desktop Services session can be idle (without user input) before it is automatically disconnected.
  • Set time limit for active Remote Desktop Services sessions
  • This policy allows you to specify the maximum amount of time that a Remote Desktop Services session can be active before it is automatically disconnected.
  • Set time limit for disconnected sessions
  • This policy allows you to configure a time limit for disconnected Terminal Services sessions.
  • End session when time limits are reached
  • This policy allows you to specify whether to terminate a timed-out Terminal Services session instead of disconnecting it.
  • Set a time limit for log off of RemoteApp sessions
  • This policy allows you to specify how long a user's RemoteApp session will remain in a disconnected state after closing all RemoteApp programs before the session is logged off from the RD Session Host server.
  • Close the Group Policy Management console; as this is a Computer-based policy, it may take up to 90 minutes to take effect unless the session hosts are restarted to force it to pick up the policy sooner.

Reference: Taken from: https://kb.parallels.com/en/123638

DeleteUserAppContainersOnLogoff

Back in March 2019, there were issues with slow server performance caused by numerous Windows Firewall Rules getting created on user login. A patch was released; however, to enable this 'fix', a registry key needs to be set. You could eventually run into host performance/hang issues if this key is not configured. See: https://support.microsoft.com/en-us/help/4490481

  1. On a server with the Group Policy Management Console is installed for managing your Azure Virtual Desktop farm, open the Group Policy Management Console.
  2. Expand your domain and Group Policy Objects.
  3. Right-click the GPO that you created for the group policy settings and select Edit.
  4. In the Group Policy Management Editor, navigate to Computer Configuration > Preferences> Windows Settings > Registry.
  5. Right-click in the window and select New, Registry Item
  6. Select Update as the Action
  7. Make sure HKEY_LOCAL_MACHINE is set to Hive
  8. Enter in the following for the Key Path: SYSTEM\CurrentControlSet\Services\SharedAccess\Parameters\FirewallPolicy
  9. For the Value name type: DeleteUserAppContainersOnLogoff
  10. Change the Value type to REG_DWORD
  11. Put: '1' to enable the option and click Apply
  12. Close the Group Policy Management console. As this is a Computer-based policy, it may take up to 90 minutes to take effect unless the session hosts are restarted to force it to pick up the policy sooner.

Delete user Apps

Configure RDP Shortpath

RDP Shortpath is a feature of Azure Virtual Desktop that establishes a direct UDP-based transport between Remote Desktop Client and Session host. RDP uses this transport to deliver Remote Desktop and RemoteApp while offering better reliability and consistent latency. RDP Shortpath establishes the direct connectivity between Remote Desktop client and Session Host. Direct connectivity reduces the dependency on the Azure Virtual Desktop gateways, improves the connection's reliability, and increases the bandwidth available for each user session. You can read more about it here: Azure Virtual Desktop RDP Shortpath.

  1. On a server with the Group Policy Management Console is installed for managing your Azure Virtual Desktop farm, open the Group Policy Management Console.
  2. Expand your domain and Group Policy Objects.
  3. Right-click the GPO that you created for the group policy settings and select Edit.
  4. In the Group Policy Management Editor, navigate to Computer Configuration > Preferences> Windows Settings > Registry.
  5. Right-click in the window and select New, Registry Item
  6. Select Update as the Action
  7. Make sure HKEY_LOCAL_MACHINE is set to Hive
  8. Enter in the following for the Key Path: SYSTEM\CurrentControlSet\Control\Terminal Server\WinStations
  9. For the Value name type: fUseUdpPortRedirector
  10. Change the Value type to REG_DWORD
  11. Put: '1' to enable the option and click Apply
  12. Right-click in the window and select New, Registry Item
  13. Select Update as the Action
  14. Make sure HKEY_LOCAL_MACHINE is set to Hive
  15. Enter in the following for the Key Path: SYSTEM\CurrentControlSet\Control\Terminal Server\WinStations
  16. For the Value name type: UdpPortNumber
  17. Change the Value type to REG_DWORD
  18. Put: '3390' as the UDP report and click Apply
  19. Close the Group Policy Management console. Restart the session hosts.

Virtual-Desktop-Optimization-Tool

Automatically apply a range of optimisations for pooled and personal Azure Desktop hosts, this is a good resource to add to your initial image creation builds.

Virtual-Desktop-Optimization-Tool

Implement Windows Defender FSLogix exclusions

Make sure to configure antivirus exclusions for FSLogix Profiles.

For a list of exclusions, along with a PowerShell script to implement them, please refer to the following Microsoft documentation: FSLogix for the enterprise

Implement FSLogix Profile Exclusions

By default, FSLogix will capture a lot of user profile data, including Teams Cache, Chrome cache and save it to the profile VHD/VHDX; this causes profile size bloat and can decrease the performance of your applications.

It is recommended to implement exclusions to reduce storing user profile data that you don't need.

  1. On a server with the Group Policy Management Console is installed for managing your Azure Virtual Desktop farm, open the Group Policy Management Console.
  2. Expand your domain and Group Policy Objects.
  3. Right-click the GPO that you created for the group policy settings and select Edit.
  4. In the Group Policy Management Editor, navigate to Computer Configuration > Policies > Administrative Templates > FSLogix > Profile Containers > Advanced
  5. Enable the setting Provide RedirXML file to customize directions.
  6. Point the path to a UNC path that is accessible to all session hosts that contains are 'redirections.xml' file. This just needs the folder; it will automatically pick up the redirections.xml file.
  7. Close the Group Policy Management console. As this is a Computer-based policy, it may take up to 90 minutes to take effect unless the session hosts are restarted to force it to pick up the policy sooner.

An example redirections.xml can be found here:

redirections.xml

<?xml version="1.0" encoding="UTF-8"?>
<FrxProfileFolderRedirection ExcludeCommonFolders="0">

<Excludes>
<Exclude>AppData\Local\Google\Chrome\User Data\Default\Cache\</Exclude>
<Exclude>AppData\Local\Google\Chrome\User Data\Default\Cached Theme Images\</Exclude>
<Exclude>AppData\Roaming\Google\Chrome\UserData\Default\Code Cache\js</Exclude>
<Exclude>AppData\Local\Google\Chrome\UserData\Default\Code Cache\js</Exclude>
<Exclude>AppData\Local\Mozilla\Firefox</Exclude>
<Exclude Copy="0">AppData\Local\Microsoft\Terminal Server Client</Exclude>
<Exclude Copy="0">AppData\Local\Microsoft\Edge SxS\User Data\Default\Cache</Exclude>
<Exclude>AppData\Roaming\Adobe\Flash Player\AssetCache</Exclude>
<Exclude>AppData\Roaming\Adobe\Flash Player\NativeCache</Exclude>
<Exclude>AppData\Roaming\Microsoft\Teams\Cache</Exclude>
<Exclude>AppData\Roaming\Microsoft\Teams\Service Worker\CacheStorage</Exclude>
<Exclude>Desktop</Exclude>
<Exclude>Documents</Exclude>
<Exclude>Downloads</Exclude>
<Exclude>Musics</Exclude>
<Exclude>Pictures</Exclude>
<Exclude>Videos</Exclude>
</Excludes>

<Includes>
<Include Copy="3">AppData\LocalLow\Sun\Java\Deployment\security</Include>
<Include>AppData\Roaming\Google\Chrome\User Data\Default\Extensions</Include>
</Includes>

</FrxProfileFolderRedirection>

Note: Make sure you test and adjust this for your own environment. The Desktop/Documents have been excluded as the assumption is these are redirected or covered by OneDrive.

DeleteUserAppContainersOnLogoff

Back in March 2019, there were issues with slow server performance caused by numerous Windows Firewall Rules getting created on user login. A patch was released; however, to enable this 'fix', a registry key needs to be set. You could eventually run into host performance/hang issues if this key is not configured. See: https://support.microsoft.com/en-us/help/4490481

  1. On a server with the Group Policy Management Console is installed for managing your Azure Virtual Desktop farm, open the Group Policy Management Console.
  2. Expand your domain and Group Policy Objects.

Implement Storage Sense

On Windows 10, Storage sense is a built-in tool designed to free up space automatically. When it's enabled, the feature monitors your device. When it's running low on space, it deletes temporary files, empties the Recycle Bin, cleans up the Downloads folder, removes previous installation files, and more to make space to install new updates or store more important data. Storage Sense can also help dehydrate files that are available locally and do not need to be stored locally anymore, helping to reduce profile space and OneDrive processing.

Note: If you find that Storage Sense is missing, it is because it is mainly a client setting and may be missing from the Windows Server; you can copy the PolicyDefinitions folder from an Azure Virtual Desktop host to your domains Central Store, i.e. in my case \\luke.geek.nz\SYSVOL\luke.geek.nz\Policies\PolicyDefinitions. Or just look for StorageSense.admx and StorageSense.adml and copy it (the ADML goes in the language directory, i.e. en-US).

  1. On a server with the Group Policy Management Console is installed for managing your Azure Virtual Desktop farm, open the Group Policy Management Console.
  2. Expand your domain and Group Policy Objects.
  3. Right-click the GPO that you created for the group policy settings and select Edit.
  4. In the Group Policy Management Editor, navigate to Computer Configuration > Policies > Administrative Templates > System > Storage Sense.
  5. Enable the setting Allow Storage Sense.
  6. Enable the setting Configure Storage Sense Cloud Content dehydration threshold
  7. Now we can provide the minimum number of days a cloud-backed file can remain unopened before Storage Sense dehydrates it back to Files on Demand, for example, 30 days since it was last accessed.
  8. Enable the setting Configure Storage Storage Downloads cleanup threshold
  9. Type in a minimum number of days, that files sit in the Downloads before before Storage sense will delete it.
  10. Close the Group Policy Management console. As this is a Computer-based policy, it may take up to 90 minutes to take effect unless the session hosts are restarted to force it to pick up the policy sooner.

Storage Sense - Group Policy

Configure Microsoft Teams Optimisations

You can run Microsoft Teams in Azure Virtual Desktop. To do so, you need to install as a Machine installer and set the WVD environment variable.

Install as Machine:

msiexec /i Teams_windows_x64 /l*v teams_install.log ALLUSER=1

Set IsWVDEnvironment key:

  1. On a server with the Group Policy Management Console is installed for managing your Azure Virtual Desktop farm, open the Group Policy Management Console.
  2. Expand your domain and Group Policy Objects.
  3. Right-click the GPO that you created for the group policy settings and select Edit.
  4. In the Group Policy Management Editor, navigate to Computer Configuration > Preferences> Windows Settings > Registry.
  5. Right-click in the window and select New, Registry Item
  6. Select Update as the Action
  7. Make sure HKEY_LOCAL_MACHINE is set to Hive
  8. Enter in the following for the Key Path: SOFTWARE\Microsoft\Teams
  9. For the Value name type: IsWVDEnvironment
  10. Change the Value type to REG_DWORD
  11. Put: '1' to enable the option and click Apply
  12. Close the Group Policy Management console. Restart the session hosts.

Install the Remote Desktop WebRTC Redirector

  1. The Remote Desktop WebRTC Redirector onto the Sessions Hosts: https://learn.microsoft.com/en-us/azure/virtual-desktop/teams-on-AVD#install-the-teams-websocket-service

Configure Auto Close Apps on Logoff

When users may go to logoff, open applications may halt or prolong the logoff process and prompts for users to close applications, this can leave to sessions being left connected, if a user hits logoff or shutdown and walks away. To stop the prompt about open Applications we need to set a registry key - this is not an 'optimisation' to be treated lightly, as it won't ask users to double check some of the apps they have open, as soon as they hit the logoff button - that it is, any open apps will be closed!

  1. On a server with the Group Policy Management Console is installed for managing your Azure Virtual Desktop farm, open the Group Policy Management Console.
  2. Expand your domain and Group Policy Objects.
  3. Right-click the GPO that you created for the group policy settings and select Edit.
  4. In the Group Policy Management Editor, navigate to User Configuration > Preferences> Windows Settings > Registry.
  5. Right-click in the window and select New, Registry Item
  6. Select Update as the Action
  7. Make sure HKEY_CURRENT_USER is set to Hive
  8. Enter in the following for the Key Path: Control Panel\Desktop
  9. For the Value name type: AutoEndTasks
  10. Change the Value type to REG_SZ
  11. Put: '1' to enable the option and click Apply
  12. Close the Group Policy Management console. Restart the session hosts.

This is a user-based policy, so will take effect on next logon.

Hide the Shutdown button

This is not so much of an optimization, but it is one of my favourite group policy configurations, something I implement in server base policies; it prevents that "Oops!" moment when someone clicks Shutdown on a server, especially with multi-session VDI machines, this just removes the shortcuts to shutdown and restart the server from the Start Menu.

Note: You can still restart and shut down the server from the Command Prompt with the 'shutdown' command.

  1. On a server with the Group Policy Management Console is installed for managing your Azure Virtual Desktop farm, open the Group Policy Management Console.
  2. Expand your domain and Group Policy Objects.
  3. Right-click the GPO that you created for the group policy settings and select Edit.
  4. In the Group Policy Management Editor, navigate to User Configuration > Policies > Administrative Templates > Start Menu and Taskbar
  5. Enable the setting Remove and prevent access to Shut Down, Restart, Sleep, and Hibernate commands.
  6. Close the Group Policy Management console; as this is a User-based policy, it should take effect on the next user login.

How to setup FSLogix profiles for Azure Virtual Desktop

· 9 min read

If you have a few Azure Virtual Desktop machines, you need some way to keep user persistence's and application customisations, which would usually be stored in the user profile locally across multiple machines (or even the same machine if using Ephemeral OS), this is where FSLogix Profile Containers can assist.

We are going to implement FSLogix using an Azure File Share, to store the profiles.

I am going to assume you already have an Azure Virtual Desktop farm (and Azure ADDS), if not you can check out my guide here.

This article will be based on the Azure Virtual Desktop farm created in a previous article, however, you can just still along and replace the resource names and groups with your own.

Setup Storage Account

  1. Log in to the Azure Portal
  2. Click on Create a resource
  3. Type in Storage Account and press Enter to search
  4. Select Storage account
  5. FSLogix - Azure Storage Account
  6. Click Create
  7. If you already have a Resource Group, then select it, if not you can create a new resource group. I am going to put my resources user profiles in the same resource group as my utility server: aad_infra (this is just personal preference, keeping the session hosts in their own resource groups).
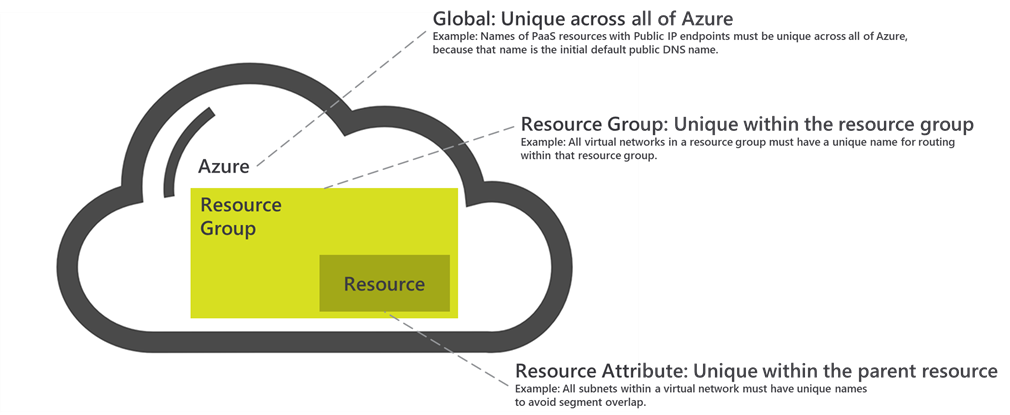
  8. Type in a Storage Account Name (the name needs to be globally unique across all of Azure, the field can contain only lowercase letters and numbers. Name must be between 3 and 24 characters.), in my case I have gone with: fslogixprofileslgnz.
  9. Select your Region (the same region you have your Azure Virtual Desktop session hosts and Virtual Network)
  10. Select Standard performance (Microsoft have recommendations, based on users on what Tier to select - https://learn.microsoft.com/en-us/azure/virtual-desktop/store-fslogix-profile)
  11. For Redundancy, I am going to select LRS storage (I haven't built have any redundancy in my Azure Virtual Desktop farm).
  12. Note: Just a heads up, don't select Geo-Redundant if you are looking to create File Shares on this Storage account over 100TiB, it is only supported in LRS. If you do need this kind of large file size, I recommend using a completely different storage account from the one you are using for user profiles. My screenshot below has GRS, just ignore it!
  13. FSLogix - Azure Storage Account
  14. Click Next: Advanced
  15. Leave everything as default and select Next: Networking
  16. Now we need to configure a Private Endpoint for the Azure storage account to add onto the Virtual Network directly.
  17. Select Private endpoint and click + Add Private endpoint
  18. Verify that your Location is correct and type in a Name for your Private Endpoint service, in my case: fslogixprofileslgnzPE
  19. Select the drop-down for Storage sub-resource and select file
  20. Select your Virtual Network and subnet (I will be selecting my main resource subnet of aadds-subnet, where the Azure Virtual Desktop hosts are)
  21. Click Ok
  22. FSLogix - Azure Storage Account
  23. Select Next: Data Protection
  24. Untick the Enable soft delete for Blogs and Container's (we will only be using Azure Files in this storage account)
  25. Soft delete allows you to quickly recover a deleted file-share, even though we can backup the Azure Fileshare, my recommendation would be to leave this on for additional protection and '7' days is enough for me.
  26. FSLogix - Azure Storage Account
  27. Select Review + Create
  28. Validate your configuration and select Create

Configure Storage Account

  1. Once your storage account has been created, go to it.

  2. Navigate down the left-hand side Blade and select: Networking

    Make sure: Selected networks are selected and the Private Endpoint connection is displaying.

  3. FSLogix - Azure Storage Account

  4. FSLogix - Azure Storage Account

  5. Now its time to join the Storage account to Microsoft Entra ID Domain Services, on the left-hand side Blade, click on Configuration (under Settings)

  6. Navigate to: Identity-based access for file shares

  7. Select Enabled

  8. Click Save

  9. FSLogix - Azure Storage Account

  10. Now its time to create the File Share, On the left-hand side Blade, navigate to File Shares (under Data Storage)

  11. Select + File Share

  12. Give this File share a name: fslogixprofiles

  13. Even though you don't need to have a Quota (the Fileshare will grow), I will add one in stop any surprises and make sure that I have an ongoing task to review and optimize the profiles

  14. Because user profiles are generally a lot of read/write activity, select Transaction Optimized (take a look at the https://azure.microsoft.com/en-us/pricing/details/storage/files/ )

  15. Click Create

  16. FSLogix - File Share

  17. One last thing we can do on the Storage Account is enable backups for your Azure File Share - https://learn.microsoft.com/en-us/azure/backup/backup-afs?WT.mc_id=AZ-MVP-5004796

Configure File Share

Now that the Microsoft Entra ID rights have been assigned and the File Share has been created, we now need to set up the NTFS permissions on the FSLogix share.

  1. Navigate to File Shares (under Data Storage)

  2. Click on your file-share

  3. Click on Properties

  4. Copy the URL

  5. FSLogix - File Share

  6. Remove http and replace the forward slashes with backslashes so it looks like this: \\fslogixprofileslgnz.file.core.windows.net\fslogixprofiles

  7. Using a user that is a member of the 'AVD Admins' group and can log into the Azure Virtual Desktop farm (it’s a good chance to test connectivity to the Storage account through the private endpoint from your Azure Virtual Desktop session host)

  8. Open Computer

  9. Select the Computer Tab and select Map network drive

  10. FSLogix - Mapped Drive

  11. Select a drive letter that isn't in use and paste in the UNC path created earlier (step 6).

  12. FSLogix - Mapped Drive

  13. Hopefully, you should successfully have mapped a drive!

  14. Once the drive is mapped, open up a Command Prompt

    Note: Don't run the Command Prompt as Administrator, as this runs in a separate context and doesn't have permissions to the mapped drive.

  15. Run the following command to set the necessary NTFS permissions (change the Drive mapping and AVD Users group to your own group):

    icacls z: /grant "AVD Users":(M)

    icacls z: /grant "Creator Owner":(OI)(CI)(IO)(M)

    icacls z: /remove "Authenticated Users"

    icacls z: /remove "Builtin\Users"
  16. FSLogix - Security Permissions

  17. The permissions should look similar to:

  18. FSLogix - Security Permissions

Configure FSLogix policies

Now that you have successfully created a Storage Account and granted it the proper permissions, we now need to configure Group Policy for FSLogix.

  1. Connect to your Microsoft Entra ID Utility server, that has Group Policy management installed using an account in the: AAD DC Administrators group
  2. Download the latest FSLogix Agent - https://aka.ms/fslogix_download onto the Utility server
  3. Extract the FSLogix agent zip file to a folder
  4. Now we will create a Central Store to manage the Group Policy consistently
  5. On your Utility server, browse to C:\Windows (If you are primarily using Azure Virtual Desktop, it may be best to copy the PolicyDefinitions folder from an Azure Virtual Desktop session host to make sure you can edit all the latest Windows 10 policies)
  6. Copy the PolicyDefinitions folder
  7. Copy the PolicyDefinitions folder to your Policies folder on your domain: \luke.geek.nz\SYSVOL\luke.geek.nz\Policies
    (replace luke.geek.nz, with your ADDS DNS name)
  8. FSLogix - Group Policy
  9. Go to your extracted FSLogix folder and copy:
    • fslogix.admx to: \luke.geek.nz\SYSVOL\luke.geek.nz\Policies\PolicyDefinitions\
    • fslogix.adml to: \luke.geek.nz\SYSVOL\luke.geek.nz\Policies\PolicyDefinitions\en-US\
  10. This will allow us to use Group Policy to manage FSLogix using Group Policy, Open Group Policy Management
  11. Navigate to your Hosts OU
  12. Right-click the OU and select: Create a GPO in this domain, and Link it here…
  13. Name it according to your naming standards (this is a Computer-based policy) - in my example, I am using: AVD_ComputerPolicy
  14. Click Ok
  15. FSLogix - Group Policy
  16. Right-click the GPO you have just created and select Edit…
  17. Because this is a Computer-based policy, to speed up processing, right-click the Policy heading and select Properties
  18. Tick: Disable User Configuration Settings
  19. Confirm that you want to do it and select Yes
  20. Click Apply
  21. While you have the screen open, click on Comment, and add in some details about the GPO for future reference then click Apply and Ok
  22. FSLogix - Group Policy
  23. Now it's time to actually configure the FSLogix Group Policy settings.
  24. Navigate to: Computer Configuration\Policies\Administrative Templates\FSLogix\Profile Containers
  25. Open up Enabled and select: Enabled and Apply
  26. Open: VHD Location and copy in your Profiles UNC share (for example, mine is: [\\fslogixprofileslgnz.file.core.windows.net\fslogixprofiles) click Ok
  27. Select: Delete local profile when FSLofix profile should apply, click Enabled and check to Delete local profile when FSLogix Profile should apply (don't blindly follow this, I am making the assumption this is a new farm, with no user-based profile stored on it. You may need to create a separate GPO to test this setting on, or you could lose valuable data).
  28. Open: Set Outlook cached mode on successful container attach to Enabled.
  29. Now in Group Policy Management console, click on Container and Directory Naming and select Virtual Disk type
  30. Click Enabled and change the Option to VHDX, click Ok
  31. Click on: Swap directory name components setting and click Enabled, check the swap directory name components and click Apply
  32. Restart the Azure Virtual Desktop session hosts to pick up the new policies.
  33. You have now set up FSLogix profiles! If you map the drive you should see your user profile folders!
  34. FSLogix - Mapped Profiles