Create Azure Point to Site VPN using Microsoft Entra ID authentication
You may be working remotely or only have a few devices needing access to your resources in Azure; a solution that can be deployed is a point to site connection straight into your Microsoft Azure network.
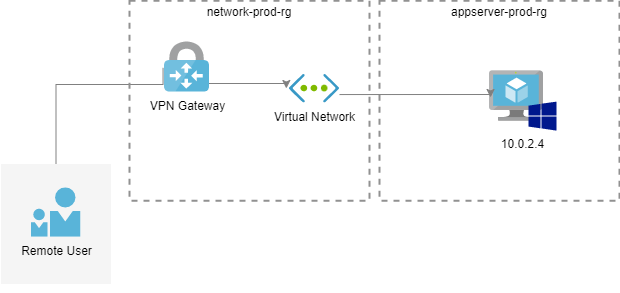
This functionality allows your computer to connect privately to resources over a secure tunnel using your internet connection, using an Azure Virtual Network gateway, you can seamlessly connect to resources without the need of opening up your resources to the internet or having to whitelist your (or third party vendor) IP address, which may change daily.
You know only your specified users access your Azure resources using Microsoft Entra ID.
You can have a site to site and point to site VPN running on the same Gateway today. We will set up a Point to Site VPN using Windows 11.
Depending on the SKU of your Virtual Network Gateway, depends on the number of concurrent connections and throughput you are allowed; because we are using Microsoft Entra ID and the OpenVPN protocol, I will be selecting Generation 1, VpnGw1, supporting a max of 250 connections (you can double the number of throughput and connections if you are running in Active/Active and have a second gateway, or select a higher SKU).
Azure AD authentication is supported for OpenVPN® protocol connections only and requires the Azure VPN client.
A note about Gateway SKUs (apart from Basic) you can resize in the same generation (i.e. Generation 1 VpnGw1 to VpnGw3, but you can't go from Generation 1 VpnGw1 to Generation 2 VpnGw5, in order to upgrade, you have to delete and recreate the Gateway, just keep this in mind when deciding on the SKU of your resources).
You can read more about the Virtual Network Gateways and VPN SKUs at the official Microsoft documentation here; your Gateway SKU may differ depending on your requirements.
Create Azure Point to Site VPN using Microsoft Entra ID authentication
Prerequisites
- An Azure subscription (that you have at least contributor rights to and the ability to create Users and Groups)
- An endpoint device running Windows 10 or 11 that you can install the Azure VPN client onto
Create Virtual Network
First things first, let's create a Virtual Network.
- Log in to the Azure Portal
- Click on + Create a resource
- Search for: Virtual Network and click on it
- Click Create
- Select or create your Resource Group that you want your network resource to sit in (I recommend Virtual Network and the gateway resources sit in its own Resource Group away from other resources so that they can be protected by resource locks, RBAC and they are usually classified as a shared resource).

- Click Next: IP Addresses
- Now we need to define the Address space and subnets; I will leave the Address space as 10.0.0.0/16 but remove the Default subnet (select the checkbox next to the Subnet and select Delete)
- Click +Add Subnet, and add a new subnet with the name of GatewaySubnet with an IP range of: 10.0.1.0/27 (this Subnet will be used by our Virtual Network Gateway, and the name needs to be exactly GatewaySubnet).
- Now I will add a subnet named: app servers, for the Virtual Machines I will need to connect to will be placed.

- Click Next: Security
- Leave everything (BastionHost, DDoS Protection Standard, Firewall) as Disabled.
- Click Next: Tags
- Enter in any tags and click Review + Create
- Review your configuration and click Create
Create Virtual Network Gateway
Now that we have the foundation of our setup - an Azure Virtual Network, it is time to provision the Gateway itself; just a note before we continue, the Gateway can take 30-60 minutes to provision.
- Log in to the Azure Portal
- Click on + Create a resource
- Type in and search for: Virtual Network Gateway
- Click Create
- Type in the name of your Azure Virtual Network Gateway
- Select the region (it must be the same region as your virtual network)
- Select the Gateway Type: VPN
- The VPN type is: Route-based
- Select the SKU, in this example - I will be going with VpnGw1
- Select the Generation of the Virtual Network Gateway; I am going with: Generation 1
- Select the Virtual Network that you created earlier, and it will automatically find and assign the Gateway to the Subnet named: GatewaySubnet
- Select Standard public IP address SKU
- Select Public IP address and select: Create new
- Type in your public IP name
- Leave 'Enable active-active mode' and 'Configure BGP' as Disabled.
- Click Review + Create

- Verify configuration is correct and clicks Create
- It can take up to 30-60 minutes for the Virtual Network Gateway to be created.
Setup Microsoft Entra ID authentication on the Virtual Network Gateway
Now that the Virtual Network has been created, we can now set up Microsoft Entra ID authentication.
Collect Microsoft Entra ID Tenant ID
First, we need to collect the Azure AD Tenancy ID
- Log in to the Azure Portal
- Click on Microsoft Entra ID
- In the Overview pane, copy the Tenant ID and save this for the next step.
Grant Azure VPN Client permisisons
Now we need to grant the Azure VPN application permissions.
-
Log in to the Azure Portal
-
Open a new window and type in and press Enter:
https://login.microsoftonline.com/common/oauth2/authorize?client_id=41b23e61-6c1e-4545-b367-cd054e0ed4b4&response_type=code&redirect_uri=https://portal.azure.com&nonce=1234&prompt=admin_consent -
If you get an error about external identity, then replace /common/ with your tenant ID.
-

-
Click Accept
-
Navigate back to Microsoft Entra ID
-
Select Enterprise Applications
-
Select Azure VPN
-
Copy the Application ID of the Azure VPN enterprise application (you will need both Application ID and tenant ID for the next steps)
-

Configure Point to Site Connection
Now its time to configure the Virtual Network Gateway
- Log in to the Azure Portal
- Navigate to the Virtual Network Gateway you created earlier
- Click on Point-to-site configuration
- Click Configure now
- Enter in your address pool (this is the address pool of the VPN clients, make sure this doesn't overlap with any other IP range you use, I will go with: 172.0.0.0/16)
- Make sure the Tunnel type is: OpenVPN (SSL)
- Select Microsoft Entra ID for the Authentication type
- For Tenant, ID enter in: https://login.microsoftonline.com/**TENANTID**/ and enter in your own Tenant ID.
- For the Audience (this is the users and groups that are assigned to the Enterprise Azure VPN application), put in the Application ID of the Azure VPN.
- For the Issuer, enter in: https://sts.windows.net/**TENANTID**/

- Click Save
- It may take 1-5 minutes to save the configuration
Install and connect using the Azure VPN client
Now that the Point to Site VPN has been configured it's time to connect!
- Click on Download VPN client (if it is greyed out, then navigate to the Overview pane, then back to the Point-to-site configuration).
- Extract the zip file, you will need these files
- Download the Azure VPN Client to your computer.

- Once, downloaded click Open.
- Click the + sign (lower left)
- Click Import
- Navigate to the: azurevpnconfig.xml file that you downloaded earlier and click Open
- You can change the Connection Name to something more user friendly (you can also edit the file directly for when you look at pushing out this to multiple users, but make sure you have a backup of the file)
- Click Save

- Click Connect
- Enter in your Microsoft Entra ID credentials (you may be prompted for MFA, depending on the rules - you can use Azure VPN application under conditional access)

- You should now be connected to the Azure network through a point to site VPN!
- If I run 'ipconfig /all' on my device, I can see a PPP adapter that is connected and on the VPN address range created earlier: 172.0.0.2

- If I navigate back to the Point-to-site connection in the Azure Portal, I can see, my connection has been allocated:

- I can now use Remote Desktop to connect to a Virtual Machine, running in my AppServers Subnet, which I am running without the need of a Public IP or bastion/jump host:

Note: I don't have a DNS service running in Azure, but the Azure VPN agent will take DNS from the Virtual Network if you have this configured to point towards a DNS server (Active Directory, or other DNS forwarder (pointing towards Azure DNS IP: 168.63.129.16) such as Azure Firewall DNS proxy; you can set Custom DNS servers by modifying your DNS configuration, or add entries into the host file of the computers.
You can set your Custom DNS settings (remember to add the DNS suffix if needed) and configure the VPN to automatically connect by following the details on the OpenVPN Azure AD Client page.
Using Intune, you can also push this configuration to your Windows 10 and 11 clients