13 posts tagged with "PowerShell"

View All Tags

Microsoft Azure Management with PowerShell - Introduction

· 7 min read

To see a video of these commands in action, take a look at the following YouTube-hosted video: Microsoft Azure Management with PowerShell - Introduction

PowerShell

PowerShell is a powerful scripting and automation framework developed by Microsoft. It is designed for task automation and configuration management and is particularly useful for managing and automating Microsoft Windows environments. PowerShell uses a command-line interface with a scriptable approach, and it's built on the .NET Framework.

PowerShell and Microsoft Azure

When it comes to Microsoft Azure, PowerShell provides a robust set of cmdlets (pronounced "command-lets") that enable you to interact with and manage Azure resources, making it a valuable tool for working with Azure services.

When you run a PowerShell cmdlet to, for example, create a virtual machine or retrieve information about an Azure resource, the cmdlet translates your request into an HTTP request to the relevant Azure REST API endpoint.

There is an assumption, that you have access to an Azure environment, and the ability to create resources, within that environment.

Microsoft Azure Management with PowerShell

First up, let's verify the version of PowerShell we have, open a Powershell terminal and run:

$PSVersionTable

A supported version of PowerShell version 7 or higher is the recommended version of PowerShell for use with the Az PowerShell module on all platforms including Windows, Linux, and macOS.

The Az PowerShell module is preinstalled in Azure Cloud Shell and in Docker images.

Setting up your Azure environment for PowerShell

First thigs first, lets installed the Azure (Azure Az PowerShell module)modules.

# Install Azure Modules
# The Set-PSRepository cmdlet is used to set values for a registered repository.
# The Install-Module cmdlet is used to download one or more modules from an online gallery and installs them on the local computer. In this case, the command is installing the Az module, which provides cmdlets for managing Azure resources.
Set-PSRepository -Name 'PSGallery' -InstallationPolicy Trusted
Install-Module Az

If you don't have local administrator rights, you can install it into your user profile like below:

# Install Azure Module as Current User (as opposed to System)
# '-Scope CurrentUser` specifies that the module should be installed only for the current user. If you don't specify a scope, the default is `AllUsers`, which requires administrator permissions.

Install-Module -Name Az -Repository PSGallery -Scope CurrentUser

You can install a specific version of the Az module by specifying RequiredVersion, like below:

# Install specific version of Azure Modules

Install-Module -Name Az -RequiredVersion 7.1.0

You will find that the Azure powershell cmdlets will constantly get updated, to resolve bugs, offer new functionality, to update the modules to the ltest you can use:

# Update Azure Module
# The command Get-InstalledModule -Name Az* | Update-Module is used to update all installed PowerShell modules that start with "Az".
Set-PSRepository -Name 'PSGallery' -InstallationPolicy Trusted
Get-InstalledModule -Name Az* | Update-Module

Az is a collection of different cmdlets, across multiple Azure resource types, to view a list of avaliable commands you use 'Get-Command', like below:

# Gets Az Commands
# Note: Will take a while for all the cmdlets to list.
Get-Command -Noun Az*

Getting started with Azure PowerShell module

Lets connect to Microsoft Azure

# Connect to Azure - Interactive will prompt for credentials
Connect-AzAccount

If your wanting to connect to Azure, from a device that doesn't supoport the credential prompt, like Azure Cloudshell you can connect using another device, using a device code:

# Connect to Azure
Connect-AzAccount -UseDeviceAuthentication

If you have a Service principal, you can use this to authenticate, commonly used for automation scripts, Azure DevOps agents and GitHub runners.

# Connect to Azure using Service Principal authentication
$SecurePassword = ConvertTo-SecureString -String "Password123!" -AsPlainText -Force
$TenantId = 'yyyyyyyy-yyyy-yyyy-yyyy-yyyyyyy'
$ApplicationId = 'zzzzzzzz-zzzz-zzzz-zzzz-zzzzzzzz'
$Credential = New-Object -TypeName System.Management.Automation.PSCredential -ArgumentList $ApplicationId, $SecurePassword
Connect-AzAccount -ServicePrincipal -TenantId $TenantId -Credential $Credential

Once, connected - its time to check what Azure subscriptions you can use.

# Get Azure Subscriptions
Get-AzSubscription

Once you have selected the right Azure subscription to connect to, you can set your Subscription context (modify/delete resources). Add your subscription ID, from the earlier step in between ''.

# Select Azure Subscription
$subid = ''
Set-AzContext -SubscriptionId $subid

Now you have connected to your, Azure subscription, it is time to get your Azure resources and Resource Groups

# Get Azure resource groups and resources
Get-AzResourceGroup | Format-Table
Get-AzResource | Format-Table
# Get Azure resource
Get-AzResource
# Get Azure resource by ResourceType
Get-AzResource | Where-Object {$_.ResourceType -eq 'Microsoft.Network/virtualNetworks'}
# Sort Azure resource by Name and Resource Group
Get-AzResource | Where-Object {$_.ResourceType -eq 'Microsoft.Storage/storageAccounts'} | Sort-Object Name
Get-AzResource | Sort-Object ResourceGroupName
# Working with Variables

# Working with variables and data types in PowerShell
$resourceType = 'Microsoft.Network/virtualNetworks'
Get-AzResource | Where-Object {$_.ResourceType -eq $resourceType}
# Using PowerShell operators for comparisons and calculations

$resources = Get-AzResource
$count = $resources.Count
Write-Host "You have $count resources in your Azure subscription."
# Scripting constructs: loops and conditional statements
$resources = Get-AzResource

foreach ($resource in $resources) {
if ($resource.ResourceType -eq 'Microsoft.Network/virtualNetworks') {
Write-Host "Found a virtual network: $($resource.Name)"
Write-Host "This virtual network is in $($resource.ResourceGroupName)" -ForegroundColor Green
}
}
# Scripting constructs: loops and conditional statements
$subscriptions = Get-AzSubscription

foreach ($subscription in $subscriptions) {
$resource = Get-AzResource | Where-Object {$_.ResourceType -eq 'Microsoft.Network/virtualNetworks'}

if ($resource.ResourceType -eq 'Microsoft.Network/virtualNetworks') {
Write-Host "Found a virtual network: $($resource.Name)" -BackgroundColor Black -ForegroundColor White
Write-Host "This virtual network is in $($resource.ResourceGroupName)" -ForegroundColor Green
Write-Host "This Virtual Network is in $($subscription.Name)" -ForegroundColor Green
}
}
# Error handling in PowerShell
try {
Get-AzResource -ResourceGroupName "NonexistentResourceGroup" -ErrorAction Stop
} catch {
Write-Host "An error occurred: $_. Make sure you have selected the right Resource Group" -ForegroundColor Red
}

Resource Creation

# Import Module
Import-Module Az -Verbose
#Create Azure Resource Group
New-AzResourceGroup -Name "MyResourceGroup" -Location "West US"
# Get Regions
Get-AzLocation | Select-Object -First 1
Get-AzLocation | Select-Object DisplayName, Location, PhysicalLocation, GeographyGroup | Format-Table
ate Azure Resource Group
$region = 'AustraliaEast'
New-AzResourceGroup -Name "MyResourceGroup$region" -Location $region
# Create a storage account
$uniqueId = [guid]::NewGuid().ToString().Substring(0,4)
$region = 'AustraliaEast'
$ResourceGroupName = "MyResourceGroup$region"
New-AzStorageAccount -ResourceGroupName $ResourceGroupName -Name "mystgacc$uniqueId" -Location $region -SkuName Standard_LRS -AllowBlobPublicAccess $false -verbose
#Remove Azure Storage account
$region = 'AustraliaEast'
$ResourceGroupName = $ResourceGroupName
Remove-AzStorageAccount -ResourceGroupName $ResourceGroupName -Name "mystgacc$uniqueId" -Force -verbose
Get-AzStorageAccount -ResourceGroupName $ResourceGroupName -Name "mystgacc$uniqueId" -verbose
# Create an Azure Virtual Network
$region = 'AustraliaEast'
$ResourceGroupName = 'network-prod-rg'
$VNetname = 'vnet-prod'
$subnetname = 'infraservers'
$subnetAddressPrefix = '10.0.0.0/24'

# Create a resource group
$ResourceGroup = Get-AzResourceGroup -Name $ResourceGroupName -ErrorAction SilentlyContinue

if ($null -eq $ResourceGroup)
{
Write-Host "Creating Resource Group $ResourceGroupName in $region" -ForegroundColor Yellow
$ResourceGroup = New-AzResourceGroup -Name $ResourceGroupName -Location $region -Force
}
else
{
Write-Host "Resource Group $ResourceGroupName already exists in $region" -ForegroundColor Green
}

# Create a virtual network
$AzVNET = New-AzVirtualNetwork -ResourceGroupName $ResourceGroupName -Name $VNetname -AddressPrefix '10.0.0.0/16' -Location $region

# Create a subnet
$subnetConfig = Add-AzVirtualNetworkSubnetConfig -Name $subnetname -AddressPrefix $subnetAddressPrefix -VirtualNetwork $AzVNET
# Get full object output
# Alias (This is a pipeline to the Format-List cmdlet (fl is an alias for Format-List). It formats the output as a list of properties for each object. This can make it easier to read the details of the virtual network.)

Get-AzVirtualNetwork -ResourceGroupName $ResourceGroupName -Name $VNetname # | fl
# Alias

Get-Alias | Select-Object -First 2
#splat

$configData = @{
ResourceGroupName = "MyResourceGroup"
Location = "West US"
StorageAccountName = "stgacctest100"
}

try {
New-AzStorageAccount -ResourceGroupName $configData.ResourceGroupName -Name $configData.StorageAccountName -Location $configData.Location -SkuName Standard_LRS
} catch {
Write-Error "Failed to create storage account: $_"
}
#splat as parameters

$configData = @{
"ResourceGroupName" = "MyResourceGroup"
"Location" = "West US"
"StorageAccountName" = "stgacctest100"
"SkuName" = "Standard_LRS"

}

try {
New-AzStorageAccount @configData
} catch {
Write-Error "Failed to create storage account: $_"
}
# Tags
$ResourceGroupName = 'TagTestRG'
New-AzResourceGroup -Name $ResourceGroupName -Location 'AustraliaEast'
Set-AzResourceGroup -Name $ResourceGroupName -Tag @{ Department = "Finance"; Project = "Q1" }
# Get Tag Resource Group
$ResourceGroupName = 'TagTestRG'
(Get-AzResourceGroup -Name $ResourceGroupName).Tags
$ResourceGroupName = 'TagTestRG'
$tags = (Get-AzResourceGroup -Name $ResourceGroupName).Tags
$tags.Remove("Project")
Set-AzResourceGroup -Name $ResourceGroupName -Tag $tags

Open multiple Microsoft Teams instances using PowerShell

· 2 min read

There may be circumstances, you need to open up multiple Microsoft Team instances, a reason for this - maybe to chat and join meetings across multiple accounts.

Microsoft are working on a version of Microsoft Teams that supports multiple-accounts, but until thats released - you can use a PowerShell script to open up another version of Microsoft Teams in another profile (or multiple, if you update the profilename).

This script also works within your LocalAppData, so you don't need local administrator rights to run.

# Uses the file name as the profile name
$MSTEAMS_PROFILE = 'CustomProfile'

Write-Host "- Using profile '$MSTEAMS_PROFILE'"

# Set the custom profile path
$USERPROFILE = Join-Path $env:LOCALAPPDATA "Microsoft\Teams\CustomProfiles\$MSTEAMS_PROFILE"

# Set the old user profile
$OLD_USERPROFILE = $env:USERPROFILE

# Launch MS Teams with the custom profile
Write-Host "- Launching MS Teams with profile '$MSTEAMS_PROFILE'"
Set-Location "$OLD_USERPROFILE\AppData\Local\Microsoft\Teams"

$teamsProcessStartInfo = New-Object System.Diagnostics.ProcessStartInfo
$teamsProcessStartInfo.FileName = "$OLD_USERPROFILE\AppData\Local\Microsoft\Teams\Update.exe"
$teamsProcessStartInfo.Arguments = "--processStart ""Teams.exe"""
$teamsProcessStartInfo.WorkingDirectory = "$OLD_USERPROFILE\AppData\Local\Microsoft\Teams"
$teamsProcessStartInfo.EnvironmentVariables["USERPROFILE"] = $USERPROFILE
$teamsProcessStartInfo.UseShellExecute = $false

[System.Diagnostics.Process]::Start($teamsProcessStartInfo) | Out-Null

# Set the user profile back to the old user profile
$env:USERPROFILE = $OLD_USERPROFILE

When the script is ran, a new profile will be created for Microsoft Teams, and then opened. You can then use that second Microsoft Teams instance, to connect to another account or tenancy.

To make it easier, you could also look at turning this script into an executable.

Update-AdmPwdAdSchema - The requested attribute does not exist

· One min read

Are you attempting to update the Active Directory Schema for LAPS (Local Administrator Password Solution) and keep getting the error below?

Update-AdmPwdAdSchema: The requested attribute does not exist

Here are few things you can check:

  • Make sure you are a Schema Admin
  • Run PowerShell as Administrator
  • Run the PowerShell to update the schema directly from the Schema Master

You can use the snippet below to check which Domain Controller the Schema Master role is running from:

Get-ADDomainController -Filter * | Select-Object Name, Domain, Forest, OperationMasterRoles | Where-Object {$_.OperationMasterRoles}

AVD-Collect - Azure Virtual Desktop Diagnostics and Logging

· 6 min read

AVD-Collect is a handy PowerShell script created by Microsoft Customer Support Services to assist with troubleshooting and resolving issues with Azure Virtual Desktop (and Windows 365), by capturing Logs for analysis (which could then be passed to Microsoft or allow you to delve deeper) and running basic Diagnostics against some common known issues.

You can download this script from: https://aka.ms/avd-collect

There is no publically avaliable github repository for it currently, Microsoft will retain the latest version of the script at this link.

This script was NOT created by me and comes 'As/Is', this article is merely intended to share the script to assit others in their AVD troubleshooting.

This script is intended to help support Microsoft Customer Support with assisting customers, but was made publically accessible to assist with MS Support cases and Azure Virtual Desktop diagnostics. No data is automatically uploaded to Microsoft.

Please be aware that the script may change and include new functionality not part of this article, please review the Changelog and Readme of the script directly.

A lot of the information below is contained in the script readme (including a list of the extensive diagnostics and log locations) and changelog; however, I am supplying this article for reference and to help share this nifty tool.

Script pre-requisites

  1. The script must be run with elevated permissions to collect all required data.

  2. All collected data will be archived into a .zip file located in the same folder as the script itself.

  3. As needed, run the script on AVD host VMs and/or Windows-based devices from where you connect to the AVD hosts.

  4. When launched, the script will present the Microsoft Diagnostic Tools End User License Agreement (EULA). You need to accept the EULA before you can continue using the script.

  5. If the script does not start, complaining about execution restrictions, then in an elevated PowerShell console run:

    	Set-ExecutionPolicy -ExecutionPolicy RemoteSigned -Force -Scope Process

Acceptance of the EULA will be stored in the registry under HKCU\Software\Microsoft\CESDiagnosticTools, and you will not be prompted again to accept it as long as the registry key is in place. You can also use the "-AcceptEula" command line parameter to accept the EULA silently. This is a per-user setting, so each user running the script will accept the EULA once.

Script scenarios

Core - suitable for troubleshooting issues that do not involve Profiles or Teams or MSIX App Attach

  • Collects core troubleshooting data without including Profiles/FSLogix/OneDrive or Teams or MSIXAA related data
  • Runs Diagnostics.

Core + Profiles - suitable for troubleshooting Profiles issues

  • Collects all Core data
  • Collects Profiles/FSLogix/OneDrive related information, as available
  • Runs Diagnostics.

Core + Teams - suitable for troubleshooting Teams issues

  • Collects all Core data
  • Collects Teams related information, as available
  • Runs Diagnostics.

Core + MSIX App Attach - suitable for troubleshooting MSIX App Attach issues

  • Collects all Core data
  • Collects MSIX App Attach related information, as available
  • Runs Diagnostics.

Core + MSRA - suitable for troubleshooting Remote Assistance issues

  • Collects all Core data
  • Collects Remote Assistance related information, as available
  • Runs Diagnostics.

Extended (all) - suitable for troubleshooting most issues, including Profiles/FSLogix/OneDrive, Teams and MSIX App Attach

  • Collects all Core data
  • Collects Profiles/FSLogix/OneDrive related information, as available
  • Collects Microsoft Teams related information, as available
  • Collects MSIX App Attach related information, as available
  • Runs Diagnostics.

DiagOnly

  • Skips all Core/Extended data collection and runs Diagnostics only (regardless of any other parameters that have been specified).

The default scenario is "Core".​​​​​​​

Available command line parameters (to preselect the desired scenario)

  • Core - Collects Core data + Runs Diagnostics
  • Extended - Collects all Core data + Extended (Profiles/FSLogix/OneDrive, Teams, MSIX App Attach) data + Runs Diagnostics
  • Profiles - Collects all Core data + Profiles/FSLogix/OneDrive data + Runs Diagnostics
  • Teams - Collects all Core data + Teams data + Runs Diagnostics
  • MSIXAA - Collects all Core data + MSIX App Attach data + Runs Diagnostics
  • MSRA - Collects all Core data + Remote Assistance data + Runs Diagnostics
  • DiagOnly - The script will skip all data collection and will only run the diagnostics part (even if other parameters have been included).
  • AcceptEula - Silently accepts the Microsoft Diagnostic Tools End User License Agreement.

Usage example with parameters

To collect only Core data (excluding Profiles/FSLogix/OneDrive, Teams, MSIX App Attach):

	.\AVD-Collect.ps1 -Core

To collect Core + Extended data (incl. Profiles/FSLogix/OneDrive, Teams, MSIX App Attach):

	.\AVD-Collect.ps1 -Extended

To collect Core + Profiles + MSIX App Attach data

	.\AVD-Collect.ps1 -Profiles -MSIXAA

To collect Core + Profiles data

	.\AVD-Collect.ps1 -Profiles

​​​​​​​If you are missing any of the data that the script should normally collect, check the content of the "__AVD-Collect-Log.txt" and "__AVD-Collect-Errors.txt" files for more information. Some data may not be present during data collection and thus not picked up by the script.

Execute the script

  1. Download the AVD-Collect script to the session host you need to collect the logs from, if you haven't already.

  2. Extract the script to a folder (i.e. C:\Users\%username&\Downloads\AVD-Collect)

  3. Right-click on: AVD-Collect.ps1, select Properties

  4. Because this file has been downloaded from the Internet, it may be in a protected/block status - select Unblock and click Apply

  5. Open Windows Powershell as Administrator

  6. Now we need to change the directory for where the script is located; in my example, the command I use is:

    cd 'C:\Users\Luke\Downloads\AVD-Collect'
  7. By default, the script will run as 'Core', and I want to include everything, profiles, Teams etc., so run Extended:

    .\AVD-Collect.ps1 -Extended -AcceptEula
  8. Read the notice from the Microsoft Customer Support centre and press 'Y' if you accept to move onto the next steps.

  9. The script will now run:

  10. AVD- Script Running

  11. You will start to see new folders get created in the directory that the script is running from with the extracted log files. The script will take a few minutes to complete as it extracts the logs and then zips them.

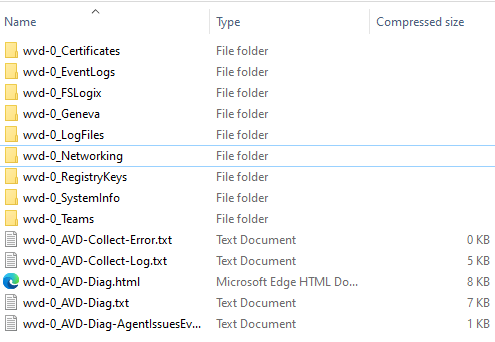
  12. Once the script has ran, there will now be a ZIP file of all the Logs collected by the script. In my example, the logs consisted of:

  • Certificates
  • Recent Event Log
  • FSLogix logs
  • Networking
  • Registry Keys
  • Teams information
  • System information
  • Networking and Firewall information
  1. AVD-Collect Logs
  2. If needed, you can now send or upload the ZIP file to Microsoft support. If you are troubleshooting yourself, you can navigate to the folders to look at the specific logs you want, all in one place!
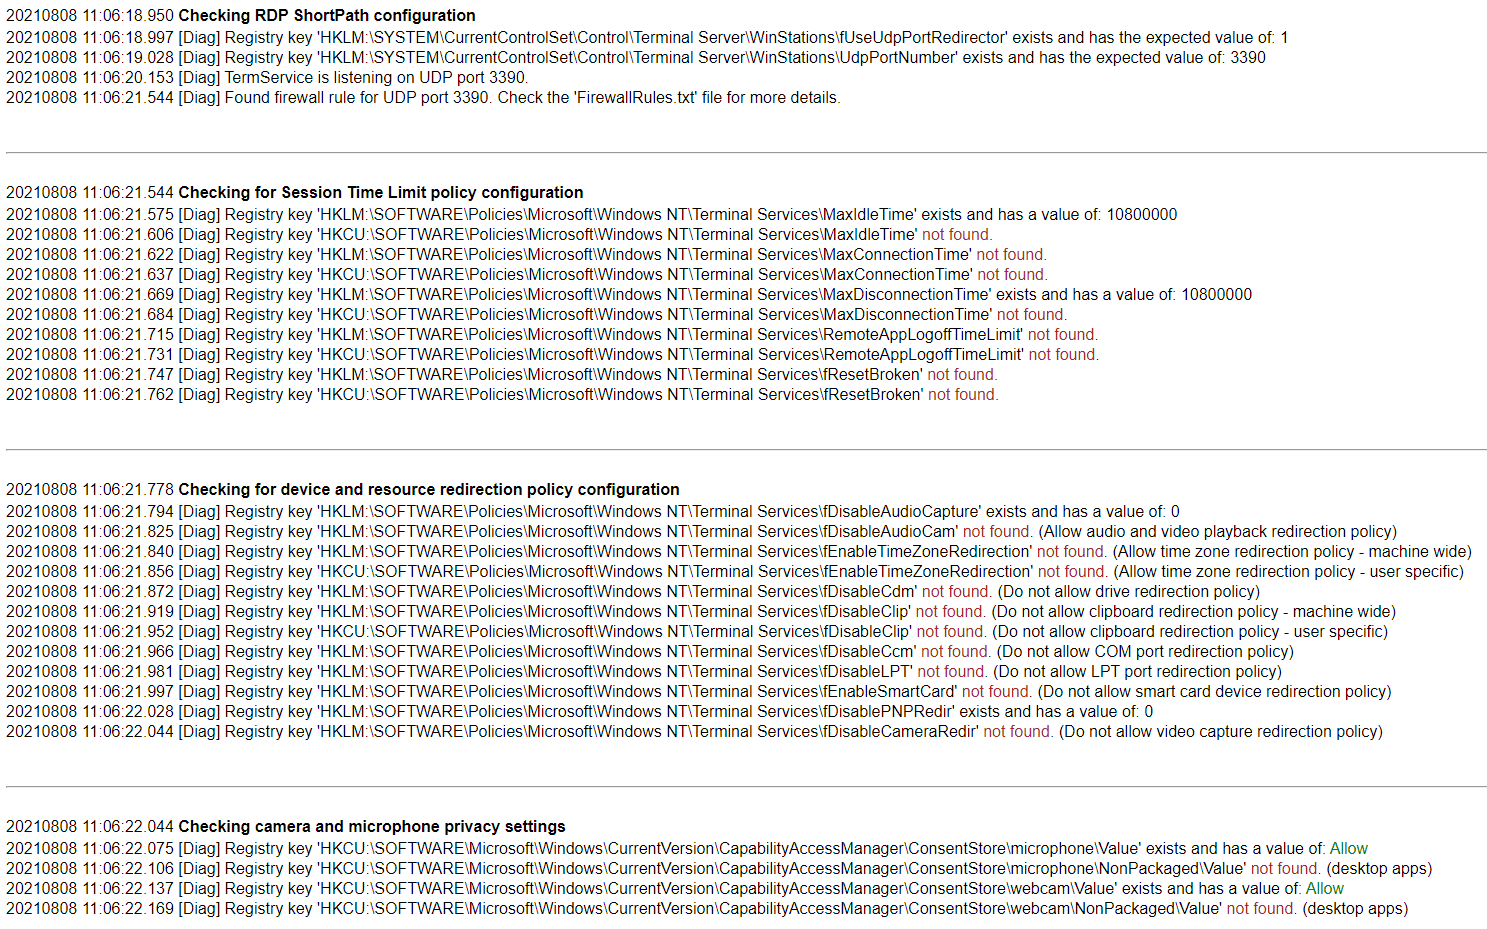
  3. To look at Diagnostic information, open the: AVD-Diag.html file.
  4. You can now see a list of common issues, what the script is looking for, and whether the host has passed or failed these scripts (this can be very useful for Azure Virtual Desktop hosts, to make sure all the standard configuration is done or being applied, including making sure that the session host has access to all the external resources it needs):
  5. AVD-Collect Diagnostics

Remove old PowerShell modules versions using PowerShell

· One min read

Did you know, that if you update PowerShell modules, the old versions can sometimes get left behind?

This little snippet with remove any old PowerShell modules (that are not the latest version), which are installed.

#requires -Version 2.0 -Modules PowerShellGet
function Remove-OldModules
{
<#
<#
authors: [Luke] Murray (Luke.Geek.NZ)
Version: 0.1
Purpose: Basic function to remove old PowerShell modules which are installed
#>

#>
$Latest = Get-InstalledModule
foreach ($module in $Latest) {

Write-Verbose -Message "Uninstalling old versions of $($module.Name) [latest is $( $module.Version)]" -Verbose
Get-InstalledModule -Name $module.Name -AllVersions | Where-Object {$_.Version -ne $module.Version} | Uninstall-Module -Verbose
}
}

Remove-OldModules