The Microsoft Azure platform is not a set-and-forget ecosystem like doing service on your car!
There are no one-size-fits when it comes to cost optimization, but some general tasks can be done or considered on a Monthly/Quarterly/Annual basis to keep on top of the resources you are running in Azure and to keep them lean.
Overview
Although Microsoft takes a lot of traditional infrastructure management and security concerns off your hand, you are still responsible for the spending and ensuring the value of the technologies and services you consume match your business goals and agility.
Today we are going to go back to basics and look at the Cost Optimization pillar of the Microsoft Well-Architected Framework.
“The cost optimization pillar provides principles for balancing business goals with budget justification to create a cost-effective workload while avoiding capital-intensive solutions. Cost optimization is about looking at ways to reduce unnecessary expenses and improve operational efficiencies.”
“Use the pay-as-you-go strategy for your architecture, and invest in scaling out, rather than delivering a large investment-first version. Consider opportunity costs in your architecture and the balance between first-mover advantage versus fast follow.”
The right governance and oversight can help prevent Cloud sprawl and wasted consumption costs.
To help get you started, I have put together a list of some optimization opportunities, that should be run regularly, items such as reviewing unassociated public IPs should be done Monthly (along with Azure Advisor checks), and Azure Reservation reviews at least quarterly.
This is not an exhaustive list, and the use of Azure Policy and Azure Advisor help supplement these tasks.
If you have other tasks that you run, feel free to share them with the community in the page comments below.
The Microsoft Graph and KQL queries can also be used in conjunction with PowerShell to pull recommendations straight out of Advisor, which can then be fed into reports, and the use of community tools such as the Azure Optimization Engine cannot be undervalued.
Design

Keep within the cost constraints
Every design choice has cost implications. Before choosing an architectural pattern, Azure service, or a price model for the service, consider the budget constraints set by the company. As part of the design, identify acceptable boundaries on scale, redundancy, and performance against cost. After estimating the initial cost, set budgets and alerts at different scopes to measure the cost.
One of the cost drivers can be unrestricted resources. These resources typically need to scale and consume more cost to meet demand.
Aim for scalable costs
A key benefit of the cloud is the ability to scale dynamically. The workload cost should scale linearly with demand.
You can save costs through automatic scaling. First, consider the usage metrics and performance to determine the number of instances. Then, choose smaller instances for a highly variable workload and scale out to get the required level of performance rather than up. This choice will enable you to make your cost calculations and estimates granular.
Pay for the consumption
Adopt a leasing model instead of owning infrastructure. Azure offers many SaaS and PaaS resources that simplify the overall architecture. The cost of hardware, software, development, operations, security, and data centre space is included in the pricing model. Also, choose pay-as-you-go over fixed pricing. That way, you're charged for only what you use as a consumer.
Right resources, the right size
Choose the right resources aligned with business goals and can handle the workload's performance.
An inappropriate or misconfigured service can impact the cost.
For example, building a multi-region service when the service levels don't require high availability or geo-redundancy will increase cost without any reasonable business justification. Specific infrastructure resources are delivered as fix-sized building blocks. Ensure that these blocks are adequately sized to meet capacity demand and deliver expected outcomes.
Monitor and optimize
Treat cost monitoring and optimization as a process rather than a point-in-time activity. Conduct regular cost reviews and measure and forecast the capacity needs so that you can provision resources dynamically and scale with demand. Review the cost management recommendations and take action.
Today, we will focus on Monitor and optimize.
Review Underutilized Resources
Optimize and improve efficiency by identifying idle and underutilized resources across the Azure ecosystem.
Review Azure App Service Plans
Review Azure App Service Plans to determine if:
- The Azure App Service Plan is ‘Standard’ or ‘Premium’ pricing and has an associated application.
- If the Azure App Service is getting utilized (by looking at the Metrics/CPU) and doesn’t need to be downscaled to a smaller plan.
Review shutdown workloads
Because you pay for Azure Resources as ‘Pay As You Go’, a quick win can be to review Virtual Machines to determine if the workload needs to be 24/7!
For example, you have automation configured to automatically start up and shut down workloads based on the following schedule: 7 AM Start – 7 PM Stop (& off Weekends).
You can add servers to this automated schedule by adding the following Tag to the Virtual Machine or trigger automation when a workload is ‘Shutdown’ and not deallocated; see my article on "Turn on an Azure Virtual Machine using Azure Automation" for a potential place to start.
Review Azure Advisor
The Azure Advisor is an inbuilt tool critical to optimizing the Azure Environment. The Azure Advisor needs to be reviewed for Cost recommendations.
- The Azure Advisor will recommend Reserved Instances.
- The Azure Advisor will recommend if a Virtual Machine runs on a VM size GREATER than what it needs (based on CPU utilization under 5% in the last 14 days). If the Azure Advisor reports an overprovisioned machine, you need to investigate its use and resize it to a more suitable size.
Review Azure SQL Databases
Review Azure SQL Databases to determine if:
- The SQL Database Pricing Tier is ‘Standard’ and uses the DTUs (usually found by looking at the Compute utilization on the databases); if not, downsize the DTU limit.
- Check Geo-Replication to ensure that the SQL Database is not replicating across Regions if it doesn’t need to be.
Review Azure Reserved Instances
Azure reserved instances significantly reduce costs—up to 72 per cent compared to pay-as-you-go prices—with one-year or three-year terms on Windows and Linux virtual machines (VMs). What's more, you can now improve budgeting and forecasting with a single upfront payment (i.e. Pay for a VM Upfront for 1/3 Year or 5 Years), making it easy to calculate your investments. Or lower your upfront cash outflow with monthly payment options at no additional cost.

The Azure Advisor is an inbuilt tool critical to optimizing the Azure Environment. The Azure Advisor needs to be reviewed for Reserved Instance recommendations.
- When reviewing Reserved Instances, you need to take into consideration:
- What workloads are they used for?
- Is there a project that may replace or resize the workloads next year?
- Who is paying for the workloads?
Review unused files and VHDs
Save Azure costs by cleaning up unused VHDs in your Azure storage. Azure stores Azure Virtual Machine OS and data disks in Azure storage accounts.
When a VM is deleted from the Azure portal, the underlying OS and data disks may not get deleted. Such disks continue to consume Azure storage and account for the cost of storing them. These disks are called Orphaned Disks.
As mentioned above, some Virtual Machines with unmanaged disks will keep the VHDs around when deleted.
Using a PowerShell script (provided by Microsoft), you can report on any disks that are not in use by a VM and then delete them.
Note: Be VERY cautious doing this; solutions such as Citrix and Azure Image Builder use unmanaged disks to create new Session hosts, etc., so context is key.
With the Azure Storage accounts using Blob data – such as Diagnostic Accounts, it is a good idea to implement Azure Blob Storage Lifecycle on the storage accounts, so we are only retaining recent and relevant data.

The lifecycle management policy lets you:
- Transition blobs to a cooler storage tier (hot to cool, hot to archive, or cool to archive) to optimize for performance and cost
- Delete blobs at the end of their lifecycles
- Define rules to be run once per day at the storage account level.
Review budgets
Budgets in Cost Management help you plan for and drive organizational accountability. With budgets, you can account for the Azure services you consume or subscribe to during a specific period.
Budgets help you inform others about their spending to proactively manage costs and monitor how spending progresses over time.
When the budget thresholds you've created are exceeded, notifications are triggered. None of your resources is affected, and your consumption isn't stopped; however, you can use Budget alerts as a trigger to run Azure Logic Apps or Functions to automate the shutdown and resize resources. You can use budgets to compare and track spending as you analyze costs.
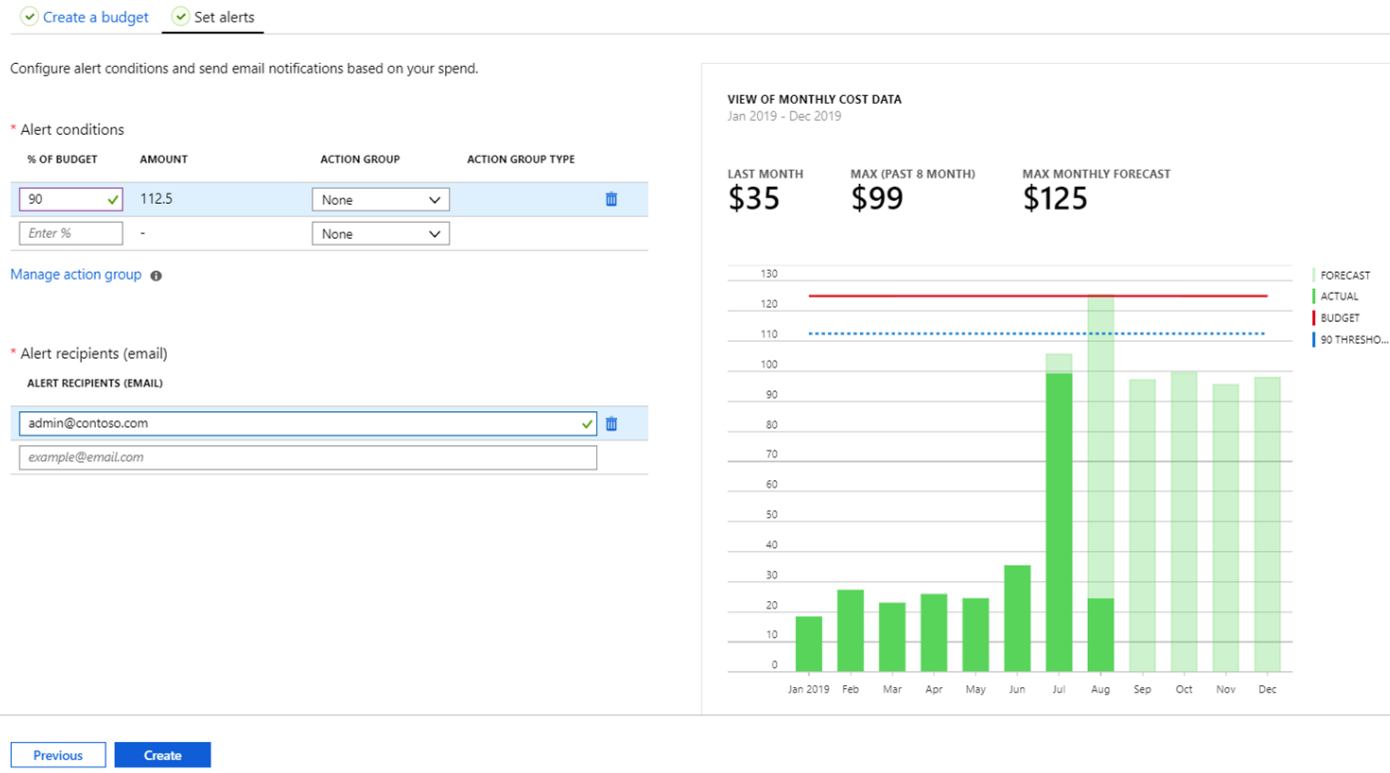
Ensure Azure Budget notifications are configured to email Product Owners or other Stakeholders once a Resource Group or Subscription reaches a specific threshold.
This is set up in the Azure Portal, on the Resource Group under Budgets, and set to email the Application Owner.
Examples of budgets that could be configured:
Generally, I recommend that three budgets should be configured to give enough notice:
You apply tags to your Azure resources, resource groups, and subscriptions to logically organize them into a taxonomy. Each tag consists of a name and a value pair. For example, you can apply the name "Environment" and the value "Production" to all the resources in production.
Tags can be used to determine things like:
- Who to bill?
- Who supports it?

The right tags can mean that the right owners get charged internally and have more ownership of their resource costs. Examples below:
| Tag Name | Value | Comment |
|---|
| Dept | Finance | Name of the department who owns the resources. |
| Environment | UAT | What environment the Resource is used for such as Production, UAT and Development |
| Application Owner | Luke Murray | The name of the Product Owner for the service sitting inside the Resource Group |
| Support Team | Platform Team | What team is responsible for the resources/site for support reasons |
| Billing Code | Operational | Purchase order or project billing code |
For further examples and a base tagging convention, check out a blog article I wrote on Microsoft Azure Tagging conventions.
Review Hub (Hybrid Use Benefit)
The Azure Hybrid Benefit is a pricing benefit for customers with Software Assurance licenses, which helps maximize the value of existing on-premises Windows Server and/or SQL Server license investments when migrating to Azure.
Eligible customers can save up to 40% on Azure Virtual Machines (infrastructure as a service, or IaaS), and save up to 55% on Azure SQL Database (platform as a service, or PaaS) and SQL Server on Azure Virtual Machines (IaaS) with Azure Hybrid Benefit, which increases to up to 80% when combined with Azure Reserved Instances.

To verify if a server is using the Azure Hybrid Benefit, Log in to the Azure Portal and navigate to the Virtual Machine Blade. Make sure that the: OS Licensing Benefit column is selected.
If a Virtual Machine Already has HUB, it will have: The azure hybrid benefit listed in the column, and any non-supported workloads (such as Linux) will have ‘Not Supported’.
If any are eligible for HUB, click on the Virtual Machine…
- Click the Configuration blade
- Select Licensing, Already have a Windows server license?
- Yes and Save
Note: This is a non-intrusive change that will take effect on the billing immediately and doesn’t cause any impact on the Virtual Machine.
Review Backups
Azure Backup is simple because it’s built into the platform. It has one-click backup support for SQL databases and virtual machines running in Azure.
Azure Backup is cost-effective and less complex than other cloud backup solutions while keeping your data safe from ransomware and human errors. Sometimes there will be workloads backed up to migrate, test, or clone, and you no longer need to retain the data.
Note: This can be a tricky one as you will need to talk to product owners to confirm the workloads were just Dev/Test workloads, and not required, there may be legal implications for keeping workloads in the backup. But if someone stood up something to play with, particularly in a Sandbox or Development subscription there may not be a reason to keep it around.
Log in to the Azure Portal and navigate the Recovery Services Vault page. Navigate to each one and click on:
Backup:
-
Under Usage, click on Backup Items
-
Click on Azure Virtual Machines
-
Sort the Backup items by Latest Restore Point (so the older restore points are at the top)
Using the Latest Restore Point as a guide, IF any servers can have their Backups deleted:
-
Click on the Name of the Backup Item
-
Click on Stop Backup
-
Select Delete Backup Data (this is non-reversible)
-
Type in the name of the Backup Item and select Stop Backup
Review unused Public IPs
Public IP addresses allow Internet resources to communicate inbound to Azure resources. Public IP addresses enable Azure resources to communicate to the Internet and public-facing Azure services.
This is also a great opportunity to inspect what Public IP addresses you have and make sure some resources have public IPs that does not need to be assigned! Tip setup an Azure Policy that prevents the creation of Public IPs.
The address is dedicated to the resource until it’s unassigned by you. A resource without a public IP assigned can communicate outbound. Azure dynamically assigns an available IP address that isn’t dedicated to the resource.

When resources get created, sometimes they will create a Public IP; these can be removed as part of the build but left in the Resource Groups.
We want to remove unattached Public IP to save money.
Note: In some cases, the Product Owner may need to be consulted before any changes are made, as some of the resources may be inflight projects or required.
- Log in to the Azure Portal and navigate to the Public IP Addresses blade
- Look in the ‘Associated to’ column, and if not required, click on the Public IP
- Click Delete
Review Azure Storage Accounts
An Azure storage account contains all your Azure Storage data objects: blobs, files, queues, tables, and disks. Your Azure storage account's data is durable, highly available, secure, and massively scalable.
General-purpose storage accounts may be configured for either of the following performance tiers:
- A standard performance tier for storing blobs, files, tables, queues, and Azure virtual machine disks.
- A premium performance tier for storing unmanaged virtual machine disks. If a Storage account is Premium but only needs to be Standard (or LRS instead of ZRS), this can save some money.
Note: In some cases, the Product Owner may need to be consulted before any changes are made, as some of the resources may be inflight projects or required.
- Log in to the Azure Portal and navigate to the Storage Account blade
- Click on Manage View, Edit Columns, and add in: SKU
- Review the Premium Storage Accounts and determine if any accounts need to be downsized to Standard
- To change, click on the Storage Account
- Click on Configuration and change from Premium to Standard
You can also look at the Replication. Does that Storage Account need to be Geo-Redundant if the rest of the application that uses it isn’t? Can the storage account be changed to Standard during off-hours or non-peak?
- Download the PDF version of these Tasks
Finally, if you prefer this in a more PDF/Visual format - you can download a PDF version of this directly from my Github "here".
- Azure Operational Checklist table
This is a very quick example of what an Azure Operational Checklist could look like; if you record what tasks you do, you can look at further automation around implementation and reporting.
| Azure Checklist | **** | **** | **** |
|---|
| Action | Status | Date | Note/Opportunity |
| Review Azure App Service Plans | | | |
| Review shutdown workloads | | | |
| Review Azure Advisor | | | |
| Review Azure SQL Databases | | | |
| Review Azure Reserved Instances | | | |
| Review unused files and VHDs | | | |
| Review budgets | | | |
| Review Tags | | | |
| Review Hub (Hybrid Use Benefit) | | | |
| Review Backups | | | |
| Review unused Public IPs | | | |
| Review Azure Storage Accounts | | | |