Controlled Chaos in Azure using Chaos Studio
Chaos engineering has been around for a while; Netflix runs their own famous Chaos Monkey, supposedly running 24/7, taking down their resources and pushing them to the limit continuously; it almost sounds counter-intuitive – but it's not.
Chaos engineering is defined as “the discipline of experimenting on a system in order to build confidence in the system’s capability to withstand turbulent conditions in production” (Principles of Chaos Engineering, http://principlesofchaos.org/). In other words, it’s a software testing method focusing on finding evidence of problems before they are experienced by users.
Chaos engineering is a methodology that helps developers attain consistent reliability by hardening services against failures in production. Another way to think about chaos engineering is that it's about embracing the inherent chaos in complex systems and, through experimentation, growing confidence in your solution's ability to handle it.
A common way to introduce chaos is to deliberately inject faults that cause system components to fail. The goal is to observe, monitor, respond to, and improve your system's reliability under adverse circumstances. For example, taking dependencies offline (stopping API apps, shutting down VMs, etc.), restricting access (enabling firewall rules, changing connection strings, etc.), or forcing failover (database level, Front Door, etc.), is a good way to validate that the application is able to handle faults gracefully.
Introducing controlled Chaos tools such as Chaos Monkey and now – Azure Chaos Studio allows you to put pressure and, in some cases, take down your services to teach you how your services will react under strain and identity areas of improvement as resiliency and scalability to improve your systems.

Azure Chaos Studio (currently in Preview and only supported in several regionsnow) is an enabler for 'controlled Chaos' in the Microsoft Azure ecosystem. Using that same tool that Microsoft uses to test and improve their services – you can as well!
Chaos Studio works by creating Experiments (i.e., Faults/Capabilities) that run against Targets (your resources, whether they are agent or service-based).
There are two types of methods you can use to target your resources:
- Service-direct
- Agent-based
Service-direct is tied into the Azure fabric and puts pressure on your resources from outside them (i.e., supported on most resources that don't need agent-based, PaaS resources, such as Network Security Groups). For example, a service-direct capability may be to add or remove a security rule from your network security group for faulty findings.
Agent-based relies on an agent installed; these are targeted at resources such as Virtual Machine and Virtual Machine scale sets; agent-based targets use a user-assigned managed identity to manage an agent on your virtual machines and wreak havoc by running capabilities such as stopping services and putting memory and disk pressure on your workloads.
Just a word of warning, before you proceed to allow Chaos to reign in your environment, make sure it is done out of hours or, better yet – against development or test resources, also make sure that any resources that support autoscaling are disabled – or you might suddenly find ten more instances of that resource you were running (unless of course you're testing that autoscaling is working)! 😊
In my test setup, I have the following already pre-created that I will be running my experiments against:
- Virtual Machine Scale set (running Windows with two instances)
- Single Virtual Machine (running Windows) to test shutdown against
The currently supported resource types of Azure Chaos Studio can be found 'here'.
Setup Azure Chaos Studio
Create Managed Identity
Because we will use Agent-based capabilities to generate our Faults, I needed to create a Managed Identity to give Chaos Studio the ability to wreak havoc on my resources!
- In the Azure Portal, search for Managed Identities
- Click on Create
- Select the subscrSubscriptionng the resources that you want to test against
- Select your Resource Group to place the managed identity in (I suggest creating a new Resource Group, as your Chaos experiments may have a different lifecycle than your resources, but it's just a preference, I will be placing mine in the Chaos Studio resource group so I can quickly delete it later).
- Select the RegionRegionur resources
- Type in a name (this will be the identity that you will see in logs running these experiments, so make sure its something you can identify with)
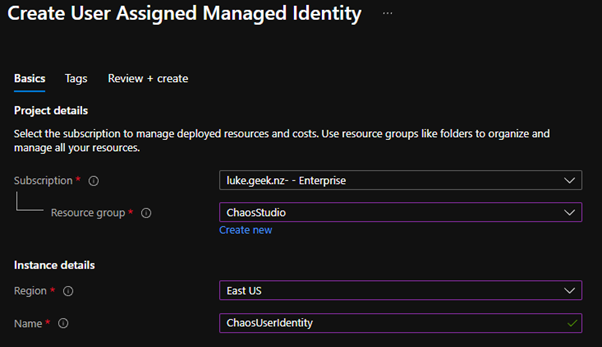
- Click Next: Tags
- Make sure you enter appropriate tags to make sure that the resource can be identified and tracked, and click Review + Create
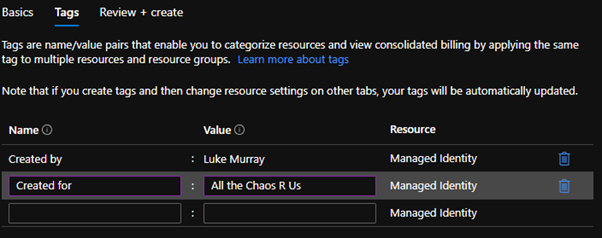
- Verify that everything looks good and click Create to create your User Assigned Managed identity.
Create Application Insights
Now, it's time to create an Application Insights resource. Applications Insights is for the logs of the experiments to go into, so you can see the faults and their behaviours.
- In the Azure Portal, search for Application Insights
- Click on Create
- Select the Subscription the resources that you want to test against
- Select your Resource Group to place the Application Insights resource into (I suggest creating a new Resource Group, as your Chaos experiments may have a different lifecycle than your resources, but it's just a preference, I will be placing mine in the Chaos Studio resource group so I can easily delete it later).
- Select the Region the resources are in
- Type in a name
- Select your Log Analytics workspace you want to link Application Insights to (if you don't have a Log Analytics workspace, you can create one 'here').
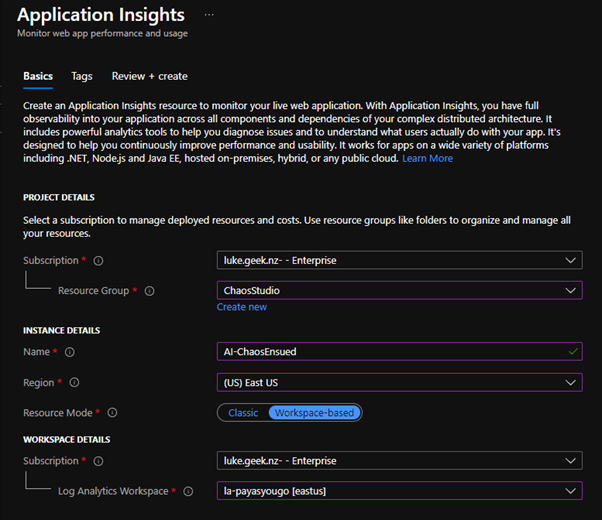
- Click Tags
- Make sure you enter appropriate tags to make sure that the resource can be identified and tracked, and click Review + Create
- Verify that everything looks good and click Create to create your Application Insights.
Setup Chaos Studio Targets
It is now time to add the resources targets to Chaos Studio
- In the Azure Portal, search for Chaos Studio
- On the left band side Blade, select Targets

- As you can see, I have a Virtual Machine Scale Set and a front-end Network Security Group.
- Select the checkbox next to Name to select all the Resources
- Select Enable Targets

- Select Enable service-direct targets (All resources)
- Enabling the service-direct targets will then add the capabilities supported by Service-direct targets into Chaos Studio for you to use.
- Once completed, I will select the scale set and click Enable Target
- Then finally, Enable agent-based targets (VM, VMSS)
- This is where you link the user-managed identity, and Application Insights created earlier
- Select your Subscription
- Select your managed identity
- Select Enabled for Application Insights and select your Application Insights account. The instrumentation key should be selected manually.
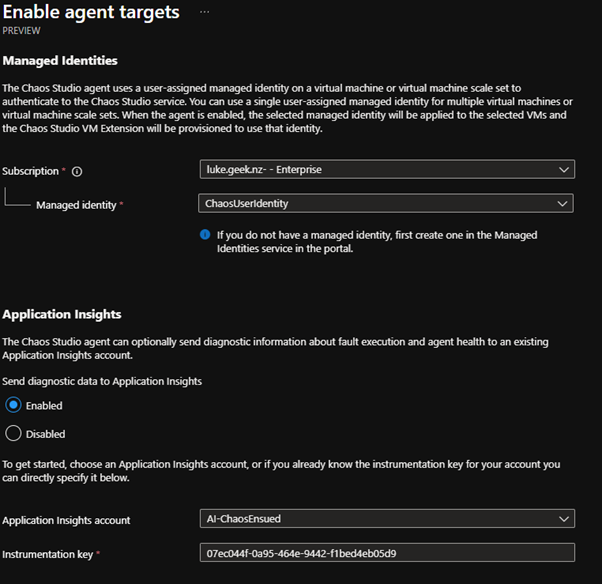
- If your instrumentation key isn't filled in, you can find it on the Overview pane of the Application Insights resource.
- Click Review + Enable
- Review the resources you want to enable Chaos Studio to target and select Enable
- Finally, you should now be back at the Targets pane make sure you select Manage actions and make sure that all actions are ticked and click Save
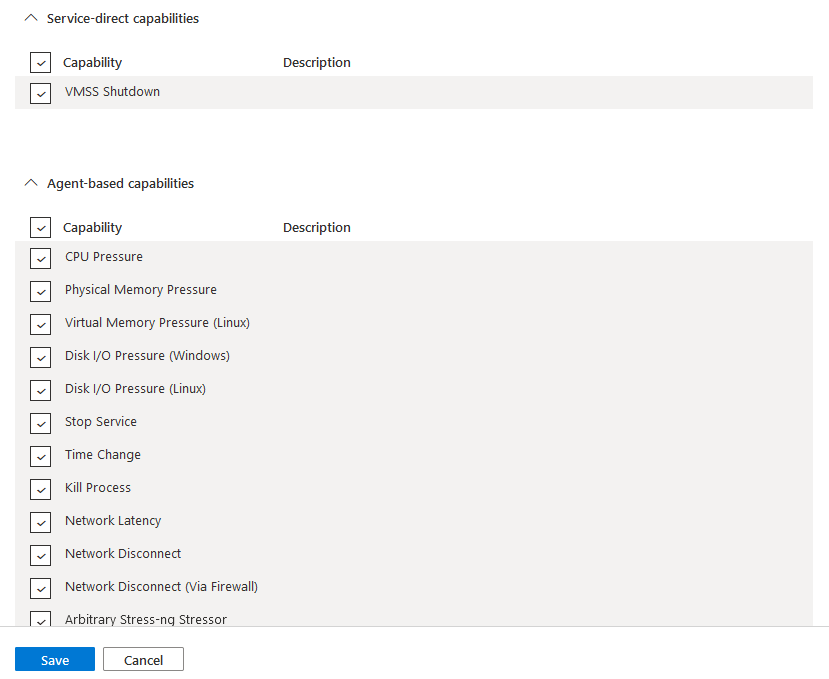
Configure and run Azure Chaos Studio
Action exclusions
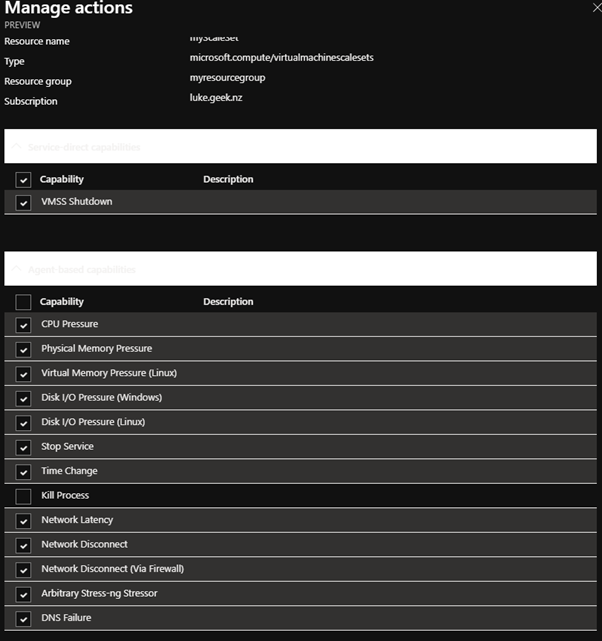
There may be actions that you don't want to be run against specific resources; an example might be you don't want anyone to kill any processes on a Virtual Machine.
- In the Target pane of Chaos Studio, select Actions next to the resource
- Unselect the capability you don't want to run on that resource
- Select Save
Configure Experiments
An experiment is a collection of capabilities to create faults, put pressure on your resources, and cause Chaos that will run against your target resources. These experiments are saved so you can run them multiple times and edit them later, although currently, you cannot reassign the same experiments to other resources.
Note: If you name an Experiment the same as another experiment, it will replace the older Experiment with your new one and retain the previous history.
- In the Azure Portal, search for Chaos Studio.
- On the left band side Blade, select Experiments
- Click + Create
- Select your Subscription
- Select your Resource Group to save the Experiment into
- Type in a name for your Experiment that makes sense; in this case, we will put some Memory pressure on the VM scale set.
- Select your Region
- Click Next: Experiment Designer
- Using Experiment Designer, you can design your Faults; you can have multiple capabilities hit a resource with expected delays, i.e., you can have Memory pressure on a VM for 10 minutes, then CPU pressure, then shutdown.
- We are going to select Add Action
- Then Add Fault
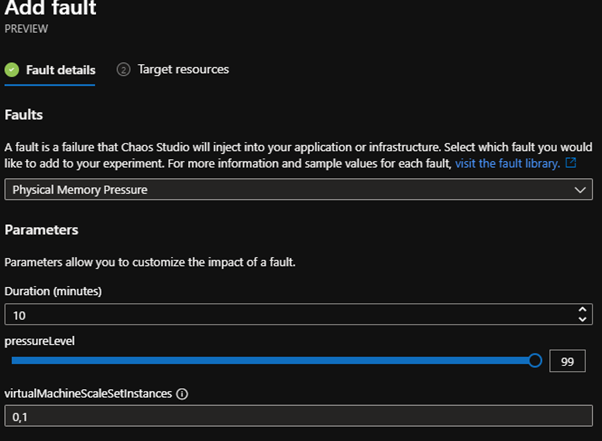
- I am going to select Physical Memory pressure
- Leave the duration to 10 minutes
- Because this will go against my VM scale set, I will add in the instances I want to target (if you aren't targeting a VM Scale set, you can leave this blank, you can find the instance ID by going to your VM Scale set click on Instances, click on the VM instance you want to target and you should see the Instance ID in the Overview pane)
- Select Next: Target resources
- Select your resources (you will notice as this is an Agent-based capability, only agent supported resources are listed)
- Select Add
- I am then going to Add delay for 5 Minutes
- Then add an abrupt VM shutdown for 10 minutes (Chaos Studio will automatically restart the VM after the 10-minute duration).
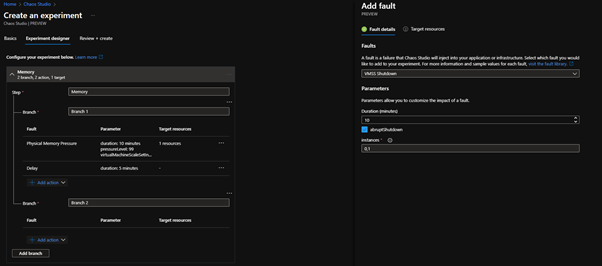
- As you can see with the Branches (items that will run in parallel) and actions, you can have multiple faults running at once in parallel by using branches or one after the other sequentially.
- Now that we are ready with our faulty, we are going to click Review + Create
- Click Create
Note: I had an API error; after some investigation, I found it was having problems with the '?' in my experiment name, so I removed it and continued to create the Experiment.
Assign permissions for the Experiments
Now that the Experiment has been created, we need to give rights to the Managed User account created earlier (and/or the System managed identity that was created when the Experiment was created for service-direct experiments).
I will assign permissions to the Resource Group that the VM Scale set exists in, but you might be better off applying the rights to the individual resource for more granular control. You can see suggested roles to give resources: Supported resource types and role assignments for the Chaos Studio Microsoft page.
- In the Azure Portal, click on the Resource Group containing the resources you want to run the Experiment against
- Select Access control (IAM)
- Click + Add
- Click Add Role Assignment
- Click Reader
- Click Next
- Select Assign access to Managed identity
- Click on + Select Members
- Select the User assigned management identity
- Click Review and assign.
- Because the shutdown is a service-direct, go back and give the experiment system managed identity Virtual Machine Contributor rights, so it has access to shutdown the VM.
Run Experiments
Now that the Experiment has been created, it should appear as a resource in the resource group you selected earlier; if you open it, you can see the Experiment's History, Start, and Edit buttons.
- Click Start

- Click Ok to start the Experiment (and place it into the queue)
- Click on Details to see the experiment progress (and any errors), and if it fails one part, it may move to the next step depending on the fault.
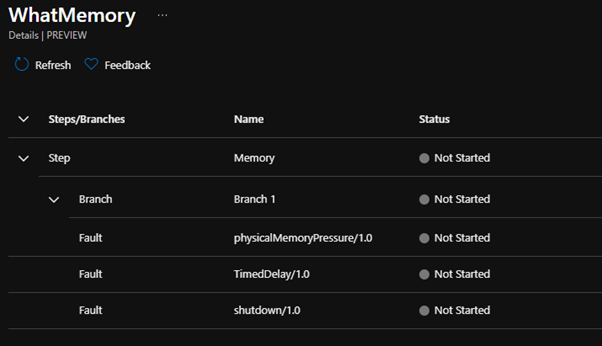
- Azure Chaos studio should now run rampant and do best – cause Chaos!
This service is still currently in Preview. If you have any issues, take a look at the: Troubleshoot issues with Azure Chaos Studio.
Monitor and Auditing of Azure Chaos Studio
Now that Azure Chaos Studio is in use by your organization, you may want to know what auditing is available, along with reporting to Application Insights.
Azure Activity Log
When an Azure Chaos Studio experiment has touched a resource, there will be an audit trail in the Azure activity log of that resource; here, you can see that 'WhatMemory', which is the Name of my Chaos Experiment, has successfully powered off and on my VM.

Azure Alerts
It is easy to set up alerts when a Chaos experiment kicks off; to create an Azure, do the following.
- In the Azure Portal, click on Azure Monitor
- Click on Alerts
- Click + Create
- Select Alert Rule
- Click Create resource
- Filter your resource type to Chaos Experiments
- Filter your alert to Subscription and click Done
- Click Add Condition
- Select: Starts a Chaos Experiment
- Make sure that: *Event initiated by is set to (All services and users)
- Click Done
- Click Add Action Group
- If you have one, assign an action group (these are who and how the alerts will get to you). If you don't have one, click: + Create an action group.
- Specify a resource group to hold your action groups (usually a monitor or management resource group)
- Type the Action Group name
- Type the Action group Display name
- Click Next: Notifications
- Select Notification Type
- Select email
- Select Email
- Type in your email address to be notified
- Click ok
- Type in the Name of the mail to be a reference in the future (i.e. Help Desk)
- Click Review + Create
- Click Create to create your Action group
- Type in your rule name (i.e. Alert – Chaos Experiment – Started)
- Type in a description
- Specify the resource group to place the alert in (again, usually a monitor or management resource group)
- Check Enable alert rule on creation
- Click Create alert rule
Note: Activity Log alerts are hidden types; they are not shown in the resource group by default, but if you check the: Show hidden types box, they will appear.
![]()
