Azure Public DNS as Code
The Microsoft Azure ecosystem offers a lot of capabilities that empower individuals and businesses; one of those capabilities that are often overlooked is DNS(Domain Name System).
Azure DNS allows you to host your DNS domain in Azure, so you can manage your DNS records using the same credentials, billing, and support contract as your other Azure services. Zones can be either public or private, where Private DNS Zones (in Managed Preview) are only visible to VMs that are in your virtual network.
You can configure Azure DNS to resolve hostnames in your public domain. For example, if you purchased the contoso.xyz domain name from a domain name registrar, you can configure Azure DNS to host the contoso.xyz domain and resolve
www.contoso.xyzto the IP address of your web server or web app.
In this article, we are going to focus on Azure Public DNS.
I had my external DNS under source control using Terraform and the Cloudflare provider a few years ago. I wanted to see if I use source control and continuous integration to do the same thing using Azure DNS and Azure Bicep.
My theory was I could make a change to a file and then commit it and have the Azure DNS records created or modified automatically, allowing changes to DNS to be gated, approved, scheduled and audited, allowing changes and rollback a lot easier – without having to give people access to be able to create DNS records with no auditability, turns out you can!
Using an Azure DevOps pipeline and repository and Azure Bicep, we will deploy an Azure Public DNS zone to a resource group automatically on a successful commit and any records.
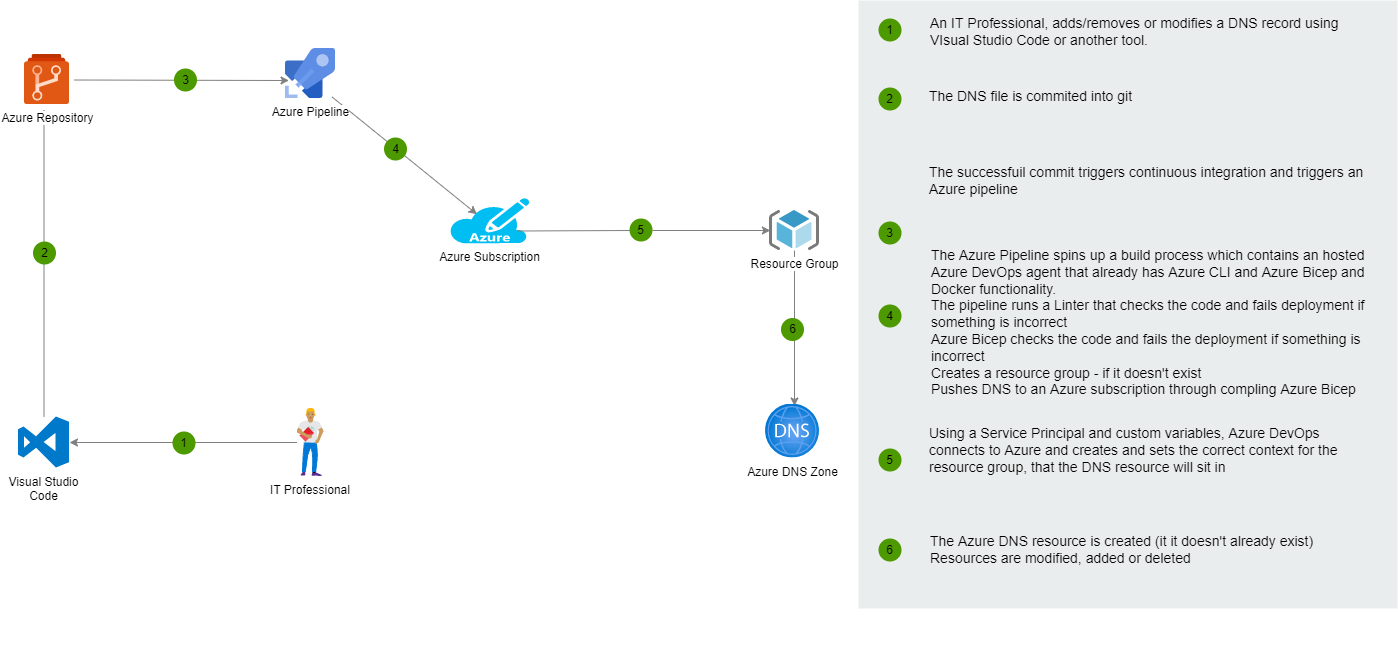
Create Azure Public DNS as Code
Prerequisites
- An Azure DevOps account and permissions to create a service endpoint
- An Azure subscription that you have at least contributor rights to
- A git repository (I am going to use the repository in Azure DevOps, but you could use a nested repository from GitHub)
- The latest Azure PowerShell modules and Azure Bicep/Azure CLI for local editing
- A domain name and rights to change the nameservers to point towards Azure DNS
In this article, I will be using an Azure subscription. I have access to an Azure DevOps (free) subscription and a custom domain I joined named 'badasscloud.com'.
I will assume that you have nothing set up but feel free to skip the sections that aren't relevant.
That that we have the prerequisites sorted let's set it up...
Create Azure DevOps Repository
-
Select + New Project
-
Give your project a name (i.e., I am going with: DNSAsCode)
-
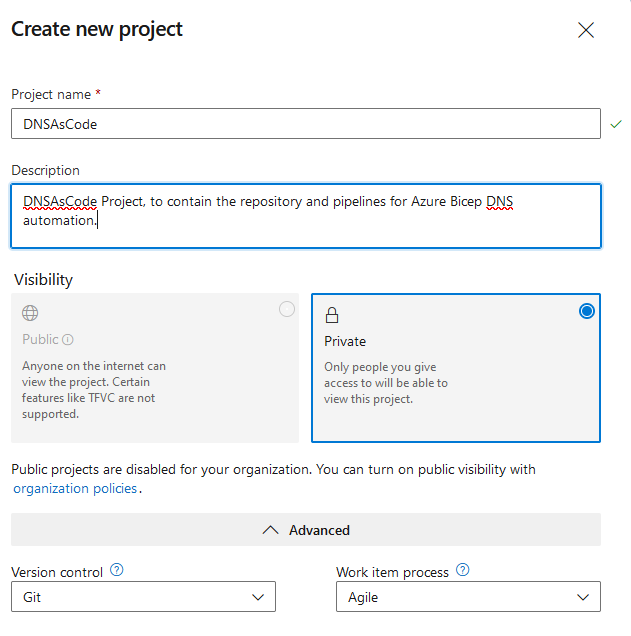
-
Click Create (your project will now be created)
-
Click on Repos
-
Click on Files
-
Find the 'Initialize Main branch with a README or gitignore' section and click Initialize.
-
-
You should now have an empty git repository!
Create Azure DevOps Service Connection
For Azure DevOps to connect to Microsoft Azure, we need to set up a service principal; you can create the service connection in Azure DevOps. However, it usually generates a service principal with a name that could be unrecognizable in the future in Azure, and I prefer to develop them according to naming convention and something that I can look at and instantly recognize its use-case. To do that, we will create it using Azure CLI.
-
Open PowerShell
-
Run the following commands to connect to Azure and create your Service Principal with Contributor access to Azure:
#Connects to Microsoft Azure
az.cmd login
#Set SPN name
$AppRegName = 'SPN.AzureSubscription.Contributor'
#Creates SPN and sets SPN as Contributor to the subscription
$spn = az.cmd ad sp create-for-rbac --name $AppRegName --role 'contributor'
#Exports Password, Tenant & App ID for better readability - required for Azure DevOps setup
$spn | ConvertFrom-Json | Select-Object -Property password, tenant, appId
az.cmd account show --query id --output tsv
az.cmd account show --query name --output tsv -
Make sure you record the password, application ID and the subscription ID/name; you will need this for the next step - you won't be able to view it anywhere else; if you lose it, you can rerun the sp create command to generate a new password. Now that we have the SPN, we need to add the details into Azure DevOps.
-
Navigate to the DNS As Code project you created earlier
-
Click on Project Settings (bottom right-hand side of the window)
-
Click on Service connections
-
Click on: Create a service connection
-
Select Azure Resource Manager
-
Click Next
-
Click on: Service Principal (Manual) and click Next
-
Enter in the following details that we exported earlier from the creation of the service principal:
- Subscription ID
- Subscription Name
- Service Principal ID (the appId)
- Service principal key (password)
- Tenant ID
-
Click Verify to verify that Azure DevOps can connect to Azure; you should hopefully see a Verification succeeded.
-
Give the Service connection a name (this is the display name that is visual in Azure DevOps)
-
Add a description (i.e. created by, created on, created for)
-
Click on Verify and save
-
You now have a new Service connection!
-

-
Note: The password for the service principal is valid for one year, so when they expire, you can come into the Azure DevOps service connection and update it here.
Add Azure Bicep to Repository
Now that Azure DevOps has the delegated rights to create resources in Microsoft Azure, we need to add the Azure Bicep for Azure DNS Zone.
I have created the below Azure Bicep file named: Deploy-PublicDNS.bicep
Don't edit the file yet. You can add your DNS records later - after we add some variables into the Azure Pipeline.
This file will:
- Create a new public Azure DNS zone, if it doesn't exist
- Add/Remove and modify any records
I have added CNAME, A Record and TXT Records as a base.
///Variables - Edit, these variables can be set in the script or implemented as part of Azure DevOps variables.
//Set the Domain Name Zone:
param PrimaryDNSZone string = ''
//Deploys to the location of your resource group, that is specified during the deployment.
var location = 'Global'
//Variable array for your A records. Add, remove and amend as needed, any new record needs to be included in {}.
var arecords = [
  {
    name: '@'
    ipv4Address: '8.8.8.8'
  }
  {
    name: 'webmail'
    ipv4Address: '8.8.8.8'
  }
]
//Variable array for your CNAME records. Add, remove and amend as needed, any new record needs to be included in {}.
var cnamerecords = [
  {
    name: 'blog'
    value: 'luke.geek.nz'
  }
]

//

var txtrecords = [
  {
    name: '@'
    value: 'v=spf1 include:spf.protection.outlook.com -all'
  }

  ]

///Deploys your infrastructure below.

//Deploys your DNS Zone.

resource DNSZone 'Microsoft.Network/dnsZones@2018-05-01' = {
  name: toLower(PrimaryDNSZone)
  location: location
  properties: {
    zoneType: 'Public'
  }
}

//Deploys your A records that are listed in the arecord variable table above.

resource DNSARecords 'Microsoft.Network/dnsZones/A@2018-05-01' = [for arecord in arecords: {
  name: toLower(arecord.name)
  parent: DNSZone
  properties: {
    TTL: 3600
    ARecords: [
      {
        ipv4Address: arecord.ipv4Address
      }

    ]
  targetResource: {}
  }
}]

//Deploys your CNAME records that are listed in the cnamerecord variable table above.

resource CNAMErecords 'Microsoft.Network/dnsZones/CNAME@2018-05-01' = [for cnamerecord in cnamerecords: {
  name: toLower(cnamerecord.name)
  parent: DNSZone

  properties: {
    'TTL': 3600
    CNAMERecord: {

      cname: cnamerecord.value

    }
  targetResource: {}
  }
}]

resource TXTrecords 'Microsoft.Network/dnsZones/TXT@2018-05-01' = [for txtrecord in txtrecords: {
name: toLower(txtrecord.name)
parent: DNSZone

properties: {
   'TTL': 3600
   TXTRecords: [
      {
 value: [
        txtrecord.value
       ]
      }

    ]
}


}]


output cnamerecords string = CNAMErecords[0].properties.CNAMERecord.cname
output arecords string = arecords[0].ipv4Address
To add the Azure Bicep file into Azure DevOps, you can commit it into the git repository; see a previous post on 'Git using Github Desktop on Windows for SysAdmins' to help get started. However, at this stage, I will create it manually in the portal.
- Sign in to Azure DevOps
- Navigate to the DNS As Code project you created earlier
- Click on Repos
- Click on Files
- Click on the Ellipsis on the right-hand side
- Click New
- Click File
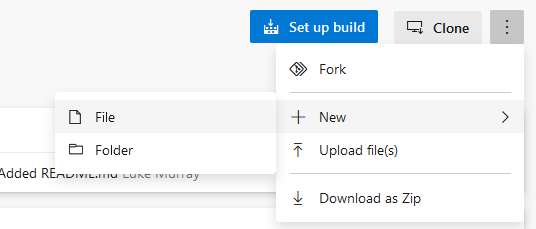
- Type in the name of your file (including the bicep extension), i.e. Deploy-PublicDNS.bicep
- Click Create
- Copy the contents of the Azure Bicep file supplied above and paste them into the Contents of Deploy-PublicDNS.bicep in Azure DevOps
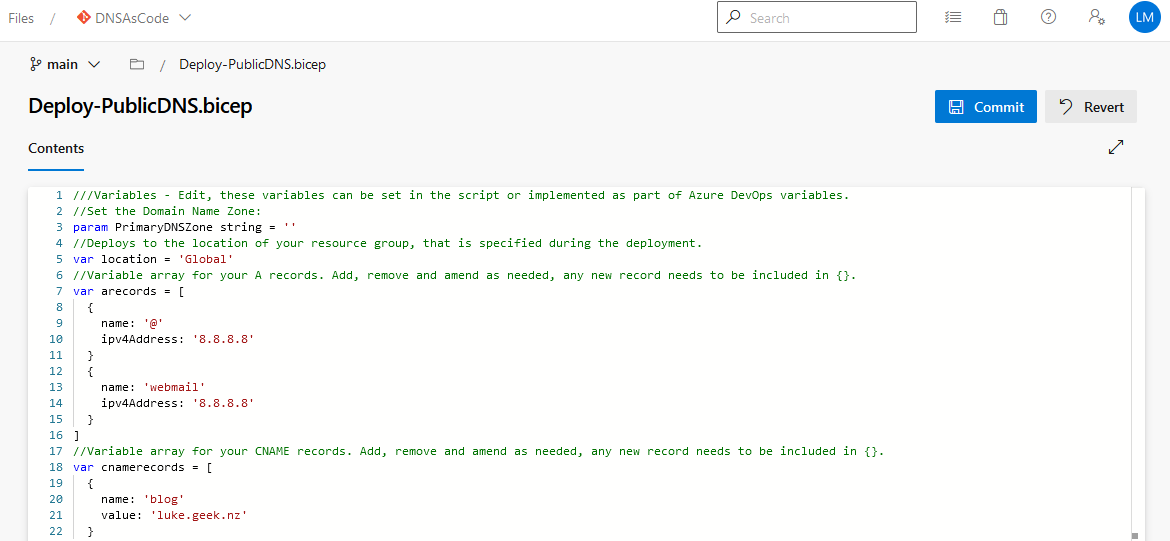
- Click Commit
- Click Commit again
- While we are here, let's delete the README.md file (as it will cause issues with the pipeline later on), click on the README.md file.
- Click on the Ellipsis on the right-hand side
- Click Delete
- Click Commit
- You should now only have your: Deploy-PublicDNS.bicep in the repository.
Create Azure DevOps Pipeline
Now that we have the initial Azure Bicep file, it's time to create our pipeline that will do the heavy lifting. I have created the base pipeline that you can download, and we will import it into Azure DevOps.
# Variable 'location' was defined in the Variables tab
# Variable 'PrimaryDNSZone' was defined in the Variables tab
# Variable 'ResourceGroupName' was defined in the Variables tab
# Variable 'SPN' is defined in the Variables tab
trigger:
  branches:
    include:
    - refs/heads/main
jobs:
- job: Job_1
  displayName: Agent job 1
  pool:
    vmImage: ubuntu-latest
  steps:
  - checkout: self
  - task: AzureCLI@2
    displayName: 'Azure CLI '
    inputs:
      connectedServiceNameARM: $(SPN)
      scriptType: pscore
      scriptLocation: inlineScript
      inlineScript: >2-
         az group create --name $(ResourceGroupName) --location $(location)
                        az deployment group create  `
                        --template-file $(Build.SourcesDirectory)\Deploy-PublicDNS.bicep `
                        --resource-group $(ResourceGroupName) `
                        --parameters PrimaryDNSZone=$(PrimaryDNSZone)
      powerShellErrorActionPreference: continue
This pipeline will run through the following steps:
- Spin up an Azure-hosted agent running Ubuntu (it already has the Azure CLI and PowerShell setup)
- Create the Azure resource group to place your DNS zone into (if it doesn't already exist)
- Finally, do the actual Azure Bicep deployment and create your Primary DNS zone resource, and, if necessary, modify any resources.
Copy the contents of the YAML pipeline above, and let's import it to Azure DevOps.
- Sign in to Azure DevOps
- Navigate to the DNS As Code project you created earlier
- Click on Pipelines
- Click on the Create Pipeline
- Select Azure Repos Git (YAML)
- Select your DNSAsCode repository
- Select Starter pipeline
- Overwrite the contents of the starter pipeline with the YAML file supplied
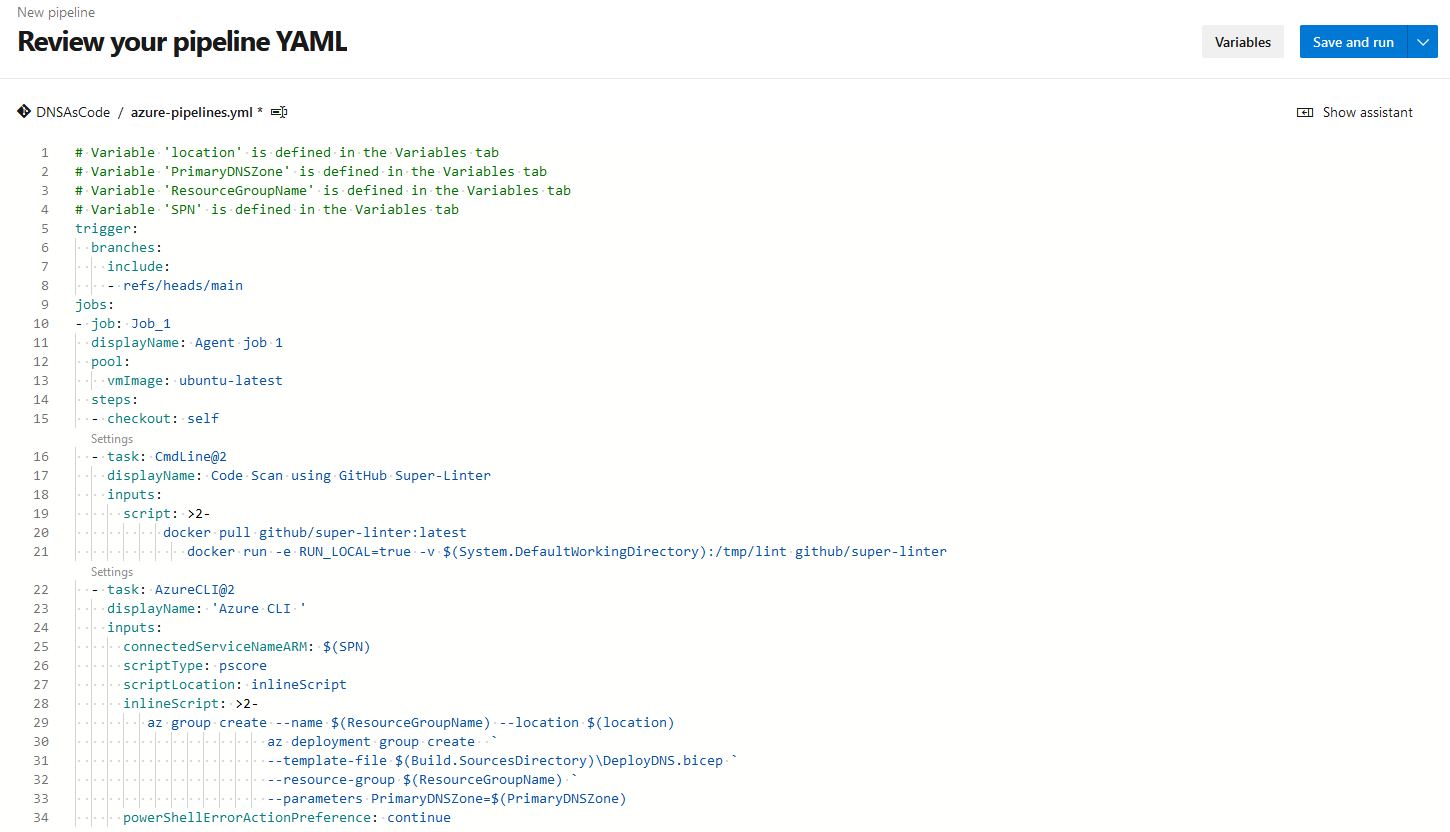
- Click on the arrow next to Save and Run and select Save
- Select Commit directly to the main branch
- Click Save
- You may get an error about the trigger. You can ignore it - we will need to set the variables and trigger now.
- Click on Pipelines, select your newly created pipeline
- Select Edit
- Click Variables
- Click on New Variable
- We need to add four variables. To make the deployment more environment-specific, add the following variables into Azure DevOps (these variables will be accessible by this pipeline only).
| Variable | Note |
|---|---|
| location | Location where you want to deploy the Resource into – i.e. ‘Australia East’ |
| PrimaryDNSZone | The name of your domain you want the public zone to be, i.e. badasscloud.com |
| ResourceGroupName | The name of the Resource Group that the DNS Zone resource will be deployed into, i.e. DNS-PRD-RG |
| SPN | The name of the Service Connection, that we created earlier to connect Azure DevOps to Azure, i.e., SPN.AzureDNSCode |
-
-
Click Save
Test & final approval of Azure DevOps Pipeline
Now that the Azure Pipeline has been created and variables set, it's time to test, warning this will run an actual deployment to your Azure subscription!
We will deploy a once-off to grant the pipeline access to the service principal created earlier and verify that it works.
-
Navigate to the DNS As Code project you created earlier
-
Click on Pipelines
-
Click on your Pipeline
-
Select Run pipeline
-
Click Run
-
Click on Agent job 1
-
You will see a message: This pipeline needs permission to access a resource before this run can continue
-
Click View
-

-
Click Permit
-
Click Permit again, to authorise your SPN access to your pipeline for all future runs
-
Your pipeline will be added to the queue and once an agent becomes available will start to run.
As seen below, there were no resources before my deployment and the Azure Pipeline agent kicked off and created the resources in the Azure portal.
Note: You can expand the Agent Job to see the steps of the job, I hid it as it revealed subscription ID information etc during the deployment.
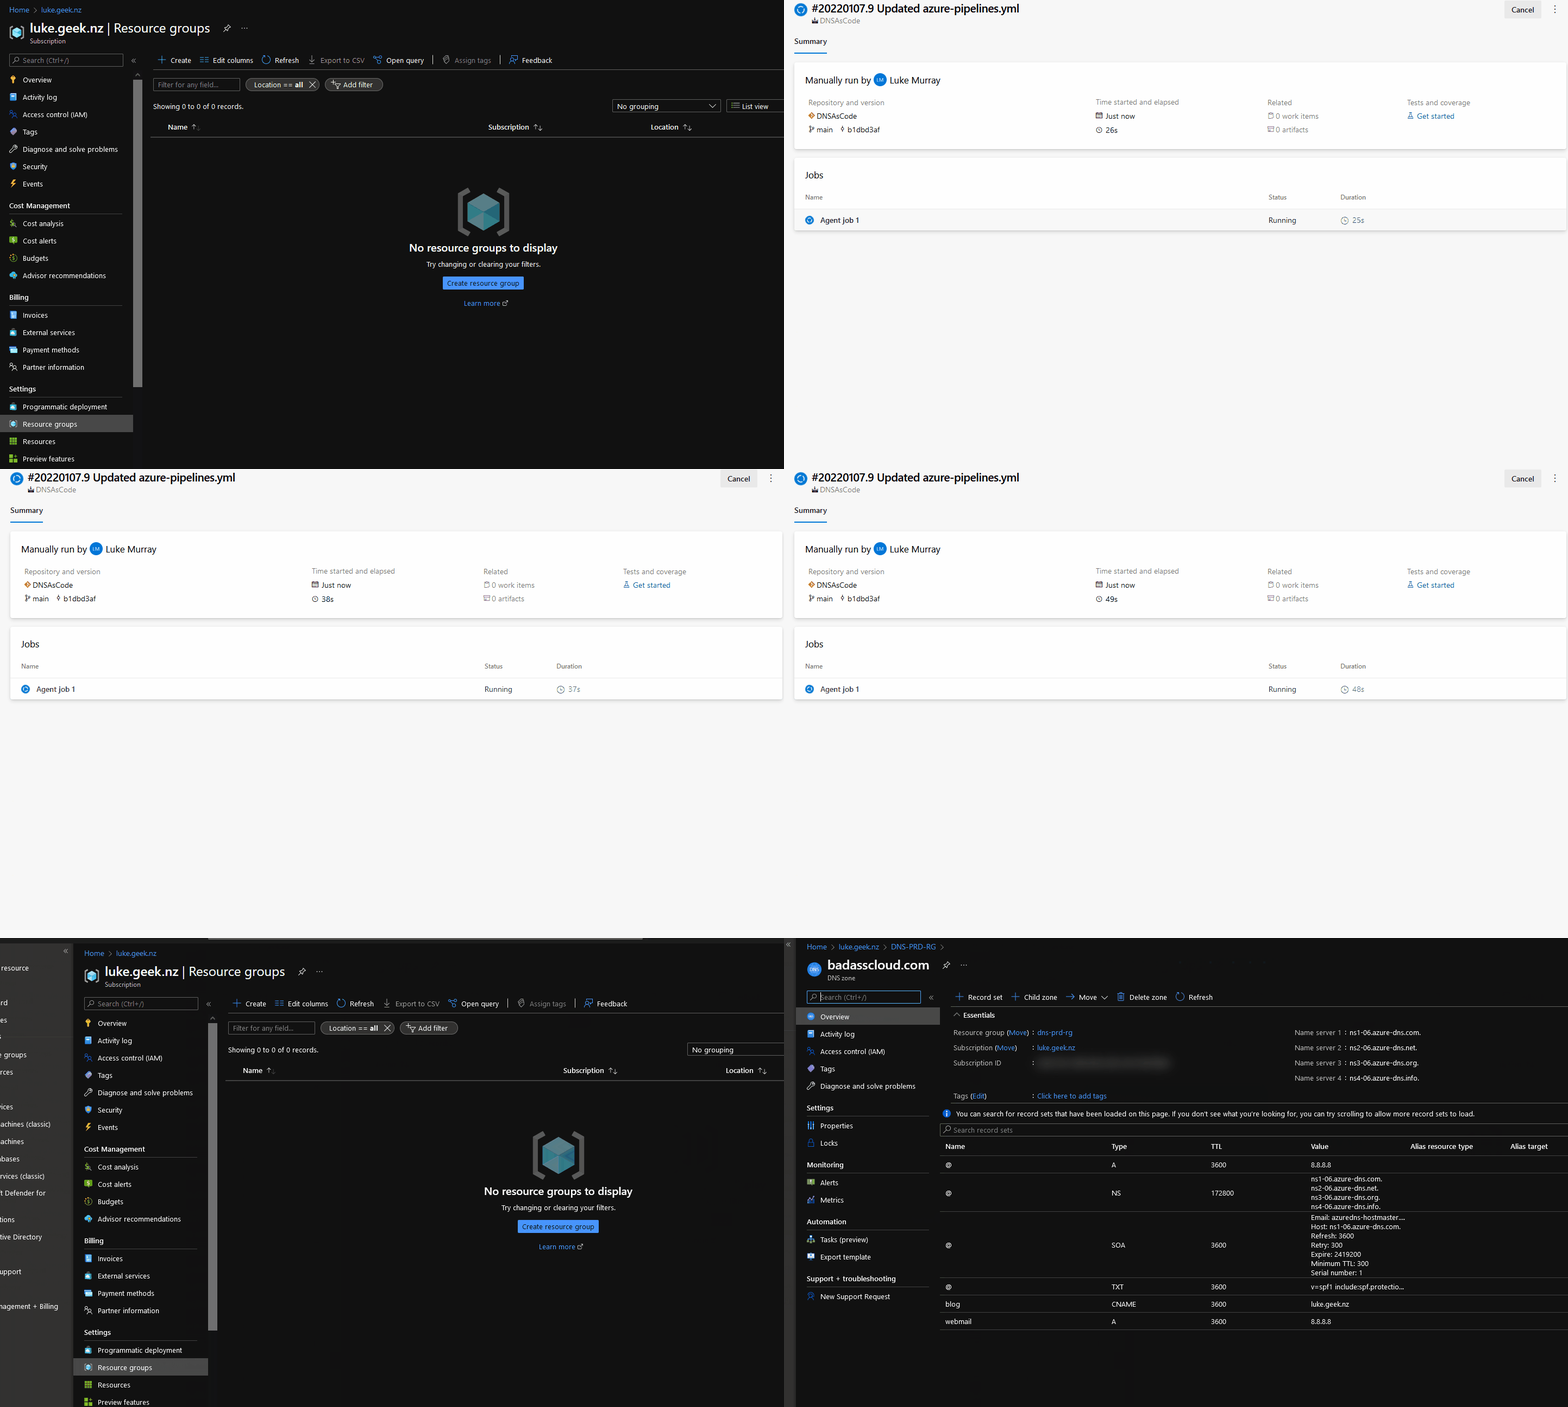
Remember to update your nameserver records for your domain to point towards the nameserver entries in the Azure DNS zone resource, to use Azure DNS!
Edit the Bicep file
Now that you have successfully deployed your Azure Bicep file, you can go into the Azure Bicep and update the A, CNAME records to match your own environment - any new change to this repository will automatically trigger Continous Integration and deployment, you can override this behaviour by editing the Pipeline, clicking Edit Trigger and unselect 'Enable; continuous integration
Each variable (var object) (cnames, arecords) is enclosed in brackets, this array allows you to add multiple records, for example, if I wanted to add another name record, it would look like this:
//Variable array for your CNAME records. Add, remove and amend as needed, any new record needs to be included in {}.
var cnamerecords = [
 {
 name: 'blog'
 value: 'luke.geek.nz'
 }
  {
 name: 'fancierblog'
 value: 'azure.com'
 }
]
Simply add another object under the first, as long as it is included in the brackets, then upon deployment Azure Bicep will parse the variable array and for each record, create/modify the DNS records, you only ever need to edit the content in the variable without touching the actual resource deployment.
As records are added and removed over time, you will develop a commit history and with the power of Azure DevOps, can implement scheduling changes at certain times and approval!
Hopefully, this article helps you achieve Infrastructure as Code for your Azure DNS resource, the same concept can be applied for other resources using Azure Bicep as well.
