Microsoft Entra ID Application Proxy Implementation
Are you running internal web-based applications that you want to give access to users working remotely securely without the need for a VPN or firewall? Do you want to enforce or use Azure Conditional Access policies to protect and manage access?
Let me introduce the Microsoft Microsoft Entra ID Application Proxy...
Application Proxy is a feature of Azure AD that enables users to access on-premises web applications from a remote client. Application Proxy includes both the Application Proxy service which runs in the cloud, and the Application Proxy connector, which runs on an on-premises server. Azure AD, the Application Proxy service, and the Application Proxy connector work together to securely pass the user sign-on token from Azure AD to the web application. Application Proxy also supports single sign-on.
Application Proxy is recommended for giving remote users access to internal resources. Application Proxy replaces the need for a VPN or reverse proxy.
Overview
The Microsoft Entra ID Application Proxyhas been around for a few years, but appears to be a hidden gem; the Application Proxy allows users_(by using Microsoft Entra ID and an Application Proxy Connector(s))_ to connect to internally hosted web applications, by the connector relaying the traffic.

Application Proxy supports the following types of applications:
- Web applications
- Web APIs that you want to expose to rich applications on different devices
- Applications hosted behind a Remote Desktop Gateway
- Rich client apps that are integrated with the Microsoft Authentication Library (MSAL)
Azure Application Proxy can often be overlooked to solve your business requirements without the need to implement costly third-party firewalls (it also doesn't have to be an on-premises workload, for example, if the web application is running on a VM in Azure, it will also work).
The Azure Application proxy connector is a lightweight agent installed on a Windows Server machine that is logically close to the backend service that you want to deliver through the proxy.
The Connector gives access to and relays the information to the Application proxy service in Microsoft Azure via HTTP/HTTPS as long as it has access to the following:
| URL | Port | How it's used |
|---|---|---|
| *.msappproxy.net *.servicebus.windows.net | 443/HTTPS | Communication between the connector and the Application Proxy cloud service |
| crl3.digicert.com crl4.digicert.com ocsp.digicert.com crl.microsoft.com oneocsp.microsoft.com ocsp.msocsp.com | 80/HTTP | The connector uses these URLs to verify certificates. |
| login.windows.net secure.aadcdn.microsoftonline-p.com *.microsoftonline.com *.microsoftonline-p.com *.msauth.net *.msauthimages.net *.msecnd.net *.msftauth.net *.msftauthimages.net *.phonefactor.net enterpriseregistration.windows.net management.azure.com policykeyservice.dc.ad.msft.net ctldl.windowsupdate.com www.microsoft.com/pkiops | 443/HTTPS | The connector uses these URLs during the registration process. |
| ctldl.windowsupdate.com | 80/HTTP | The connector uses this URL during the registration process. |
Setup Azure Application Proxy
I will set up an Azure Application Proxy to grant access to my Synology NAS (Network Attached Storage) device web page in this guide.
Although I am using my local NAS web administration page, it can be any webpage (Unifi Controller, hosted on Apache, IIS etc.) accessible from the connector.
- I have a Windows Server 2022 Domain Controller.
- Synology NAS (not domain joined, but accessible on the network via a DNS record from the domain)
- Microsoft 365 Developer subscription with appropriate licenses
Pre-requisites for Azure Application Proxy setup
The following resources and rights will be needed to set up Azure Application Proxy:
- An Microsoft Entra ID tenant
- A minimum of Application Administrator rights is required to set up the Application and user and group assignments.
- A server running Windows Server 2012 R2 or above to install the Application Proxy connector on (and the permissions to install)
- If you are using a third-party domain (you will need a public SSL certificate) and, of course, the ability to edit external DNS records, the domain will need to be added to Microsoft Entra ID as a custom domain in order to be used.
- Microsoft Entra ID Premium P1 license or M365 Business Premium/E3 license for each user using Microsoft Entra ID Application Proxy.

(Note: Normal Azure AD service limits and restrictions apply).
I will be configuring the Azure Application Proxy on a domain controller running Windows Server 2022.
Disable IE Enhanced Security Configuration
The Azure Application Proxy connector requires you to log in to Microsoft Azure, and I will be installing this on a Windows Server 2022 domain controller; if this Enhanced Security Configuration is enabled (as it should be), you will have problems authenticating to Microsoft Azure, so the easiest thing is to turn it off temporarily.
- Open Server Manager
- Click on Local Server
- Click on: IE Enhanced Security Configuration
- Select Off for: Administrators
- Close Microsoft Edge (if you have it opened)

Install Azure Application Proxy Connector
- Login to Azure Portal (on the server that you want to install the Connector on)
- Navigate to: Microsoft Entra ID
- Select Application Proxy

- Click on: Download connector service.
- Accept the system requirements and click Accept Terms & Download
- A file named: 'AADApplicationProxyConnectorInstaller.exe' should have been downloaded. Run it.
- Select: I agree to the license terms and conditions and select Install

- Wait for the Microsoft Microsoft Entra ID Application to display and log in with an Microsoft Entra ID account with Application Administrator rights.
- The Microsoft Microsoft Entra ID Application Connector will now be registered in your Microsoft Entra ID tenancy.

- Click Close
- Now re-enable IE enhanced security configuration.
You should now see two new services appear in services as Automatic (Delayed Start):
- WAPCsvc - Microsoft AAD Application Proxy Connector
- WAPCUpdaterSvc - Microsoft AAD Application Proxy Connector Updater
And the following processes running:
- ApplicationProxyConnectorService
- ApplicationProxyConnectorUpdateService

If you are running Server Core, Microsoft Microsoft Entra ID Application Proxy can be installed via PowerShell.
The Azure Application Proxy Connector agent gets updated automatically when a new major version is released by Microsoft.
Configure Connector Group
Now that you have created the Connector, the Application Proxy has put our Connector in a group that has defaulted to Asia; because you can have more than one Application Proxy Connector for redundancy and different applications, we will create a new Connector Group that is set to use the Australia region if Asia works for you – feel free to skip this step.
- Login to Azure Portal (on any PC/server)
- Navigate to: Microsoft Entra ID
- Select Application Proxy
- You should now see: Default and your Region
- If you expand the Default Group, will you see your Connector:

- Click on + New Connector Group
- Give it a name (i.e., On-premises)
- Select the Connector you had earlier and select the region closest to you (currently, the following regions can be chosen: Asia, Australia, Europe, North America)

- Click + Create
- Clicking create will create your new On-premises connector group and add the Connector to the group.
Configure your Azure Application Proxy Application
Now that you have your Connector setup, its time to set up your application
- Login to Azure Portal (on any PC/server)
- Navigate to: Microsoft Entra ID
- Select Application Proxy
- Click on: + Configure an app
- Fill in the details that match your application:
- Name: This is the application that users will see (i.e. I am going with Pizza, which is the name of my NAS)
- Internal URL: This is the internal URL used to access your application inside the network (in my example, it is: http://pizza.corp.contoso.com/)
- External Url: This is the external URL that will be created so that users can access the application form; I will go with Pizza. Note this URL down.
- Pre-Authentication: You don't have to authenticate with Azure AD, you can use passthrough, but it is not something I would recommend without delving into requirements, testing – I am going to select: Microsoft Entra ID.
- Connector Group: Select the connector group you created earlier or that your Connector is signed to.
- Leave all Additional Settings as default – they can be changed later if you need to.
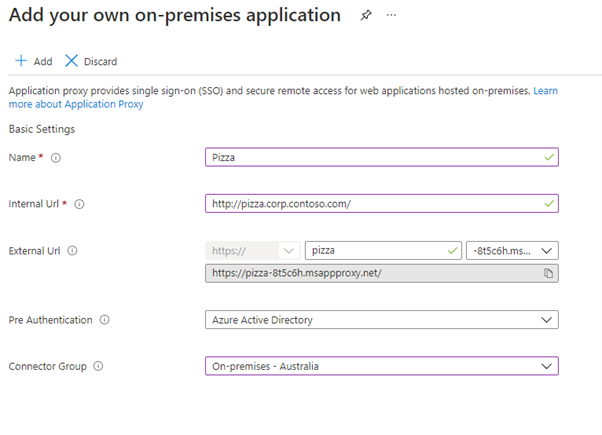
- Verify that everything is filled out correctly and, click + Add
- Azure Application Proxy has now created a new Enterprise Application for you; based on the name mentioned earlier, if you navigate to the external URL mentioned earlier, you should get a prompt similar to below:

- It is now time to assign the permissions for users to access the Application via Microsoft Entra ID!
Assign rights to your Azure Application Proxy Application
- Login to Azure Portal (on any PC/server)
- Navigate to: Microsoft Entra ID
- Select Enterprise Applications
- Find the application that was created earlier by the Azure Application Proxy service.

- Click on the Application
- Click on: Users and Groups
- Click Add Assignment
- Add a user or group (preferred) you want to have access to this application.
- Click Assigned

- Click on Application Proxy
- Here you can see and edit the information you created earlier when you created the application, copy the External URL
- Open Microsoft Edge (or another browser of your choice)
- Paste in the External URL
- Log in with the Microsoft Entra ID account that was assigned to the Enterprise application.
- You should now have access to your on-premises web application from anywhere in the world, and because you are using Microsoft Entra ID, your conditional access policies and restrictions will be in effect:

Note: Because the Synology web interface was running on port: 5000, I had to go back and add the port to the internal URL, as the Application Proxy was attempting to route to the incorrect port. Note: You may also notice that Microsoft has supplied an *.msappproxy.net certificate, even if your backend service doesn't have one..
Setup Password-based Single-Sign on
Azure Application Proxy supports various single sign-on methods, including Kerberos SPN integration.
However, my Synology NAS uses standalone accounts, so I will set Password-based single sign-on, allowing the MyApps extension to store my credentials (if you want single-sign-on using the password-based sign in, then every user will need to have this extension configured).
- Download and install the MyApps Secure Sign-in extension
- Log in using your Microsoft account to the MyApps extension

- Login to Azure Portal (on any PC/server)
- Navigate to: Microsoft Entra ID
- Select Enterprise Applications
- Find the application that was created earlier by the Azure Application Proxy service.
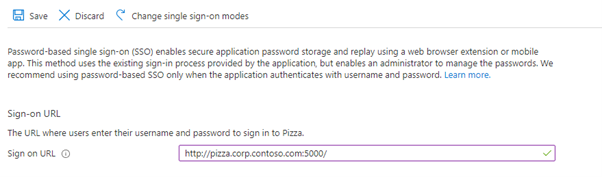
- Click on Single sign-on
- Select Password-based

- Type in the URL of the authentication webpage and click Save
- The Azure AD Application Proxy didn't find my sign-in login and password fields, so I have to manually configure them, select: Configure Pizza Password Single Sign-on Settings.
- Select: Manually detect sign-in fields
- Select Capture sign-in fields

- Your MS Edge Extension should show Capture Field:

- Enter in your username
- Press Enter
- Enter in your password
- Select the MS Apps extension and select Save
- Navigate back to the Azure Portal
- Select 'I was able to sign in.'
- If successful, Azure AD should now have mapped the fields:

- Click Save
- Next time you log in to the application, the My Apps Secure Sign-in Extension will have cached the credentials. It should automatically log you into the application, meaning you should only log in once with your Azure AD credentials.
Access your Azure Application Proxy published application
- You can now go to My Apps (microsoft.com), and you will see your application.
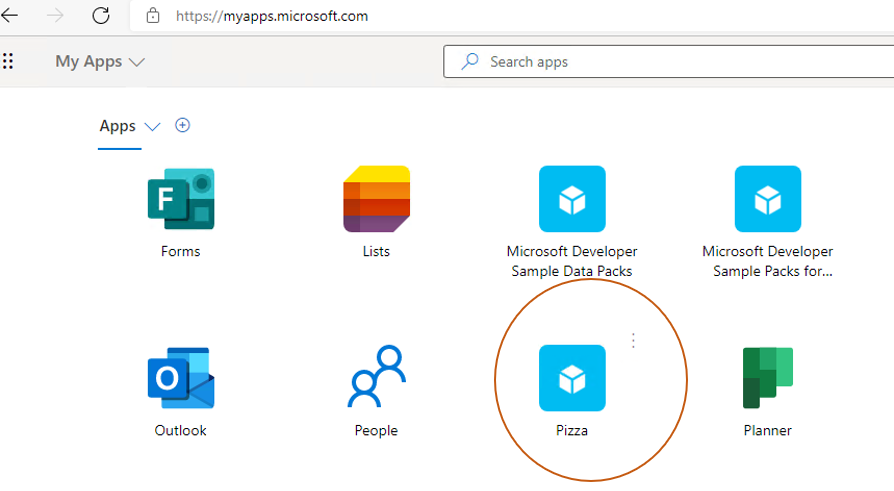
- Your application will also appear in the Microsoft 365 Waffle (it may take up to an hour to appear):

I recommend you go into the Enterprise Application and upload a better image/logo so your users can quickly tell it apart.