How to create a Azure Virtual Desktop farm
Previously known as Windows Virtual Desktop, Azure Virtual Desktop is the successor of Microsoft Remote Desktop; although compatible with Server OS (Operating System), it is the first to support Windows 10_(and soon Windows 11)_ multisession, reducing application compatibility issues and giving consistent user experience.
In this guide, I will run you through creating Azure Virtual Desktop from scratch, along with some prerequisites that will help you manage AVD after you create it.
Before I begin, I recommend reading the Azure Virtual Desktop Azure product page "here" to understand the pricing model, features and additional resources that could help you in your journey.
When selecting a region for your Session Hosts (Virtual Machines), I recommend you have a look at the: Azure Virtual Desktop Experience Estimator to help validate the proper region for your Session Hosts and the round trip time (I am in New Zealand, so my recommended region is: Australia East, which is what I will be using for this guide).
If you don't already have a Microsoft Azure subscription, you can sign up for a Free subscription "here".
Assuming you already have an Azure subscription and the appropriate access to create resources in that subscription, gets begin!
Create Microsoft Entra ID Domain Services
- Log in to the Azure Portal
- Click on Create a resource
- Search for: Azure AD Domain Services. You can change the Publisher Type to Microsoft, so it doesn't display any other marketplace offerings.


- Click Create
- If you already have a Resource Group, select it - in this Demo, we are going to create one: aad_prod
- Type in the DNS domain name - this is the FQDN of your domain; in my demo, I will choose internal.luke.geek.nz.
- Because I am in New Zealand, the closest region to me is Australia East, so that’s the region I will select. Make sure you select the appropriate region for where your Azure Virtual Desktop workloads are.
- Select the SKU and Resource Type; you can see the Pricing Calculator and the "Help Me choose.." links to verify your SKU and Forest type (however, in most cases, such as Azure Virtual Desktop, your Forest Type will be 'User').

- Click Next
- We will set up the Networking; if you have an already existing Virtual Network, select it. Azure AD Domain Services uses a dedicated subnet within a virtual network to hold all of its resources. If using an existing network, ensure that the network configuration does not block the ports required for Azure AD Domain Services to run. Learn more
- I will let it create a Virtual Network and its Subnet (/24); click Next.

- Azure AD Domain Services will create a new Azure AD Group called: AAD DC Administrators - this group will be used for Administrator level permissions on the Azure AD Domain Services domain (it automatically adds the account you are using to create Azure AD Domain Services into this group).
- You can configure Membership of this group now and configure who gets alerted if there are issues with Azure AD Domain Services.
- When you are ready, select Next.

- Depending on the amount of Microsoft Entra ID users you have in your organisation, and whether they will need Azure AD Domain Services, you can choose to synchronise ALL Azure AD Groups and Users, or specific groups of users (this can be changed later), because my Azure AD Organisation is fairly low, I am going to Sync everything, click Next.
- One thing to note here is the recommendation on the number of Objects (Users, Groups) that will get synced to Azure AD Domain Services; for the Standard SKU, the suggested Object Count is 0 to 25,000 - for the Enterprise SKU, it is 25,000 to 100,000. So although there is no hard limit, it might be worth upgrading the SKU you are running for the additional backups and authentication if fit in the Enterprise space.

- We can now configure the Security Settings, the only setting I am going to change here is TLS 1.2 Only Mode to Enable

- Enter any applicable Tags and click Review & Create to validate your configuration.
- Review your configuration, and if you are happy with it: Select Create.
- Confirm that you are happy with the following and click Ok
 Note: Azure AD Domain Services can take up to an hour to provision.
 - Once your Azure AD Domain Services has been configured, we must make some final configuration changes to point the Virtual Network DNS to use the Azure AD Domain Services. So first, open your newly created Azure AD Domain Services.
- Click on Overview and: Configuration issues for your managed domain were detected. Run configuration Diagnostics

- Click on Run
- It should find a DNS record issue; click Fix to set the DNS settings of the Virtual Network to use the Azure AD Domain Services. Please be careful here, especially if you have already existing DNS settings; you might have to add it manually.
Create a Utility server to help Administer Azure Virtual Desktop
We need to create a Virtual Machine to help manage the AAD Domain and deploy Group Policies to help manage and configure the Azure Virtual Desktop farm.
- Log in to the Azure Portal
- Click on Create a resource.
- Search for: Windows Server 2019 Datacenter and select Create
- If you already have a Resource Group, select it - in this Demo, we are going to create one: aad_infra
- Specify a name for the Virtual Machine (I am going to use: UTILITY-P01)
- Select a Region (use the same Region as the Azure AD Domain Services and Azure Virtual Desktop resources)
- For the Image, you can select either Windows Server 2019 Datacenter -Gen 1 or Gen 2; in my case, I am going with Gen2 (although it doesn't matter).
- I am a firm believer in selecting the smallest size possible for the size, then scaling up when/where needed; I am going to go with a Standard_B2ms.

- Now we need to enter in the Administrator (local account) Username and Password.
- Select 'None' for Public inbound ports
- If you have existing Windows Server licenses, you can select Hybrid Use Benefit; if not, select Next: Disks.

- For the disks, I only need the OS disk, so I don't need to add a Data Disk (although you could use this to store your Application install files etc.); however, to reduce cost, I am going to change the Disk type to Standard SSD (locally-redundant storage) and select Next: Networking.

- For the Virtual Network, make sure you select the same Virtual Network that the Azure AD Domain Services has been installed to; I will select the: aadds-subnet created earlier for my Utility server.
- Set 'None' for the Public IP and select Next: Management

- Feel free to leave this all as Default
- Just be wary of the Auto-shutdown settings, which will automatically shut down the VM daily (I will keep mine selected as this is just a demo, and I only need the UTILITY server for initial configuration, it doesn't need to be running 24.7).
- If you have a Recovery Services Vault, now is a good time to add the Utility server to Backups, so you don't forget it later, select Review & Create
- Verify the configuration is correct and select Create
Create Azure Bastion to connect to the Utility server
Once the VM has been created, we now need to connect to it securely, so we will create a Bastion instance, which will allow us to connect to it without publishing the RDP (Remote Desktop Protocol) over the internet.
- Log in to the Azure Portal
- Click on Create a resource
- Search for: Bastion

- Click Create
- This is a Networking resource to place it in the same Resource Group as my Virtual Network.
- Please type in a Name for the Bastion instance; I will call mine: Bastion
- Select the Region that matches the Virtual Network region
- Select the Virtual Network
- It now warns you about creating an: AzureBastionSubnet with a prefix of at least /27, so we need to create one; click on Manage Subnet Configuration.
- Click + Subnet
- For the Name type in: AzureBastionSubnet
- For the Subnet address range: 10.0.1.0/27 If you get an error that indicates the address is overlapping with the aadds-subnet, it may be because the Address space is only a /24; click Cancel and click on Address Space in the Virtual Network and change the /24 to/16 to increase the address range.
- Click Save to create the subnet

- Up the Top, click Create a Bastion. To go back to the Bastion setup, your Subnet should be selected automatically.
- You do need a Public IP for Bastion, so confirm the name is appropriate, then click Review + Create

- Click on Create to create your Bastion instance!
Note: Bastion may take 10-20 minutes to provision.
Configure the Utility server
Now that we have a Bastion instance, it is time to connect and configure the Utility server and create a new Azure AD user for Azure Virtual Desktop configuration.
-
First thing I am going to create a separate Azure AD account to manage the Utility server and join the Azure Virtual Desktop session hosts to the domain; this is to separate my own account. Azure AD Domain Services relies on password hash. So you won't be able to log in using Azure AD Domain Services unless you and the people using it have reset their passwords AFTER Azure AD Domain Services has been created.
-
Navigate to the Azure Portal and open Microsoft Entra ID
-
Click on Users
-
Click on + New User
-
Type in the username of a user, I am going to use: 'avdjoin'
-
Type in an easily identifiable name
-
Generate or put in a secure password
-
Add to the AAD DC Administrators group
-
Click Ok to create the user

-
Once the account has been created, make sure to login with it to the Azure Portal or Office portal to force a final password reset, or you won't be able to use it in the next steps as it will be waiting for a password reset.
-
Once that account has been created, it's time to join your utility server to the Microsoft Entra ID Domain, navigate to your Utility server and click Connect.
-
Select Bastion
-
Select Use Bastion
-
Type in the username and password of the LOCAL account created when the Virtual Machine was created and click Connect Note: If you are running a popup blocker, you need to allow it to open, as Bastion opens up the connection in a new window.

-
You should now be logged in to the server successfully.
-
Now it's time to join the server to the domain (make sure that DNS is configured for AD Domain Services on the Virtual Network, see the last step in the AD Domain Services section, or you won't be able to domain join anything).
-
In Server Management, click on Local Server
-
Select WORKGROUP
-
Click Change…
-
Select Domain
-
Please type in the DNS name of your domain; in my demo, it is: luke.geek.nz
-
Type in the username and password of the account we created earlier and clicked Ok

-
Once you see, Welcome to the domain, click Ok a few times to restart the server.
-
Once the server has been restarted, you can now close your bastion window and reconnect using your Azure AD credentials (in my case, avdjoin), a member of the ADDC Administrators group.

-
You have now successfully connected using an Azure AD account to the AD Services domain.
-
Now it's time to install some base Active Directory tools
-
Open Windows PowerShell as Administrator
-
Type in the following PowerShell commands:
Add-WindowsFeature RSAT-Role-Tools

Install-WindowsFeature –Name GPMC
Note: You can use the little arrows on the left-hand side of your Remote Desktop window to copy and paste text to and from your Bastion connection.
- This will now install the base Active Directory remote management tools, including Group Policy Management, so you can now create and manage the Group Policy objects for your Azure Virtual Desktop hosts.
- We will now set up some base configurations to create a custom OU for the Azure Virtual Desktops hosts to go into:
- Open Active Directory Users & Computers
- Expand out the Domain and right-click (at the Top Level)
- Select New, Organisational Unit
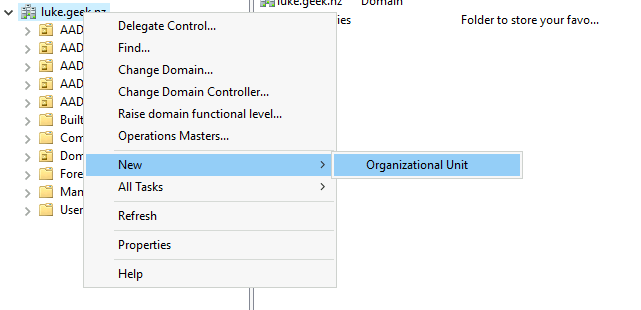
- Type in: AVD
- In the AVD OU, create a new OU called: Hosts
- Now that we have an OU for the hosts, we will need to tell Azure what OU the hosts go into, so while we have Active Directory Users and Computers open, click on View.
- Select Advanced Features
- Right-click the Hosts OU
- Select Properties
- Click on Attribute Editor
- Find the distinguishedName attribute
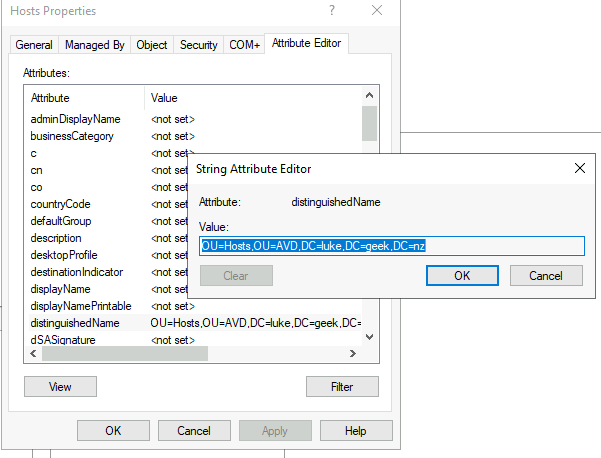
- Open and Copy the Value for future (in my case: OU=Hosts,OU=AVD,DC=luke,DC=geek,DC=nz) for future reference.
- Now that we have the AVD Hosts OU, you can also open Group Policy Management and create your Computer policies.
Deploy Azure Virtual Desktop
Now we are ready to deploy Azure Virtual Desktop finally!
- Log in to the Azure Portal
- Click on Create a resource
- Find and select Host pool

- Click Create
- Please create a new Resource Group to help resources separately, and I am going to name mine: avd_prod
- Type in a Host Pool Name, I will call mine: avd-pooled
- Please select the location of the Metadata (this is NOT the location of your session hosts, it’s the gateway, select the Region closet to you as possible)
- For Host Pool Type, if you want everyone to have a Virtual Machine each, you can select Personal; however, I want people to be shared across my servers, so I will select Pooled.
- For the Load balancing algorithm, we can choose to spread people over available hosts or fill up one host before moving connections to the next; we are going with Breadth-first.
- Click Next: Virtual Machines

- Now we can add your Session hosts to the Pool.
- By default, it has defaulted the Resource Group to the same Resource Group as the Host pool; however, you can separate them.
- Please select a Name prefix for your session hosts, and it must be unique. Azure will automatically add a number to it as you build out more sessions hosts. I will put avdhost.
- As I am based in New Zealand, I will be using the Australia East region.
- We are going to use a Gallery Image of Windows 10 Enterprise multi-session, Version 20H2 + M365 Apps (select the newest image at the time of your deployment)
- Select your Virtual machine size
- Select the number of Virtual Machines you need
- Select the OS disk type

- Select your Virtual Machine and subnet
- Select Yes to specify your domain or unit
- Type in your AD Domain Services domain name
- If you don't specify an OU, it will create it in the: AADDC Computers OU. I had previously created a separate OU for my hosts so that I will enter the OU information.
- For the Domain Administrator account, I will use the AVDJoin account I created earlier.
- When the Virtual Machines get created, a local Administrator account will be created for each machine, and you can specify the username and password of what you want this account to be.

- Click Next: WorkSpace
- Select Yes to Register Desktop App Group
- We haven’t created an Azure Virtual Desktop Workspace yet, so select Create New.
- Create a name for your Workspace; my example is: avd_workspace
- Click Ok

- Click on Review + Create
- Confirm everything looks ok and click Create Note: This may take 10-20 minutes to create your Azure Virtual Desktop resources:
- Host Pool
- Workspace
- Session hosts
- Once the resources have been created, you should now have an Application group for the Session Desktop.
- Open the Application Group and click Applications; you should confirm the SessionDesktop application is listed.

- Click on the SessionDesktop to change the Display name (this is the resource people will see when they go to your Azure Virtual Desktop), and I changed mine to AVD Desktop.

- Click on Assignments
- These are the Users & Groups that are allowed to access your Azure Virtual Desktop.
- My recommendation would be to add a Group that contains your users, but in my demo, I will add in my: 'avdjoin' account.

- Using an assigned account, you can now navigate to**:** https://rdweb.wvd.microsoft.com/arm/webclient/index.html

- You can now launch your Desktop.
- Congratulations, you have now created and connected to Azure Virtual Desktop!

Additional Configuration
- You can Navigate to your Host Pool; under Settings, you can restrict or allow RDP settings, Device redirections and configure Display sessions.
- Configure Start VM On Connect to help reduce your spend.
- If you click on Session hosts, you can add additional hosts to your pool or Drain them to prevent logins.
- If you click Application Groups, you can add RemoteApp groups to allow users to connect directly to an Application versus a Full Desktop.
- Configure FSLogix profiles for user persistance.
- Set Disconnected Session Time limits in Group Policy, to automatically log off Disconnected sessions after 'x' period of time.