Git using Github Desktop on Windows for SysAdmins
Git (Git is software for tracking changes in any set of files, usually used for coordinating work among programmers collaboratively developing source code during software development, allowing versioning, source control and enablement of continuous Integration and deployment)has been around for years(development and the first release began in 2005 by Linus Torvolds).
Although primary driven and consumed by software developers – it is now a staple of everyday life for an IT professional of many disciplines (i.e. Operations, Delivery), even if a git repository is used to store your PowerShell scripts (hint – it should!).
You don't have to know every single git command line syntax to use Git.
Tools such as Visual Studio Code allows you to utilize git source control efficiently, and of course, you can use Git directly from the command line; however, sometimes you want an easy way to leverage Git through a point and click interface, there a lot of tools out there to give you easy access to Git, but today I will concentrate on Github Desktop.
If you are looking at something a bit more powerful (especially if you are wanting to do submodules), then I suggest Atlassian Sourcetree.
Introducing Github Desktop... "Focus on what matters instead of fighting with Git. Whether you're new to Git or a seasoned user, GitHub Desktop simplifies your development workflow."

Github Desktop gives you a clean, light and easy to use tool to work with git repositories that is constantly kept up to date and improved upon!
Although Github Desktop is published by Github – this doesn't mean you cannot use a git repository hosted by another provider, such as Azure DevOps.
This article assumes that you have a Git repository initialized already; you can create free repositories from Azure DevOps or Github. Microsoft owns Azure DevOps and Github; personally, I have moved from Azure DevOps to Github for my git repositories but utilize AzureDevOps pipelines.

Install Github Desktop
Installation of Github Desktop is pretty simple, but assuming you have rights to install the software:
- In your web browser, navigate to Github Desktop homepage and click on: Download

- Once it's downloaded, you should have a file such as GitHubDesktopSetup-x64.exe (it should only take a few seconds, the file is about 109 MB at the time this article was written), then run it to install.

Congratulations, you have now installed Github Desktop!
Add your Azure DevOps repository
If you have an Azure DevOps git repository, then follow the steps below – if you have chosen to go: Github, then feel free to skip this section for the next.
- Sign in to Azure DevOps
- Navigate to the project you want to add to Github Desktop
- Click on Repos, Files

- In the address bar, you will see your URL, and it should look like this: https://dev.azure.com/%username%/_git/%projectname%
- Copy the URL and open Github Desktop
- Click on File and Clone a repository
- Click on URL

- Paste in the repository URL you copied earlier.
- Select the Local path of where you want the Git repository to be saved locally on your device
- Now we need to generate git credentials to clone your repository, navigate back to Azure DevOps.

- Click on Generate Git Credentials
- Azure DevOps will now generate the username and password that will be used by Github Desktop to authenticate with your git repository.
- Navigate back to Github Desktop
- Click Clone
- Enter in the username and password that you received from the git credentials, generated by Azure DevOps and click Clone.
- Github Desktop should now clone your repository locally.
Congratulations, you have set up an Azure DevOps git repository using Github Desktop.
Add your Github repository.
If you have an Azure DevOps git repository, follow the steps above – otherwise, follow these steps to add your Github repository into Github Desktop.
- Open Github Desktop
- Click File
- Click Clone repository….

- On the Github.com tab, enter your Github credentials
- Select the Local path of where you want the Git repository to be saved locally on your device
- Click Clone
Congratulations, you have now set up a Github git repository using Github Desktop.
Using Github Desktop
Now that you have a git repository cloned locally, it's time to use it.
Initial Commit
Once you have a file created and saved into the folder of your git repository, i.e. a PowerShell script, you will want to commit it to the git repository.
- Open Github Desktop
- Click on: Current repository to make sure your repository is selected.

- In my example, I have created a new file called: HelloWorld.ps1 in my PowerShell repository.
- What you can see in the screenshot below is the various components that make up the Github Desktop; you can see the changed file (i.e. the new file), the contents of the file and what will be added, the commit title and the all-important commit description.

- You can change the title to something more appropriate if you want, but with your commit description, this is what you will use for versioning and seeing what changes you made in the future from a quick glance – make sure it's an appropriate description and click Commit to master.
- Committing it to master does not push it to its 'Origin'. I.e. the actual remote git repository (stored in Github or Azure DevOps) will commit to the local git repository. This allows you to work on code locally without requiring every change to be uploaded to a local repository. In order to commit to the Origin and remote repository, click on: Push Origin.

- Once it has been committed, you should be able to see the file on the origin git repository, and you can Push multiple local git changes at once.
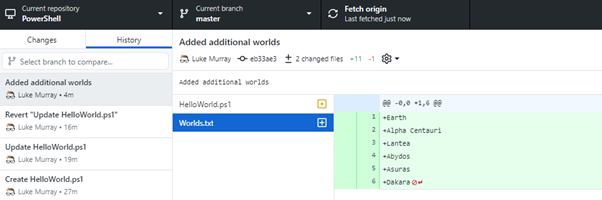
- If you click on: History should now see your commit with your file and description (as you can see, I was using an old PowerShell repository that I had merged into other repositories since then but thought it was worth using it for this article).

Congratulations, you now committed your first file into Git! It wasn't that difficult!
Restore file from the previous version
One of the benefits of using Git is version control and restoring a file if something stops working, or someone had an 'Oops!' moment! With Github Desktop, restoring a previous version is straightforward.
- Open Github Desktop
- Click on: Current repository to make sure your repository is selected
- Click on History (you may need to click Fetch Origin if files have been updated remotely)
- As you can see, someone (i.e. Luke Murray) has made a change to my' HelloWorld. ps1'' file, to be: "I like Unicorn" and changed the background and foreground colour to be both Yellow'.
- I can right-click that file and select Revert changes in the commit using Github Desktop.

- You will now have a new entry in the History that will revert the commit, and you can quickly push it back to Origin again.
Congratulations, you have successfully reverted a commit to a previous version using Github Desktop.
Working with branches
A significant function of Git is the ability to create and use branches. Branches allow you to work on features without touching the main or master branch (where you can have your production or thoroughly tested resources, for example).
- Open Github Desktop
- Click on: Current repository to make sure your repository is selected
- To create a branch, click on the Current branch and select New branch and give it a name, i.e. Dev
- Make a change to the file like you typically would and save
- Github Desktop has automatically added your changes, and you can commit them to the dev branch without touching master.

- If you navigate to the master branch, you can see that the file has remained untouched. All the control and versioning is done by Git!
- When you are ready to merge the dev branch into master, click the current branch.
- Select: Choose a branch to merge into master
- Select your branch, i.e. Dev

- Click on create a merge commit.
- You should see a message in Github notifying that the merge was successful, and you can push your changes to the origin repository.
- Github Desktop should redirect you to the master branch, and you can now see your changes:
- You can go back to using Dev to develop additional features, testing etc. and repeat the same process.
Using a master branch allows others to get production-ready scripts or code, or avoid automation around continuous deployment to production resources, while you may be still working on functionality that you don't quite want to be released yet.
Hopefully, this article gives you an excellent base to start your git journey!
There is a lot more functionality built into Github Desktop, especially around branching, but for day to day use, the above should give you all you need!
It is also worth reading this article on the .gitignore file, to make sure your git repositories don't end up bloated by unwanted files and you are only committing the files you need to be.