Azure Bicep and Insert Resource
Azure Bicep is a Domain Specific Language (DSL) for deploying Azure resources declaratively. Azure Bicep is a transparent abstraction over ARM and ARM templates, which means anything that can be done in an ARM Template can be done in Bicep.
Azure Bicep has recently (December 2021) been updated to: v0.4.1124, along with various other hotfixes and enhancements; this version supports 'Insert Resource' functionality.
Insert Resource simplifies ARM to Bicep conversion without exporting entire ARM templates, then compiles them to Bicep when you are only after export for a single resource.
To use Insert Resource, you will need to have:
- Bicep version greater than v0.4.1124
- Azure CLI
- Visual Studio Code with the Bicep extension
You can easily install both or upgrade following the Microsoft documentation on the: Install Bicep tools page. You can also review the Bicep changes and latest release notes on Github here: Azure Bicep releases
Import Resources into Bicep using Azure CLI and Bicep
- Open a new file in Visual Studio Code
- Set the Language mode to Bicep

- Now we need to login to Azure; in Visual Studio code, click View and Terminal.
- In the terminal, type in: az login
- Login to Azure using the credentials that have read access to the Resource you want to export.
- Once you are logged in, type in: az resource list
- In the JSON output in the terminal, copy the resource ID (inside the double quotes from the id value)
- Now we need to open the Command Palette, press: CTRL+Shift+P on your keyboard (or click on View, Command Palette)
- Start typing in Bicep; if you have the latest version, you should see: Bicep: Insert Resource., select this

- Enter in the resource ID you copied earlier.

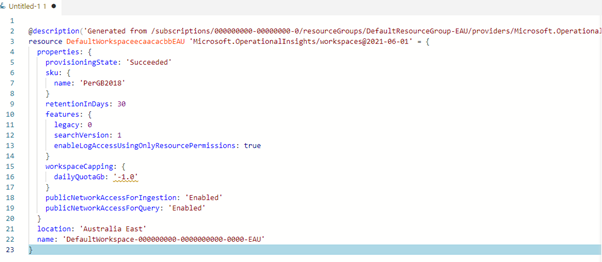
- Azure Bicep should have connected and exported your Resource straight into Bicep! As below, it had imported a Log Analytics workspace in my subscription straight into Bicep.
To find the resource ID using the Azure Portal.
You can use the Azure CLI to find the Resource ID, but you can also use the Azure Portal by navigating to it below:
- Log in to the Azure Portal
- Navigate to the Resource you want to export to Bicep
- On the Overview pane, click on JSON view
I had problems connecting to export an App Service and App Service plan, so for some resources with multiple dependencies, you may be better off exporting the ARM template from the resources/resource groups and decompiling that way, but the Insert Resource functionality is a very quick way to bring your resources into Bicep!