Deploy Azure-Firewall-mon to a Static Web App
Azure-Firewall-mon is a near real-time Azure Firewall log viewer.
Azure-Firewall-mon provides an alternative_and_opinable 😊 way to access and inspect Azure Firewall logs. The recommended approach for analysing Azure Firewall logs is to set up a Log Analytics Workspace to collect all the data and use Kusto (KQL) queries to check what's happening.
In Azure-Firewall-mon, the idea is to provide an approach much more like Sysinternals Process Monitor or Check Point's SmartView, where there is no queries or dashboards that you need to implement first to get working. Still, all events are available as a log stream. In addition, a full-text search at the top of the page lets you quickly filter the content displayed on the screen, helping you understand what is happening right now (or close to present).
Overview
Azure-Firewall-mon (AFM or Azure Firewall Monitor) is a custom solution (currently in a functional beta) created by an Italian Microsoft Cloud Solution Architect called: Nicola Delfino, its worth mentioning that although a Microsoft CSA makes AFM, IT IS NOT A SUPPORTED MICROSOFT PRODUCT.
Monitoring Azure Firewall can be a pain - with trawling through logs - using the Azure Firewall Workbook - helps fill in the gap - especially around the application and network rule traffic. Still, you may want something more straightforward and designed for real-time traffic to assist with in-the-moment troubleshooting.
Azure-Firewall-mon is an open-source, single Page Application written in Angular and hosted on an Azure WebApp - so to use this, you don't need to deploy to your environment.. add in an Event Hub connection string, and away you go (there is also a demo mode - so you can see what the experience will be like)!
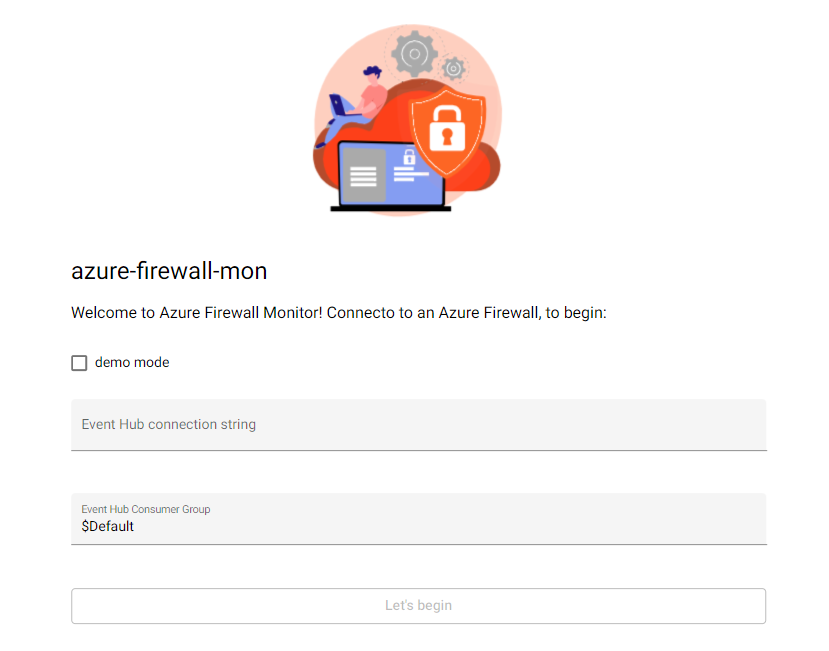
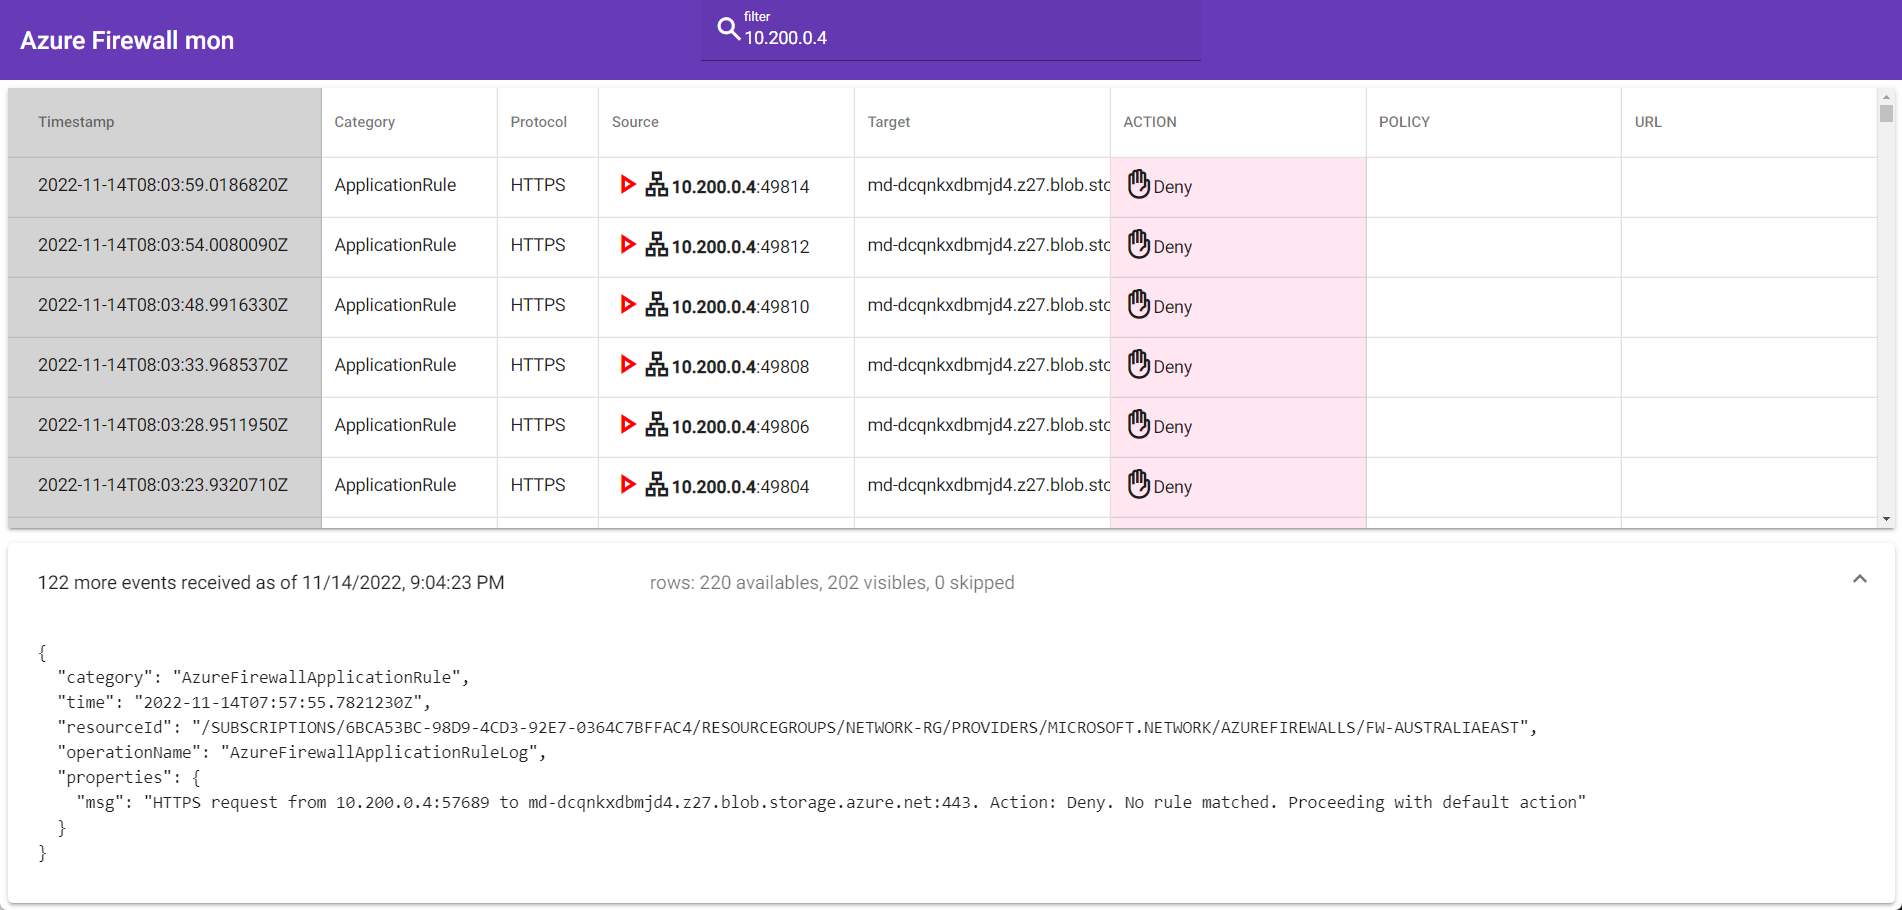
We can deploy it to an Azure Static Web App for those who would instead host it in our environment.
"Azure Static Web Apps is a service that automatically builds and deploys full-stack web apps to Azure from a code repository. When you create an Azure Static Web Apps resource, Azure interacts directly with GitHub or Azure DevOps to monitor a branch of your choice. Every time you push commits or accept pull requests into the watched branch, a build is automatically run and your app and API is deployed to Azure."
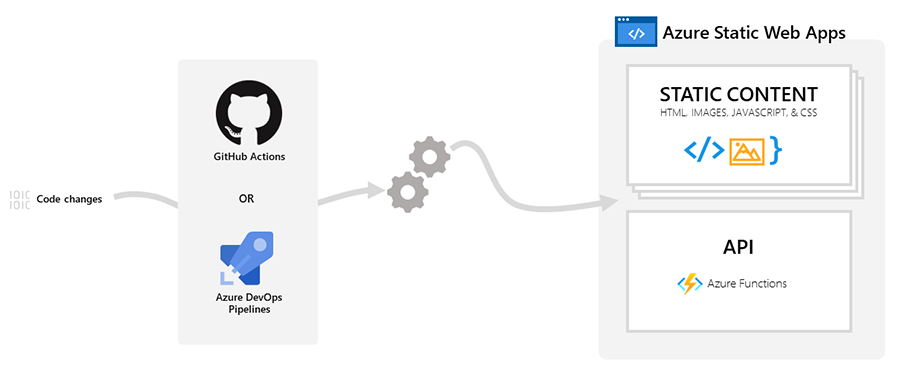
Deployment
Prerequisites
Today, we are going to deploy Azure-Firewall-mon into an Azure Static Web App - to do this; we will need the following prerequisites:
- A GitHub account
- An Azure subscription_(with permissions to deploy Event Hub, deploy an Azure Static WebApp, and configure Diagnostics on the Azure Firewall)_
- Azure Firewall (provisioned)
Note: Also, ensure that your Event Hub is in the same region as your Azure Firewall so that you can use Diagnostics settings. Regarding the Azure Static WebApp - it doesn't matter; this is a global service - and you will be entering the Event Hub listener.
We will use the Azure Portal and a browser to provision the workflow (however, I will have added Azure Bicep to the bottom of the article for reference).
This article - assumes you have basic knowledge of GitHub and Microsoft Azure.
For this demo, I am using a Hub & Spoke Azure topology.

Fork the GitHub repository
The first thing we need to do is clone the Azure-Firewall-mon repository; this repository holds the source control of Azure-Firewall-mon. First, however, we need a clone of it - to use in our Static Web App - this will also allow us to pull down and build the latest changes and updates of the Azure-Firewall-mon tool while having the stability of maintaining your version of the device.
- In your favourite browser of choice, navigate to: https://github.com/nicolgit/azure-firewall-mon.
- Click Fork (top right of the repository)
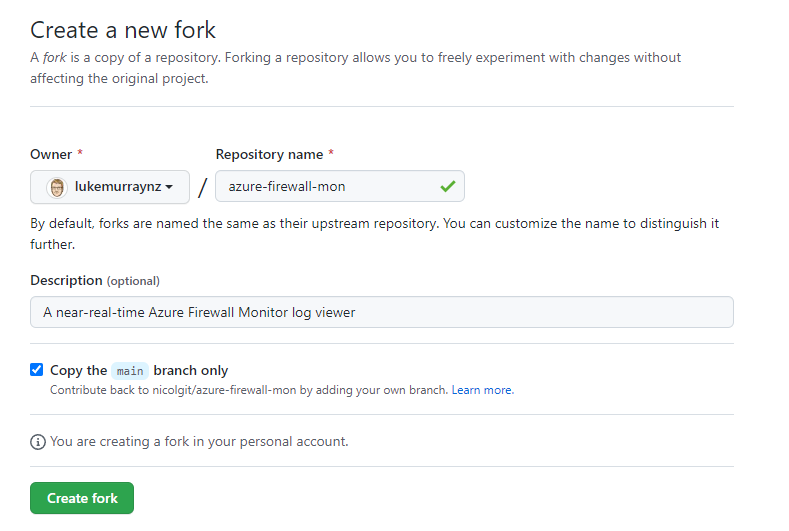
- Click Create fork
- You have now created a fork of the 'azure-firewall-mon' repository; when a new update of Azure-Firewall-mon comes out - you can also select 'Sync fork' - to keep your fork up-to-date and trigger a new build.
Create Static Web App and deploy azure-firewall-mon
Now that you have created a fork, it's time to make your Azure Static WebApp!
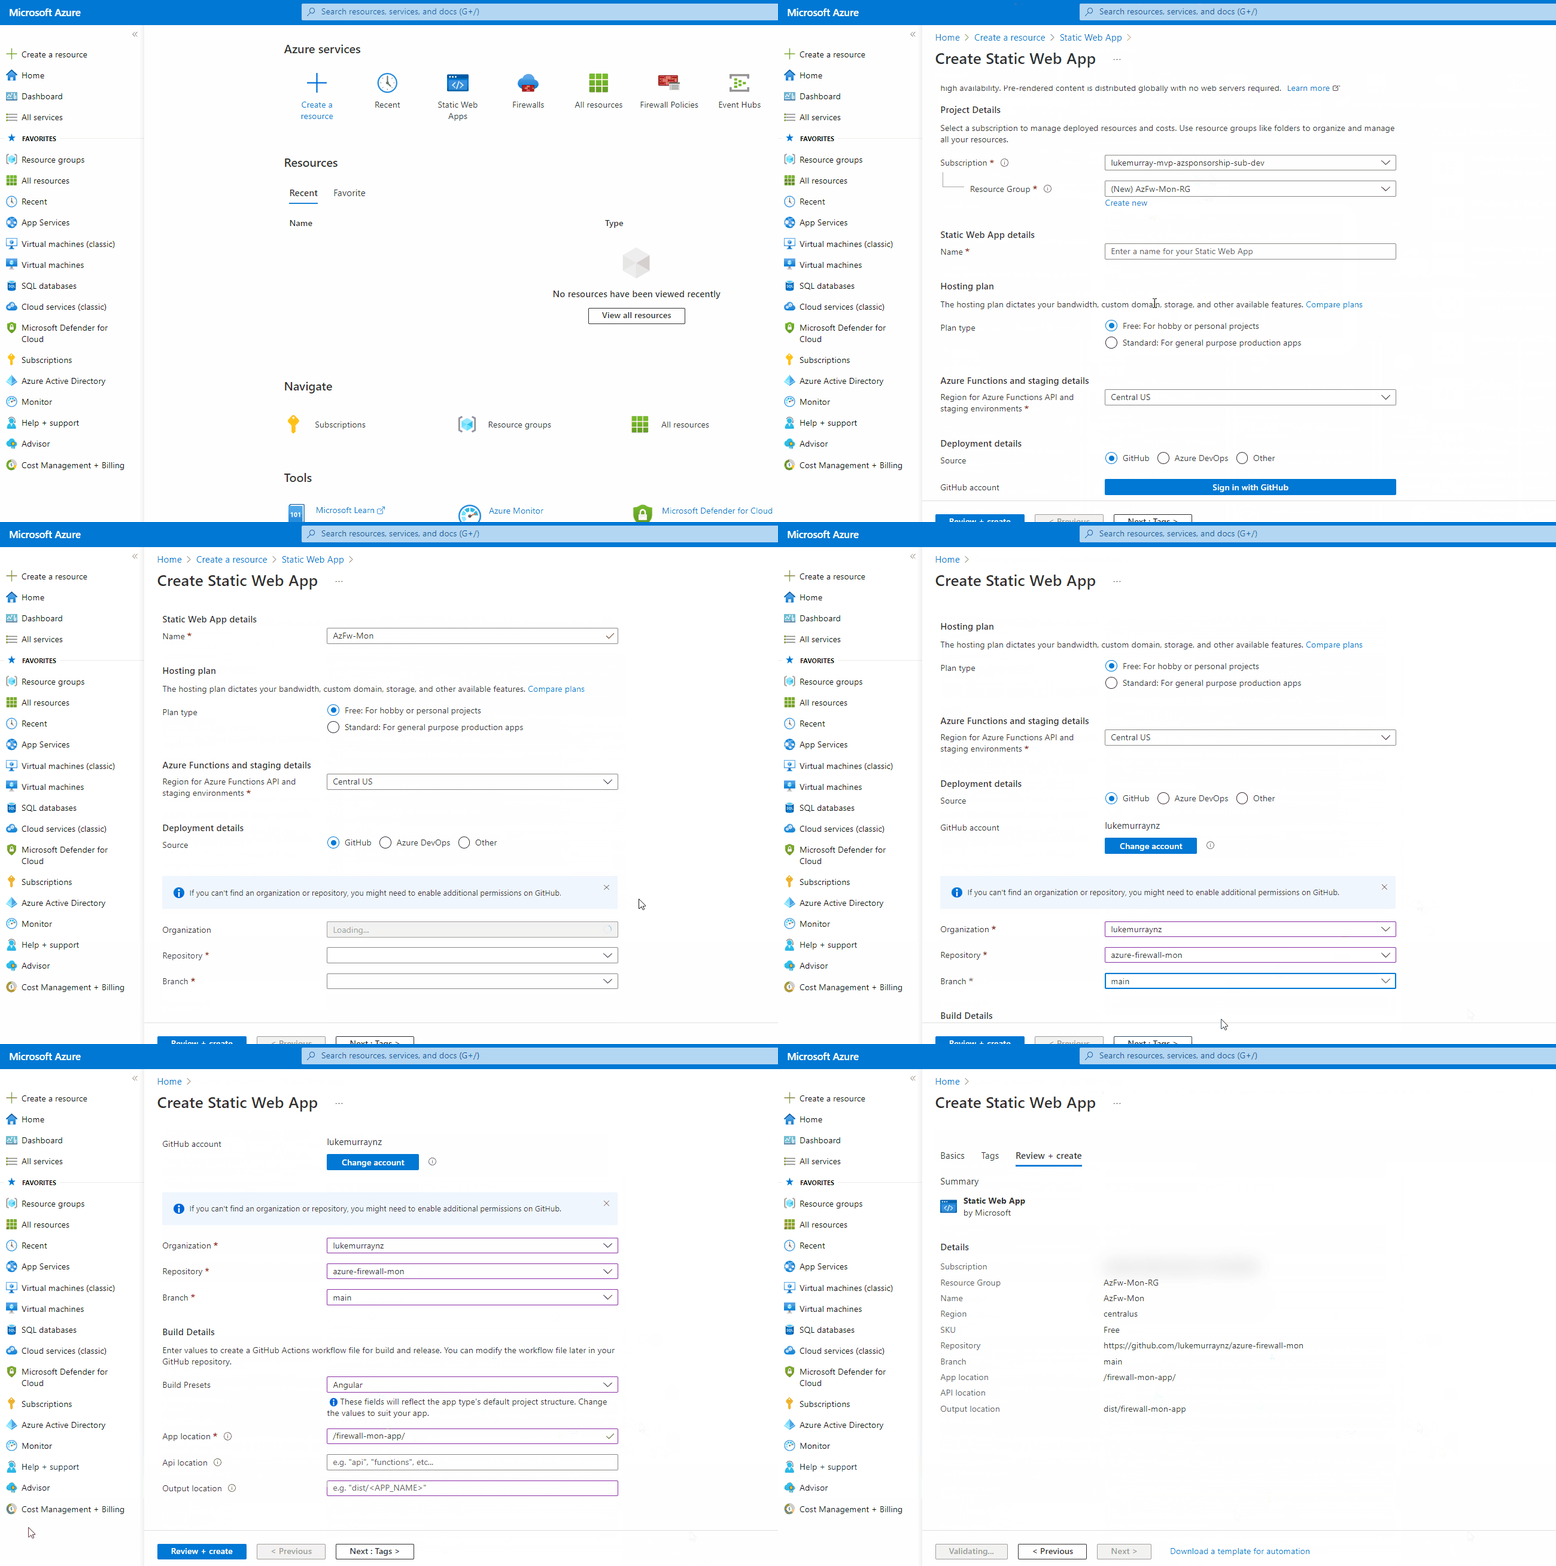
- Navigate to the Azure Portal
- Click + Create a resource
- Type in: Static Web App
- Select and click Create
- Create or select a Resource Group
- Type in the name of your Static Web App
- For the plan type, we will go with Free
- Please select your region (this is the staging environment used to create your resource so the Azure Static Web App can then be replicated geographically).
- Select Source, as GitHub
- Click Sign in with GitHub (and sign in with an account with access to the GitHub Repository fork of azure-firewall-mon created earlier).
- Authorise the Azure Static Web Apps to have access to your repositories
- Select your organisation and the azure-firewall-mon repository you forked earlier.
- Select 'main' for the branch
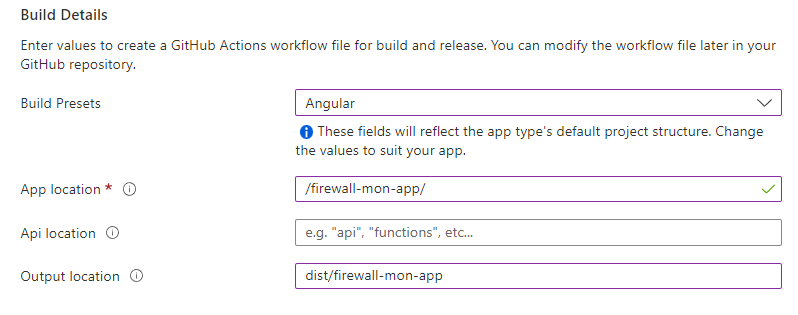
- Under Build Presents, select Angular
- For App location, enter "/firewall-mon-app/"
- Leave the API location empty
- For the Output location, enter: "dist/firewall-mon-app"
- If you navigate to your own forked GitHub repository, you should see a new folder created under .github/workflows - and a new GitHub Actions workflow file!
- If you select Actions in GitHub, you should see a deployment start.
- After roughly 5 minutes, your Azure Static App - will have deployed azure-firewall-mon!
- Navigate to your newly created Azure Static App in the Azure Portal
- Click Browse
- You should now see azure-firewall-mon!
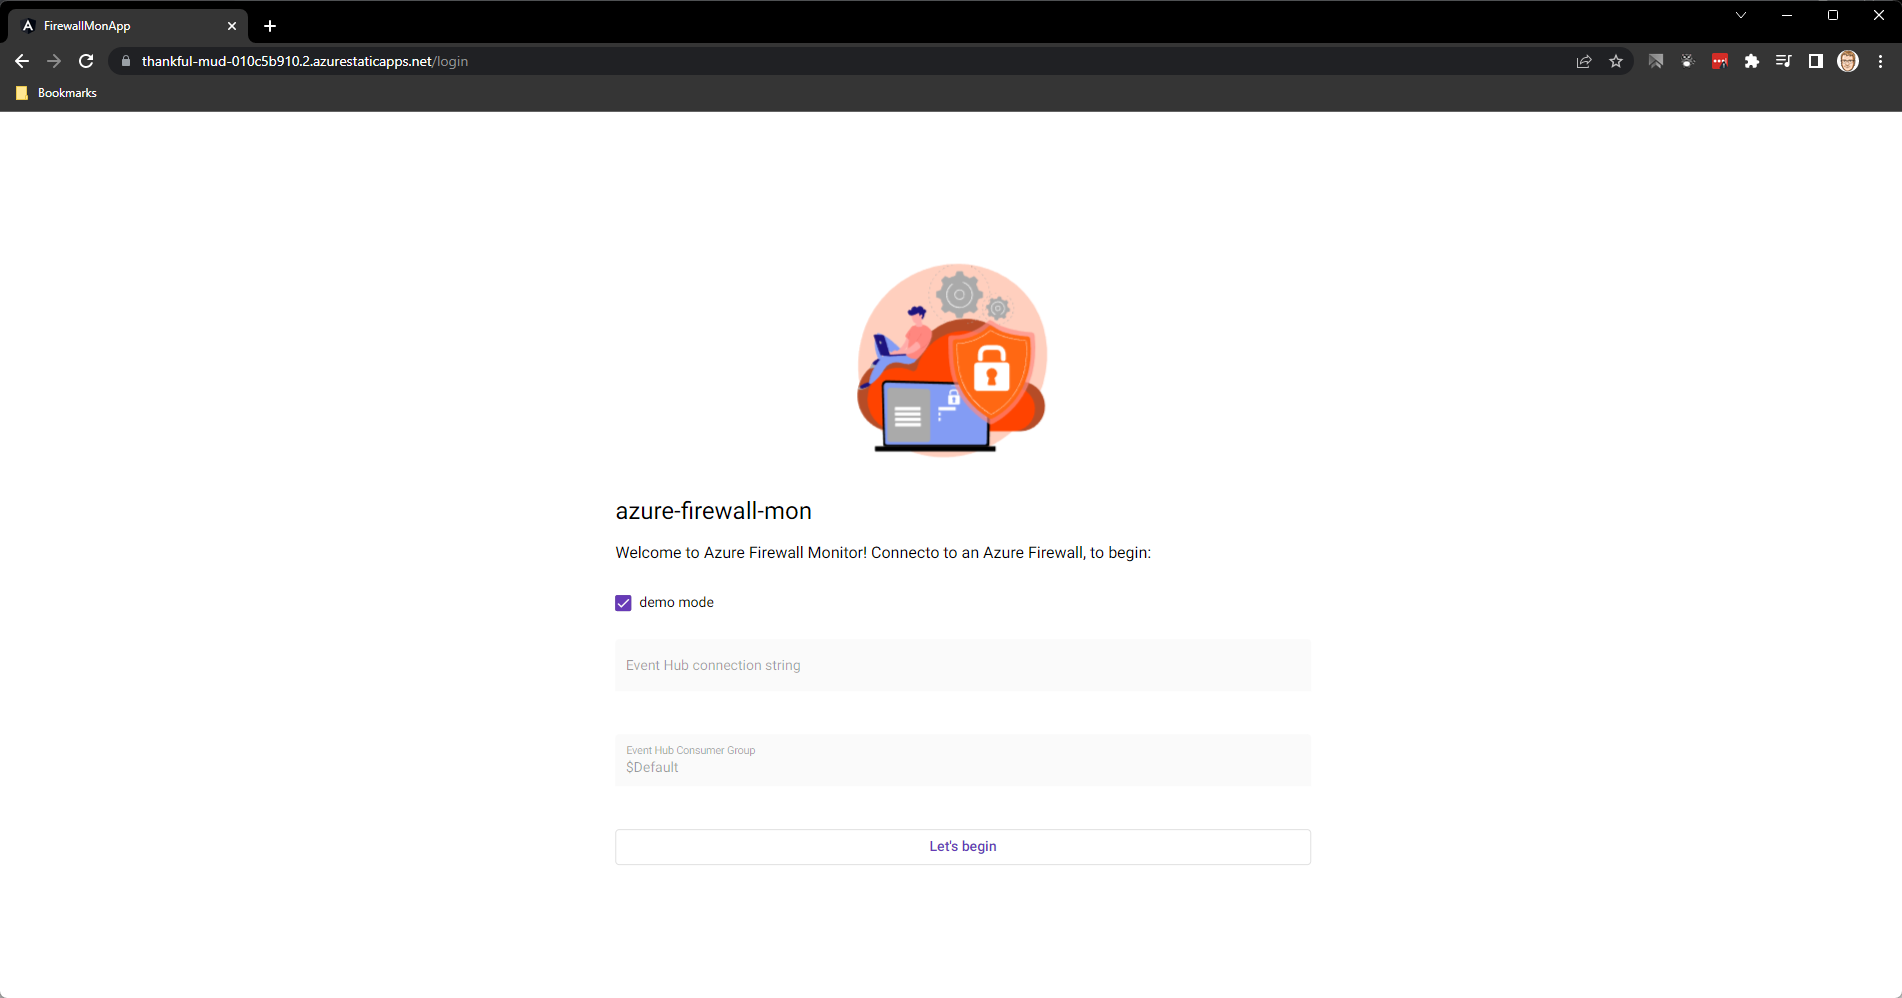
Note: In GitHub, under Actions and the Build and Deploy Job, you may see a message about Note.js 12 actions being deprecated; you can set the node version to be higher.
Add the step to set the node version below submodules and above the Build and Deploy step:
      - uses: actions/setup-node@v1
        with:
          node-version: "18.x"
Refer to a copy of my Github Actions file here: AzureStaticWebAppsCICD.yml for a comparison of GitHub action - a setup-node step running on the latest version of 18.
Create Event Hub namespace and shared access policy
Even if you use the externally hosted version of Azure Firewall Monitor, you still need an Event Hub and Namespace to stream the events from our Azure Firewall to the Azure Firewall Monitor.
-
Navigate to the Azure Portal
-
Click + Create a resource
-
Type in: Event Hubs
-
Select and click Create
-
Select your subscription and Resource Group;
-
Type in the Namespace of the event hub (i.e. AzureFirewallMonitor)
-
Select your location (make sure this is the same region as your Azure Firewall)
-
Select your Pricing Tier (in this example, I am going with Basic)
-
Click Review + create
-
Once the Namespace has been created, it's time to make our Event Hub; navigate to your newly created AzFirewallMonitor namespace.
-
Under Entitles, click + Event Hub
-
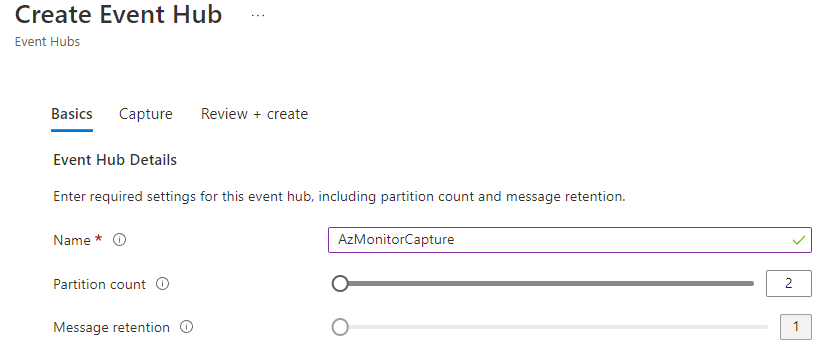
Under the name, enter the Event Hub name (i.e. AzMonitorCapture)
-
Leave the defaults (and Message retention to 1 day)
-
Click Review + Create
-
Click Create
-
-
Now that the Event Hub is created, we need to create a Shared access policy; in the Event Hub namespace, click on Shared access policies.
-
Click + Add
-
Type in a Policy name(i.e. AzMonitorListener)
-
Select Send
-
Click Create
-

Configure Azure Firewall to stream to Event Hub and run Azure Firewall monitor
Now that we have an Event Hub configured and a Shared access policy set to Listen - it's time to configure the Azure Firewall to direct logs to the Namespace.
-
Navigate to the Azure Portal
-
Navigate to your Azure Firewall
-
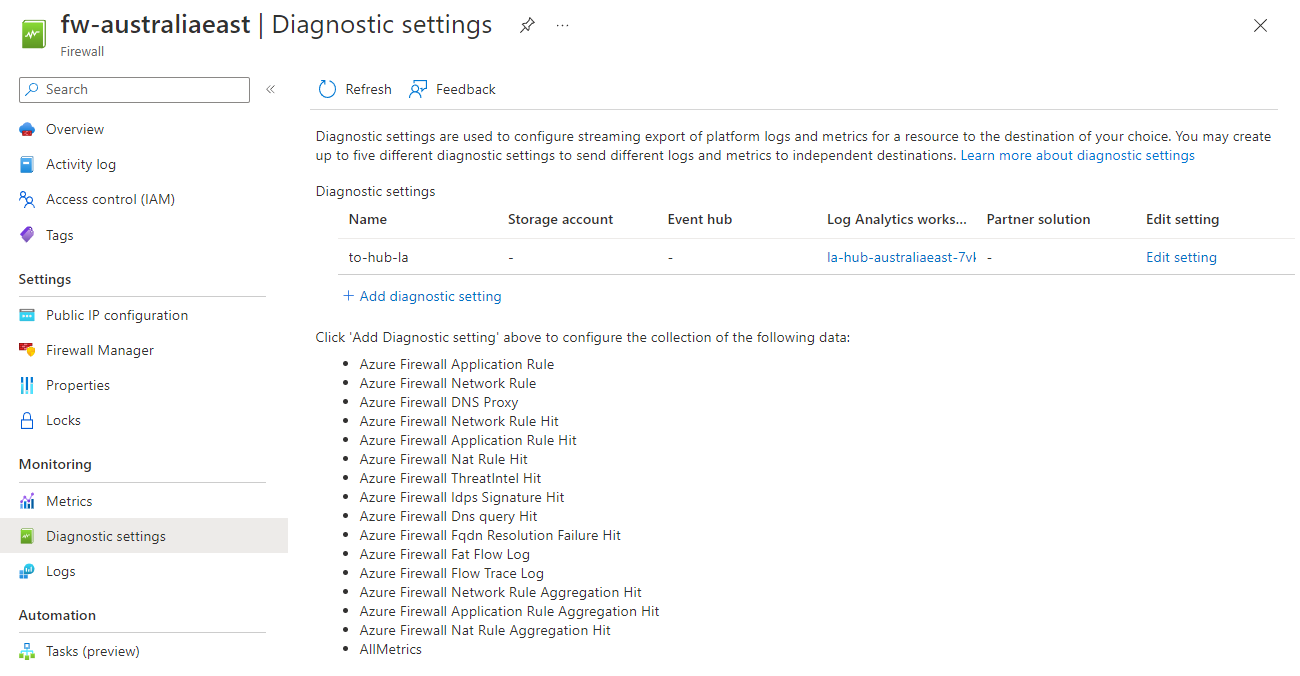
Select Diagnostic Settings
-
Click + Add diagnostic setting
-
-
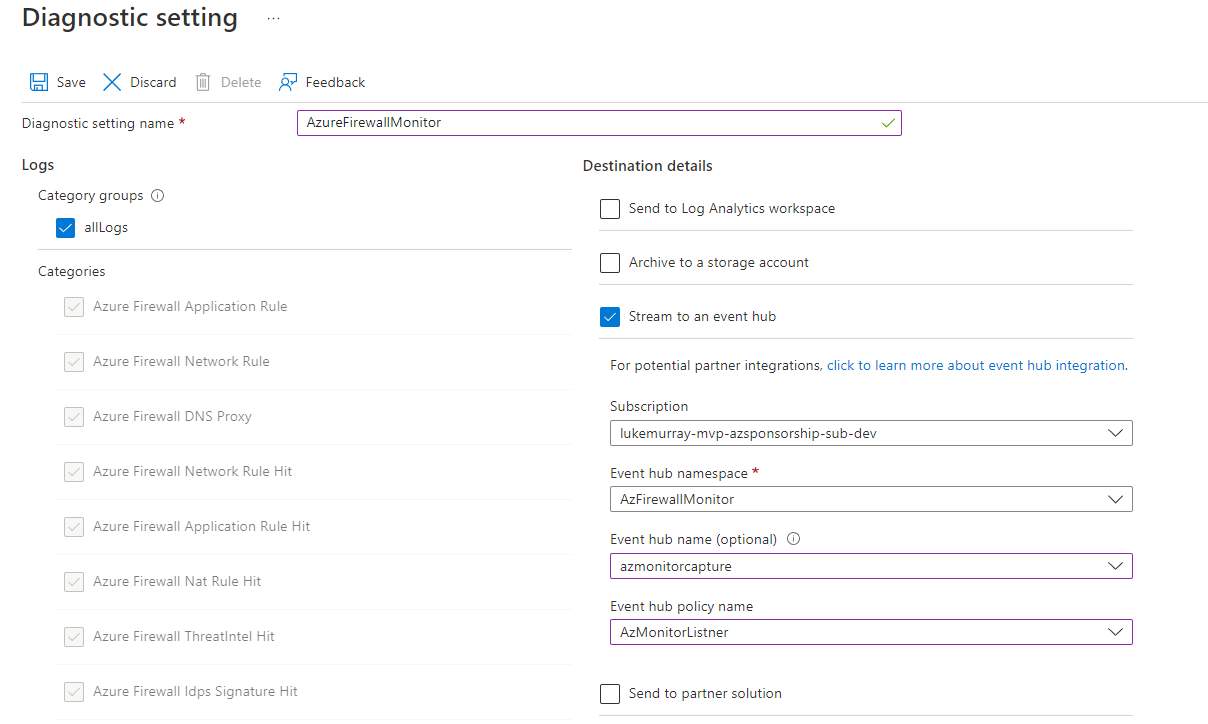
Type in a Diagnostic setting name (i.e. AzureFirewallMonitor)
-
Select All Logs
-
Select Stream to an event hub
-
Select your subscription, event hub namespace, event hub and policy created earlier.
-
-
Click Save
-
Please navigate back to your Event Hub namespace and select your Event Hub entity; now, we need to create a Shared access policy to Listen (for the entity, not the Namespace)
-
Click Shared access policies, and create a new Shared access policy with Listen.
-
Copy the Connection string-primary key
-
Navigate to your newly created Azure Static App in the Azure Portal
-
Click Browse
-
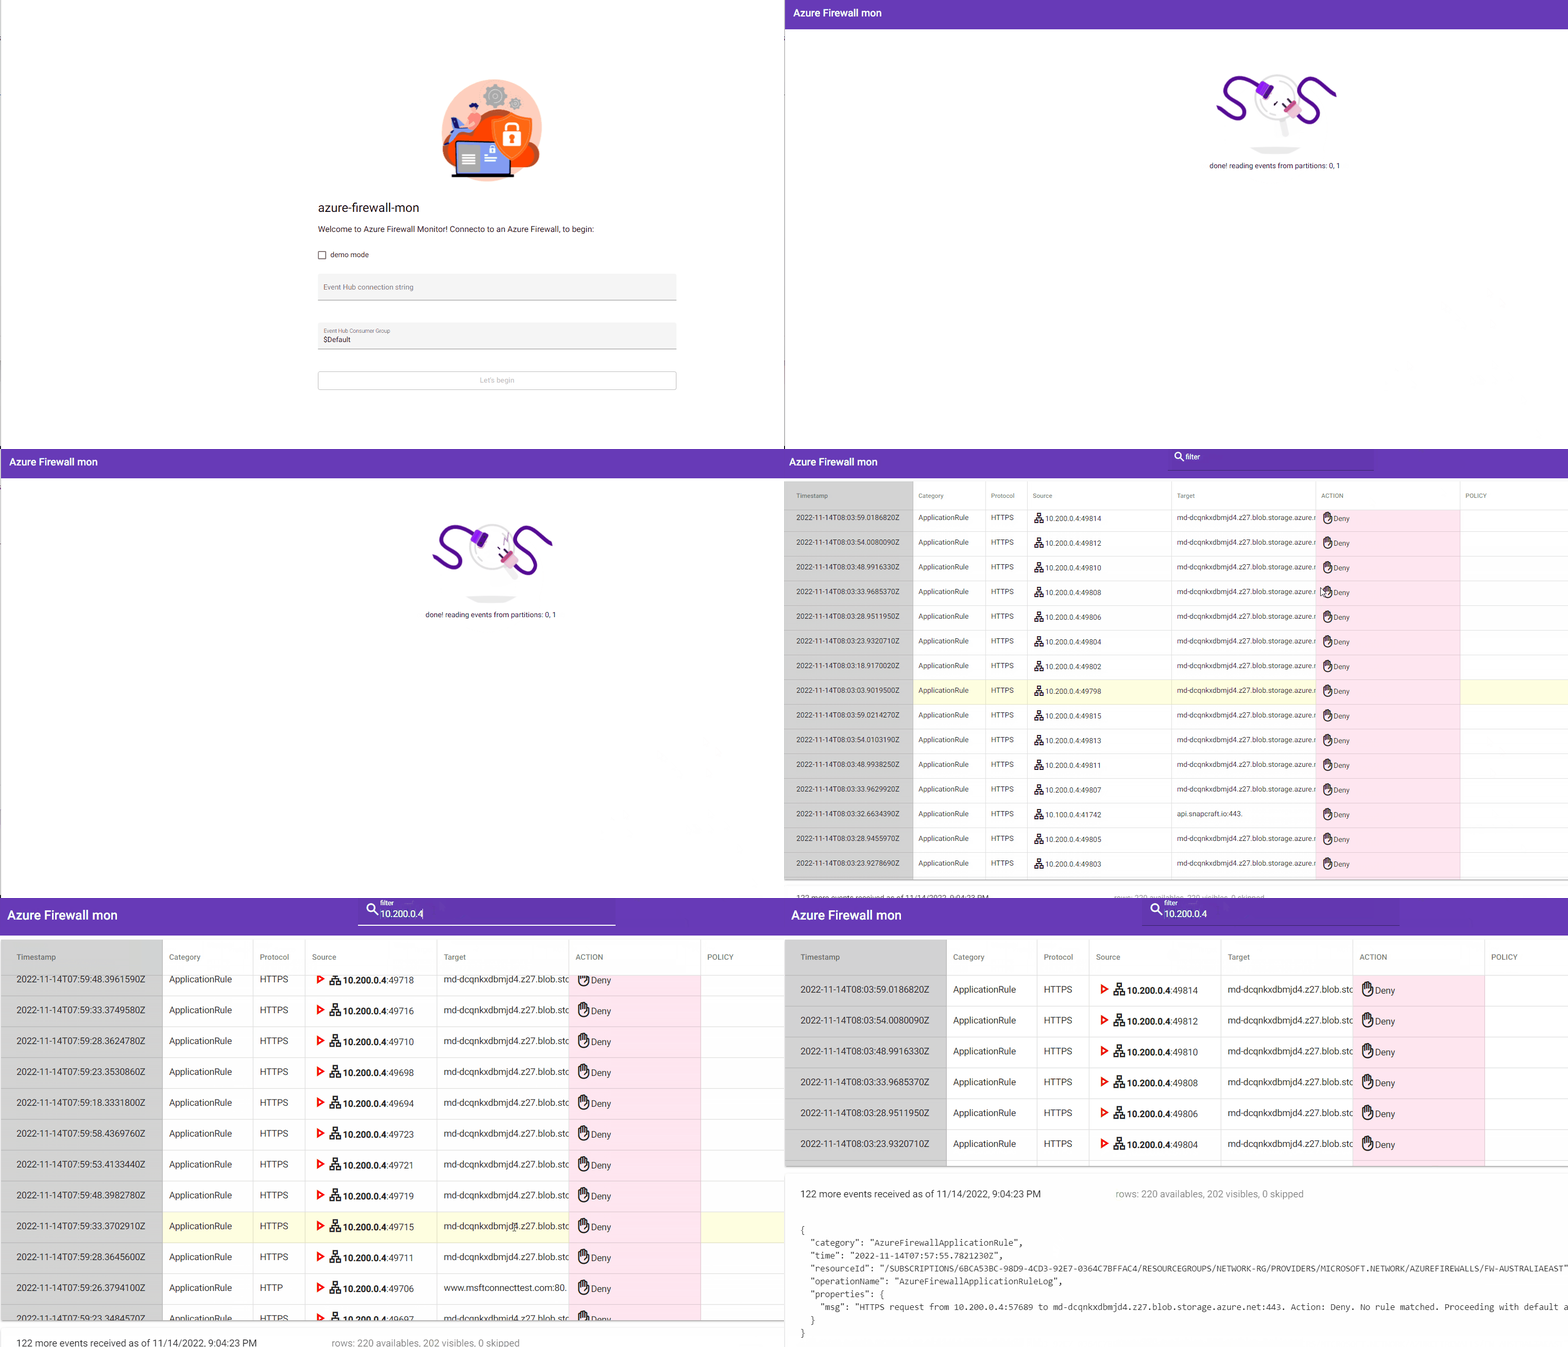
You should now see azure-firewall-mon, and enter in the Connection string-primary key copied earlier!
-
Congratulations you have now set up Azure Firewall Monitor on an Azure Static Web App and can troubleshoot your Azure Firewall quickly in real-time!
-
References: GitHub Action
name: Azure Static Web Apps CI/CD

on:
  push:
    branches:
      - main
  pull_request:
    types: [opened, synchronize, reopened, closed]
    branches:
      - main

jobs:
  build_and_deploy_job:
    if: github.event_name == 'push' || (github.event_name == 'pull_request' && github.event.action != 'closed')
    runs-on: ubuntu-latest
    name: Build and Deploy Job
    steps:
      - uses: actions/checkout@v2
        with:
          submodules: true

      - uses: actions/setup-node@v1
        with:
          node-version: "18.x"
      - name: Build And Deploy
        id: builddeploy
        uses: Azure/static-web-apps-deploy@v1
        with:
          azure_static_web_apps_api_token: ${{ secrets.AZURE_STATIC_WEB_APPS_API_TOKEN_POLITE_CLIFF_06D4C2810 }}
          repo_token: ${{ secrets.GITHUB_TOKEN }} # Used for Github integrations (i.e. PR comments)
          action: "upload"
          ###### Repository/Build Configurations - These values can be configured to match your app requirements. ######
          # For more information regarding Static Web App workflow configurations, please visit: https://aka.ms/swaworkflowconfig
          app_location: "/firewall-mon-app/" # App source code path
          api_location: "" # Api source code path - optional
          output_location: "dist/firewall-mon-app" # Built app content directory - optional

          ###### End of Repository/Build Configurations ######

  close_pull_request_job:
    if: github.event_name == 'pull_request' && github.event.action == 'closed'
    runs-on: ubuntu-latest
    name: Close Pull Request Job
    steps:
      - name: Close Pull Request
        id: closepullrequest
        uses: Azure/static-web-apps-deploy@v1
        with:
          azure_static_web_apps_api_token: ${{ secrets.AZURE_STATIC_WEB_APPS_API_TOKEN_POLITE_CLIFF_06D4C2810 }}
          action: "close"
References: Azure Bicep
Below are some Azure Bicep references:
Azure Static Web App
param staticSites_AzFw_Mon_name string = 'AzFw-Mon'

resource staticSites_AzFw_Mon_name_resource 'Microsoft.Web/staticSites@2022-03-01' = {
  name: staticSites_AzFw_Mon_name
  location: 'Central US'
  sku: {
    name: 'Free'
    tier: 'Free'
  }
  properties: {
    repositoryUrl: 'https://github.com/lukemurraynz/azure-firewall-mon'
    branch: 'main'
    stagingEnvironmentPolicy: 'Enabled'
    allowConfigFileUpdates: true
    provider: 'GitHub'
    enterpriseGradeCdnStatus: 'Disabled'
  }
}
Event Hub
param namespaces_AzFirewallMonitor_name string = 'AzFirewallMonitor'
param location string = resourceGroup().location


resource namespaces_AzFirewallMonitor_name_resource 'Microsoft.EventHub/namespaces@2022-01-01-preview' = {
  name: namespaces_AzFirewallMonitor_name
  location: 'Australia East'
  sku: {
    name: 'Basic'
    tier: 'Basic'
    capacity: 1
  }
  properties: {
    minimumTlsVersion: '1.2'
    publicNetworkAccess: 'Enabled'
    disableLocalAuth: false
    zoneRedundant: true
    isAutoInflateEnabled: false
    maximumThroughputUnits: 0
    kafkaEnabled: false
  }
}

resource namespaces_AzFirewallMonitor_name_AzMonitorListner 'Microsoft.EventHub/namespaces/authorizationrules@2022-01-01-preview' = {
  parent: namespaces_AzFirewallMonitor_name_resource
  name: 'AzMonitorListner'
  location: location
  properties: {
    rights: [
      'Listen'
      'Send'
    ]
  }
}


resource namespaces_AzFirewallMonitor_name_azmonitorcapture 'Microsoft.EventHub/namespaces/eventhubs@2022-01-01-preview' = {
  parent: namespaces_AzFirewallMonitor_name_resource
  name: 'azmonitorcapture'
  location: location
  properties: {
    messageRetentionInDays: 1
    partitionCount: 2
    status: 'Active'
  }
}

resource namespaces_AzFirewallMonitor_name_default 'Microsoft.EventHub/namespaces/networkRuleSets@2022-01-01-preview' = {
  parent: namespaces_AzFirewallMonitor_name_resource
  name: 'default'
  location: location
  properties: {
    publicNetworkAccess: 'Enabled'
    defaultAction: 'Allow'
    virtualNetworkRules: []
    ipRules: []
  }
}

resource namespaces_AzFirewallMonitor_name_azmonitorcapture_AzMonitor 'Microsoft.EventHub/namespaces/eventhubs/authorizationrules@2022-01-01-preview' = {
  parent: namespaces_AzFirewallMonitor_name_azmonitorcapture
  name: 'AzMonitor'
  location: location
  properties: {
    rights: [
      'Listen'
    ]
  }
  dependsOn: [

    namespaces_AzFirewallMonitor_name_resource
  ]
}

resource namespaces_AzFirewallMonitor_name_azmonitorcapture_Default 'Microsoft.EventHub/namespaces/eventhubs/consumergroups@2022-01-01-preview' = {
  parent: namespaces_AzFirewallMonitor_name_azmonitorcapture
  name: '$Default'
  location: location
  properties: {
  }
  dependsOn: [

    namespaces_AzFirewallMonitor_name_resource
  ]
}
