Deallocate 'Stopped' Virtual Machines using Azure Automation
Virtual Machines in Microsoft Azure have different states and, depending on what state the Virtual Machine is in, will determine whether you get billed or not (for the Compute, storage and network adapters are still billed).
| Power state | Description | Billing |
|---|---|---|
| Starting | Virtual Machine is powering up. | Billed |
| Running | Virtual Machine is fully up. This is the standard working state. | Billed |
| Stopping | This is a transitional state between running and stopped. | Billed |
| Stopped | The Virtual Machine is allocated on a host but not running. Also called PoweredOff state or Stopped (Allocated). This can be result of invoking the PowerOff API operation or invoking shutdown from within the guest OS. The Stopped state may also be observed briefly during VM creation or while starting a VM from Deallocated state. | Billed |
| Deallocating | This is the transitional state between running and deallocated. | Not billed |
| Deallocated | The Virtual Machine has released the lease on the underlying hardware and is completely powered off. This state is also referred to as Stopped (Deallocated). | Not billed |
Suppose a Virtual Machine is not being used. In that case, turning off a Virtual Machine from the Microsoft Azure Portal (or programmatically via PowerShell/Azure CLI) is recommended to ensure that the Virtual Machine is deallocated and its affinity on the host has been released.
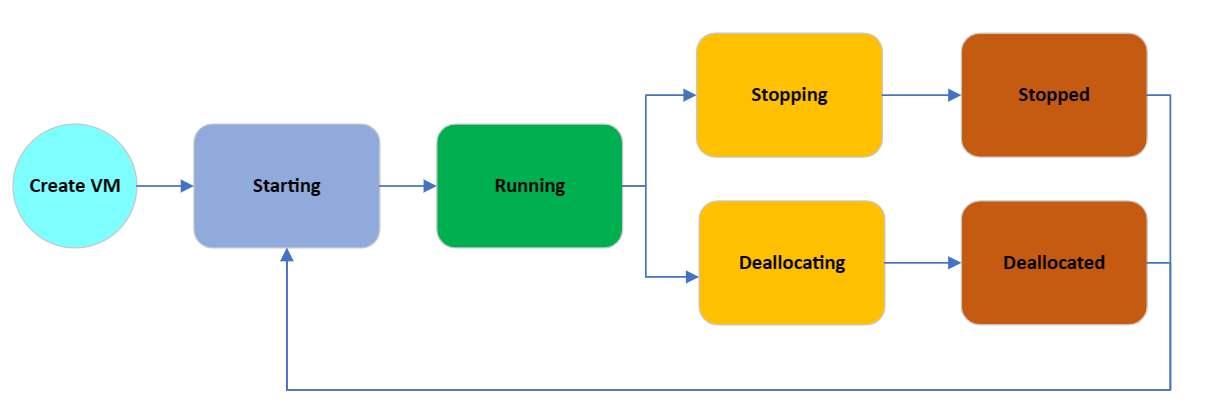
However, you need to know this, and those new to Microsoft Azure, or users who don't have Virtual Machine Administrator rights to deallocate a Virtual Machine, may simply shut down the operating system, leaving the Virtual Machine in a 'Stopped' state, but still tied to an underlying Azure host and incurring cost.
Our solution can help; by triggering an Alert when a Virtual Machine becomes unavailable due to a user-initiated shutdown, we can then start an Azure Automation runbook to deallocate the Virtual Machine.
Overview
Today, we are going to set up an Azure Automation runbook, triggered by a Resource Health alert that will go through the following steps:
- User shutdowns Virtual Machine from within the Operating System
- The Virtual Machine enters an unavailable state
- A Resource Alert is triggered when the Virtual Machine becomes unavailable (after being available) by a user initiated event
- The Alert triggers a Webhook to an Azure Automation runbook
- Using permissions assigned to the Azure Automation account through a System Managed Identity connects to Microsoft Azure and checks the VM state; if the Virtual Machine state is still 'Stopped', then deallocate the virtual machine.
- Then finally, resolve the triggered alert.
To do this, we need a few resources.
- Azure Automation Account
- Az.AlertsManagement module in the Azure Automation account
- Az.Accounts module (updated in the Azure Automation account)
- Azure Automation runbook (I will supply this below)
- Resource Health Alert
- Webhook (to trigger to the runbook and pass the JSON from the alert)
And, of course, 'Contributor' rights to the Microsoft Azure subscription to provide the resources and the alerts and resources and set up the system managed identity.
We will set up this from scratch using the Azure Portal and an already created PowerShell Azure Automation runbook.
Deploy Deallocate Solution
Setup Azure Automation Account
Create Azure Automation Account
First, we need an Azure Automation resource.
- Log into the Microsoft Azure Portal.
- Click + Create a resource.
- Type in automation
- Select Create under Automation, and select Automation.
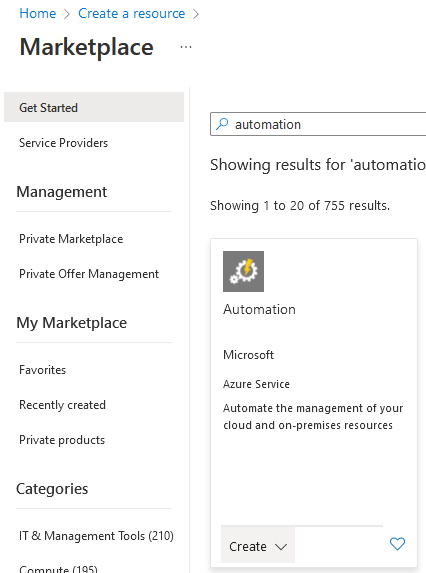
- Select your subscription
- Select your Resource Group or Create one if you don't already have one (I recommend placing your automation resources in an Azure Management or Automation resource group, this will also contain your Runbooks)
- Select your region
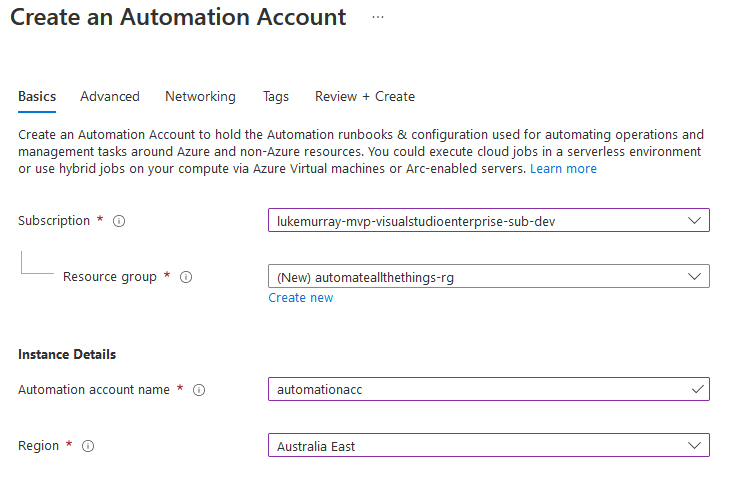
- Select Next
- Make sure: System assigned is selected for Managed identities (this will be required for giving your automation account permissions to deallocate your Virtual Machine, but it can be enabled later if you already have an Azure Automation account).
- Click Next
- Leave Network connectivity as default (Public access)
- Click Next
- Enter in appropriate tags
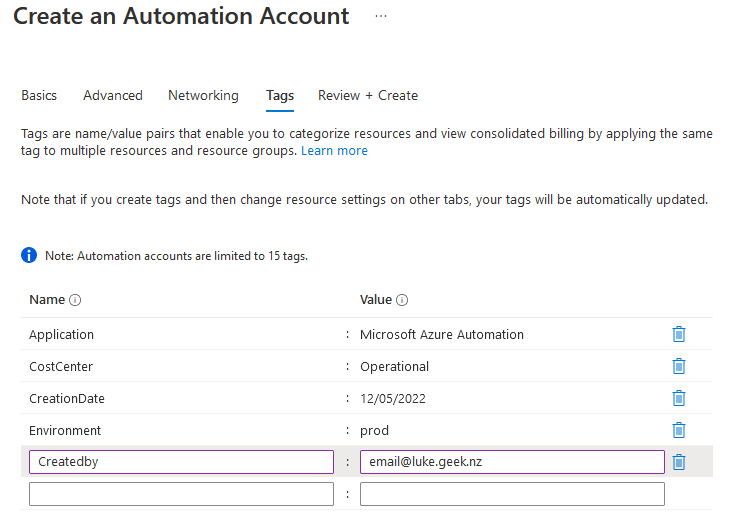
- Click Review + Create
- After validation has passed, select Create
Configure System Identity
Now that we have our Azure Automation account, its time to set up the System Managed Identity and grant it the following roles:
- Virtual Machine Contributor (to deallocate the Virtual Machine)
- Monitoring Contributor (to close the Azure Alert)
You can set up a custom role to be least privileged and use that instead. But in this article, we will stick to the built-in roles.
- Log into the Microsoft Azure Portal.
- Navigate to your Azure Automation account
- Click on: Identity
- Make sure that the System assigned toggle is: On and click Azure role assignments.
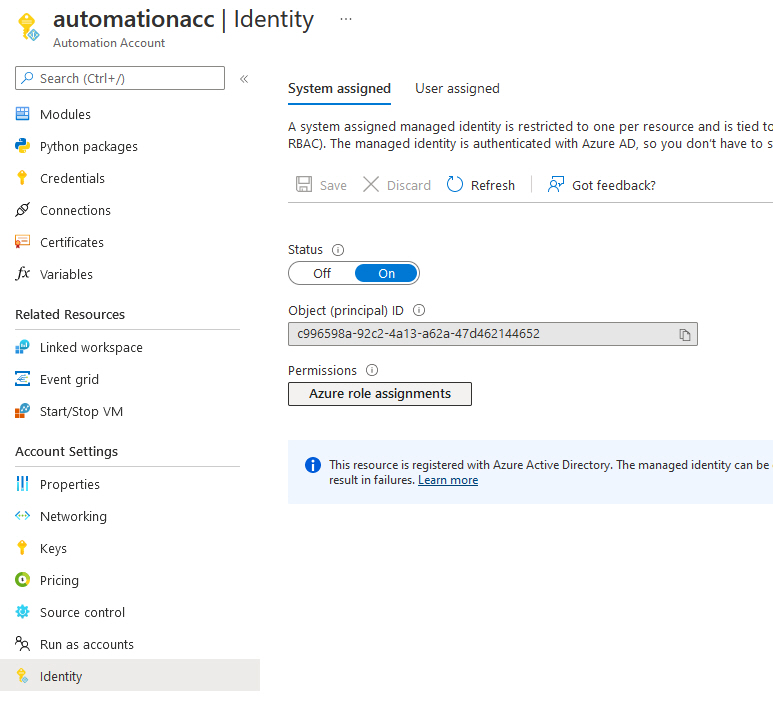
- Click + Add role assignments
- Select the Subscription (make sure this subscription matches the same subscription your Virtual Machines are in)
- Select Role: Virtual Machine Contributor
- Click Save
- Now we repeat the same process for Monitoring Contributor
- lick + Add role assignments
- Select the Subscription (make sure this subscription matches the same subscription your Virtual Machines are in)
- Select Role: Monitoring Contributor
- Click Save
- Click Refresh (it may take a few seconds to update the Portal, so if it is blank - give it 10 seconds and try again).
- You have now set up the System Managed identity and granted it the roles necessary to execute the automation.
Import Modules
We will use the Azure Runbook and use a few Azure PowerShell Modules; by default, Azure Automation has the base Azure PowerShell modules, but we will need to add Az.AlertsManagement, and update the Az.Accounts as required as a pre-requisite for Az.AlertsManagement.
- Log into the Microsoft Azure Portal.
- Navigate to your Azure Automation account
- Click on Modules
- Click on + Add a module
- Click on Browse from Gallery
- Click: Click here to browse from the gallery
- Type in: Az.Accounts
- Press Enter
- Click on Az.Accounts
- Click Select
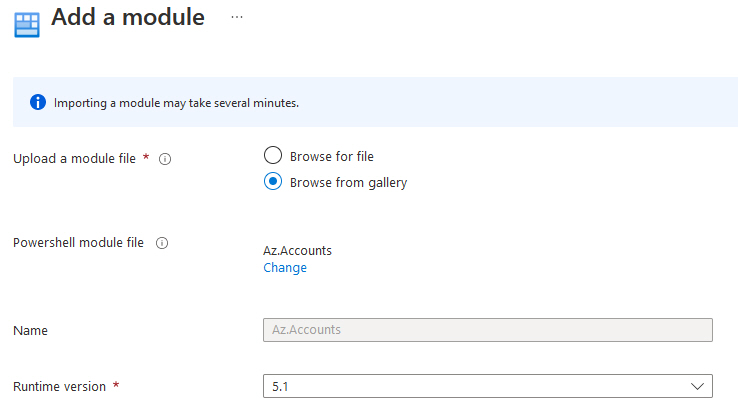
- Make sure that the Runtime version is: 5.1
- Click Import
- Now that the Az.Accounts have been updated, and it's time to import Az.AlertsManagement!
- Click on Modules
- Click on + Add a module
- Click on Browse from Gallery
- Click: Click here to browse from the gallery
- Type in: Az.AlertsManagement (note its Alerts)
- Click Az.AlertsManagement
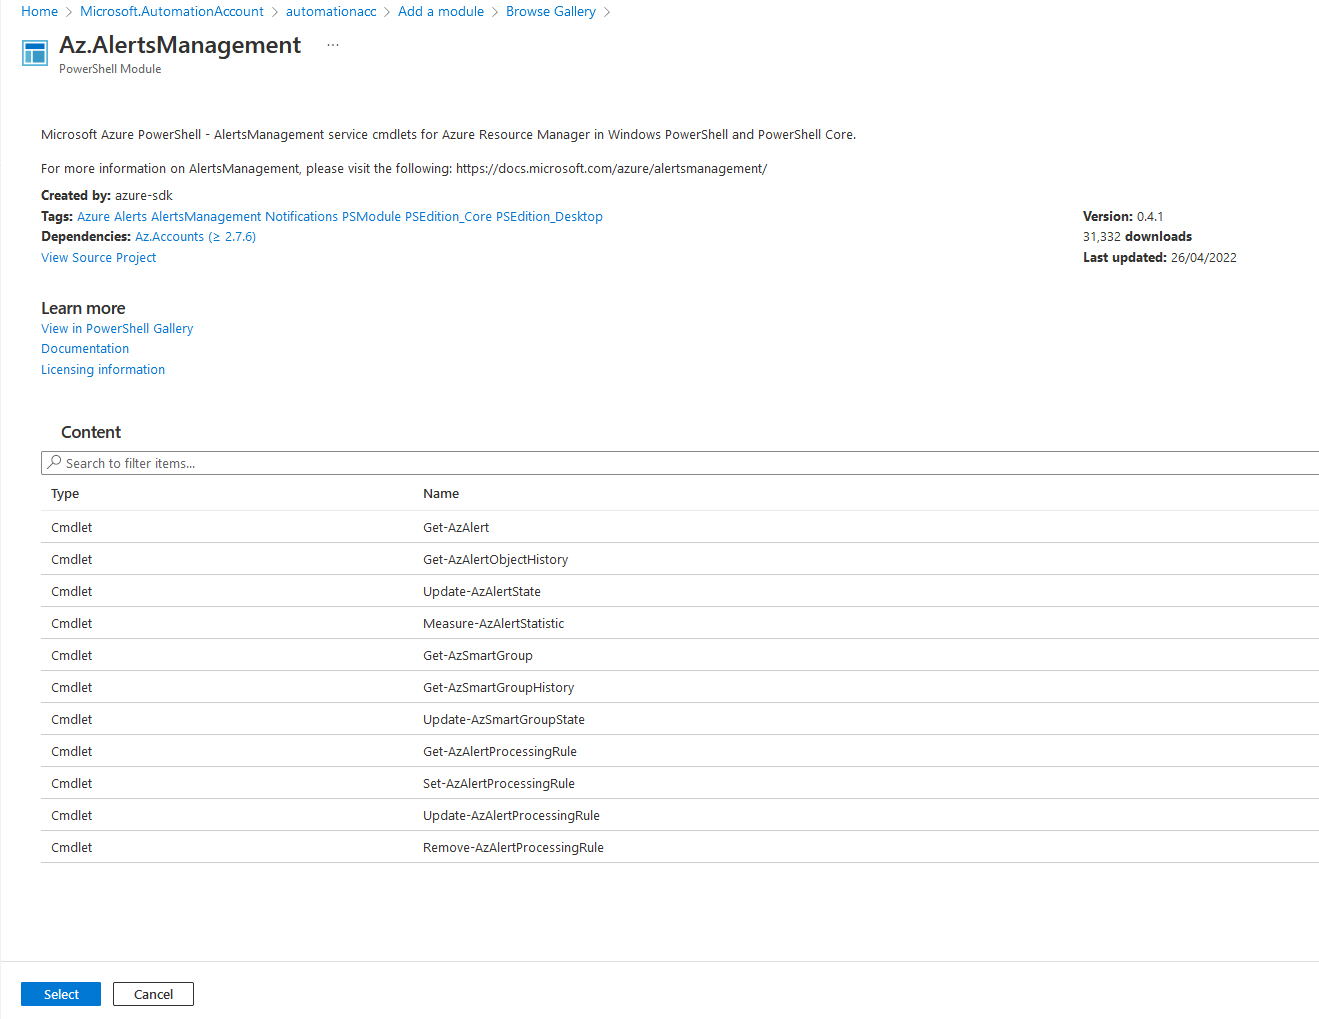
- Click Select
- Make sure that the Runtime version is: 5.1
- Click Import (if you get an error, make sure that Az.Accounts has been updated, through the Gallery import as above)
- Now you have successfully added the dependent modules!
Import Runbook
Now that the modules have been imported into your Azure Automation account, it is time to import the Azure Automation runbook.
- Log into the Microsoft Azure Portal.
- Navigate to your Azure Automation account
- Click on Runbooks
- Click + Create a runbook
- Specify a name (i.e. Deallocate-AzureVirtualMachine)
- Select Runbook type of: PowerShell
- Select Runtime version of: 5.1
- Type in a Description that explains the runbook (this isn't mandatory, but like Tags is recommended, this is an opportunity to indicate to others what it is for and who set it up)
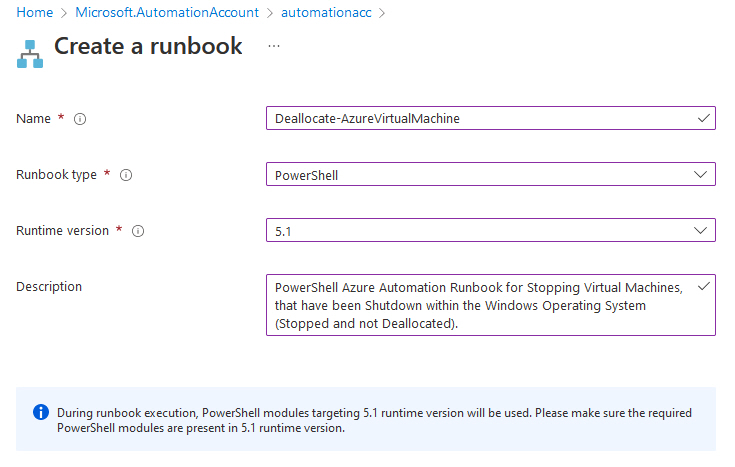
- Click Create
- Now you will be greeted with a blank edit pane; paste in the Runbook from below:
#requires -Version 3.0 -Modules Az.Accounts, Az.AlertsManagement
<#
    .SYNOPSIS
    PowerShell Azure Automation Runbook for Stopping Virtual Machines, that have been Shutdown within the Windows Operating System (Stopped and not Deallocated).
    .AUTHOR
    Luke Murray (https://github.com/lukemurraynz/)
#>

[OutputType('PSAzureOperationResponse')]
param (
    [Parameter(Mandatory = $true, HelpMessage = 'Data from the WebHook/Azure Alert')][Object]$WebhookData
)

Import-Module Az.AlertsManagement
$ErrorActionPreference = 'stop'

# Get the data object from WebhookData
$WebhookData = $WebhookData.RequestBody
Write-Output -InputObject $WebhookData
$Schema = $WebhookData | ConvertFrom-Json

#Sets the Webhook data into object
$Essentials = [object] ($Schema.data).essentials
Write-Output -InputObject $Essentials

# Get the first target only as this script doesn't handle multiple and and export variables for the resource.
$alertIdArray = (($Essentials.alertId)).Split('/')
$alertTargetIdArray = (($Essentials.alertTargetIds)[0]).Split('/')
$alertid =  ($alertIdArray)[6]
$SubId = ($alertTargetIdArray)[2]
$ResourceGroupName = ($alertTargetIdArray)[4]
$ResourceType = ($alertTargetIdArray)[6] + '/' + ($alertTargetIdArray)[7]
$ResourceName = ($alertTargetIdArray)[-1]
$status = $Essentials.monitorCondition
Write-Output -InputObject $alertTargetIdArray
Write-Output  -InputObject "status: $status" -Verbose

#Sets VM shutdown
if (($status -eq 'Activated') -or ($status -eq 'Fired')) {
    $status = $Essentials.monitorCondition
    Write-Output -InputObject "resourceType: $ResourceType" -Verbose
    Write-Output  -InputObject "resourceName: $ResourceName" -Verbose
    Write-Output  -InputObject "resourceGroupName: $ResourceGroupName" -Verbose
    Write-Output  -InputObject "subscriptionId: $SubId" -Verbose

    # Determine code path depending on the resourceType
    if ($ResourceType -eq 'Microsoft.Compute/virtualMachines') {
        # This is an Resource Manager VM
        Write-Output  -InputObject 'This is an Resource Manager VM.' -Verbose

        # Ensures you do not inherit an AzContext in your runbook
        Disable-AzContextAutosave -Scope Process

        # Connect to Azure with system-assigned managed identity
        $AzureContext = (Connect-AzAccount -Identity).context

        # set and store context
        $AzureContext = Set-AzContext -SubscriptionName $AzureContext.Subscription -DefaultProfile $AzureContext
        Write-Output   -InputObject $AzureContext
        #Checks Azure VM status
        $VMStatus = Get-AzVM -ResourceGroupName $ResourceGroupName -Name $ResourceName -Status

        Write-Output  -InputObject $VMStatus
        If ($VMStatus.Statuses[1].Code -eq 'PowerState/stopped') {
            Write-Output  -InputObject "Stopping the VM, it was Shutdown without being Deallocated - $ResourceName - in resource group - $ResourceGroupName" -Verbose
            Stop-AzVM -Name $ResourceName -ResourceGroupName $ResourceGroupName -DefaultProfile $AzureContext -Force -Verbose

            #Check VM Status after deallocation
            $VMStatus = Get-AzVM -ResourceGroupName $ResourceGroupName -Name $ResourceName -Status -Verbose

            Write-Output  -InputObject $VMStatus

            If ($VMStatus.Statuses[1].Code -eq 'PowerState/deallocated') {
                #Closes Alert
                Write-Output  -InputObject $VMStatus.Statuses[1].Code
                Write-Output  -InputObject $alertid
                Get-AzAlert -AlertId $alertid  -verbose -DefaultProfile $AzureContext
                Get-AzAlert -AlertId $alertid  -verbose -DefaultProfile $AzureContext | Update-AzAlertState -State 'Closed' -Verbose -DefaultProfile $AzureContext
            }
        }

        Elseif ($VMStatus.Statuses[1].Code -eq 'PowerState/deallocated') {
            Write-Output  -InputObject 'Already deallocated' -Verbose
        }

        Elseif ($VMStatus.Statuses[1].Code -eq 'PowerState/running') {
            Write-Output  -InputObject 'VM running. No further actions' -Verbose
        }

        # [OutputType(PSAzureOperationResponse")]
    }
}
else {
    # The alert status was not 'Activated' or 'Fired' so no action taken
    Write-Output  -InputObject ('No action taken. Alert status: ' + $status) -Verbose
}
- Click Save
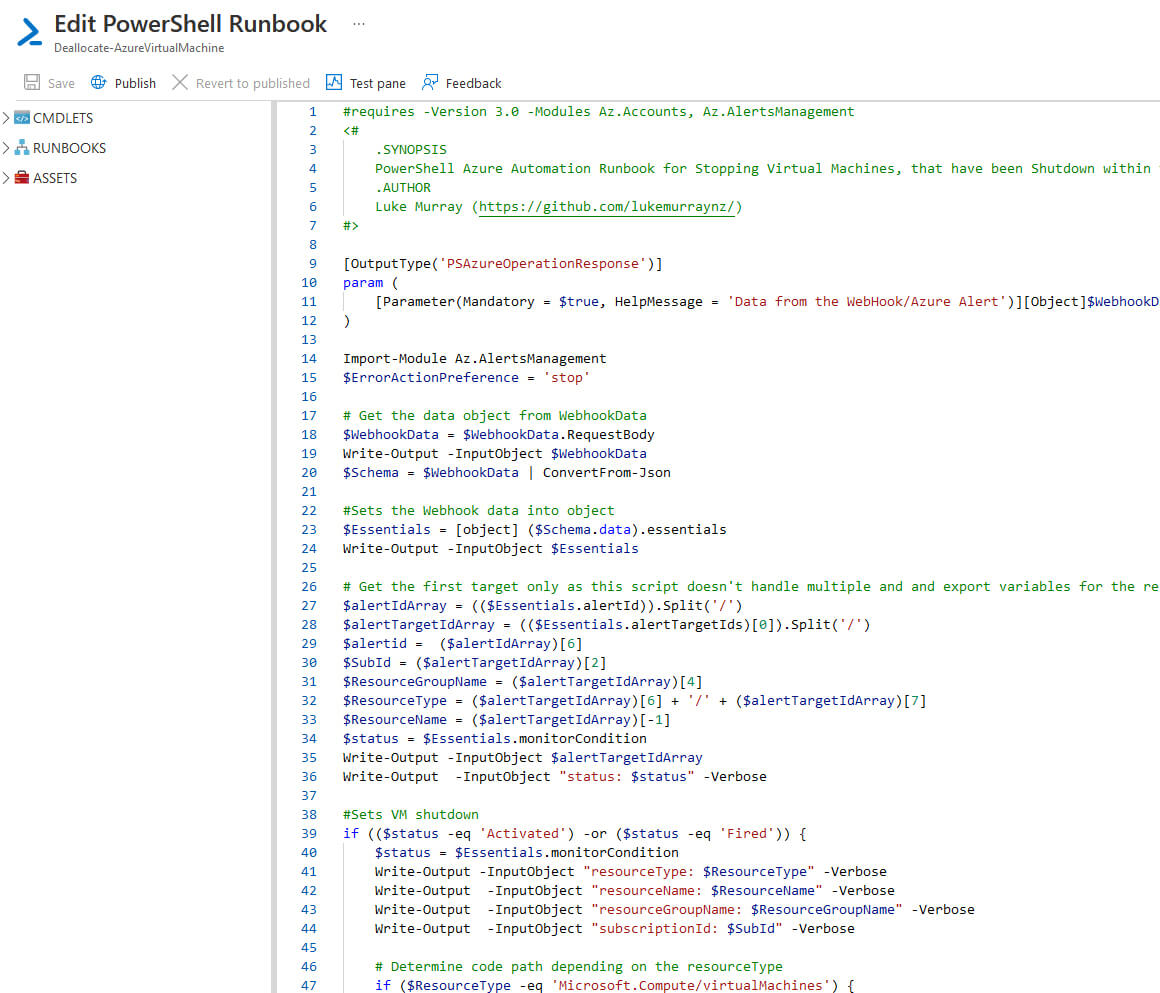
- Click Publish (so the runbook is actually in production and can be used)
- You can select View or Edit at any stage, but you have now imported the Azure Automation runbook!
Setup Webhook
Now that the Azure runbook has been imported, we need to set up a Webhook for the Alert to trigger and start the runbook.
- Log into the Microsoft Azure Portal.
- Navigate to your Azure Automation account
- Click on Runbooks
- Click on the runbook you just imported (i.e. Deallocate-AzureVirtualMachine)
- Click on Add webhook
- Click Create a new webhook
- Enter a name for the webhook
- Make sure it is Enabled
- You can edit the expiry date to match your security requirements; make sure you record the expiry date, as it will need to be renewed before it expires.
- Copy the URL and paste it somewhere safe (you won't see this again! and you need it for the next steps)
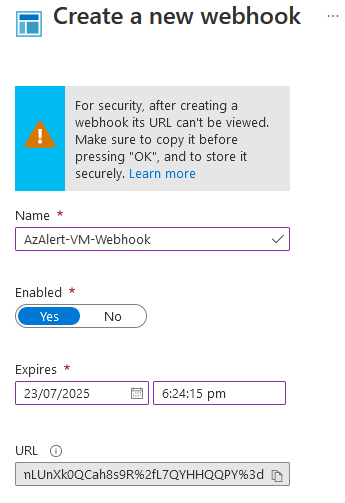
- Click Ok
- Click on Configure parameters and run settings.
- Because we will be taking in dynamic data from an Azure Alert, enter in: [EmptyString]
- Click Ok
- Click Create
- You have now set up the webhook (make sure you have saved the URL from the earlier step as you will need it in the following steps)!
Setup Alert & Action Group
Now that the Automation framework has been created with the Azure Automation account, runbook and webhook, we now need a way to detect if a Virtual Machine has been Stopped; this is where a Resource Health alert will come in.
- Log into the Microsoft Azure Portal.
- Navigate to: Monitor
- Click on Service Health
- Select Resource Health
- Select + Add resource health alert
- Select your subscription
- Select Virtual machine for Resource Type
- You can target specific Resource Groups for your alert (and, as such, your automation) or select all.
- Check Include all future resource groups
- Check include all future resources
- Under the Alert conditions, make sure Event Status is: All selected
- Set Current resource status to Unavailable
- Set Previous resource status to All selected
- For reason type, select: User initiated and unknown
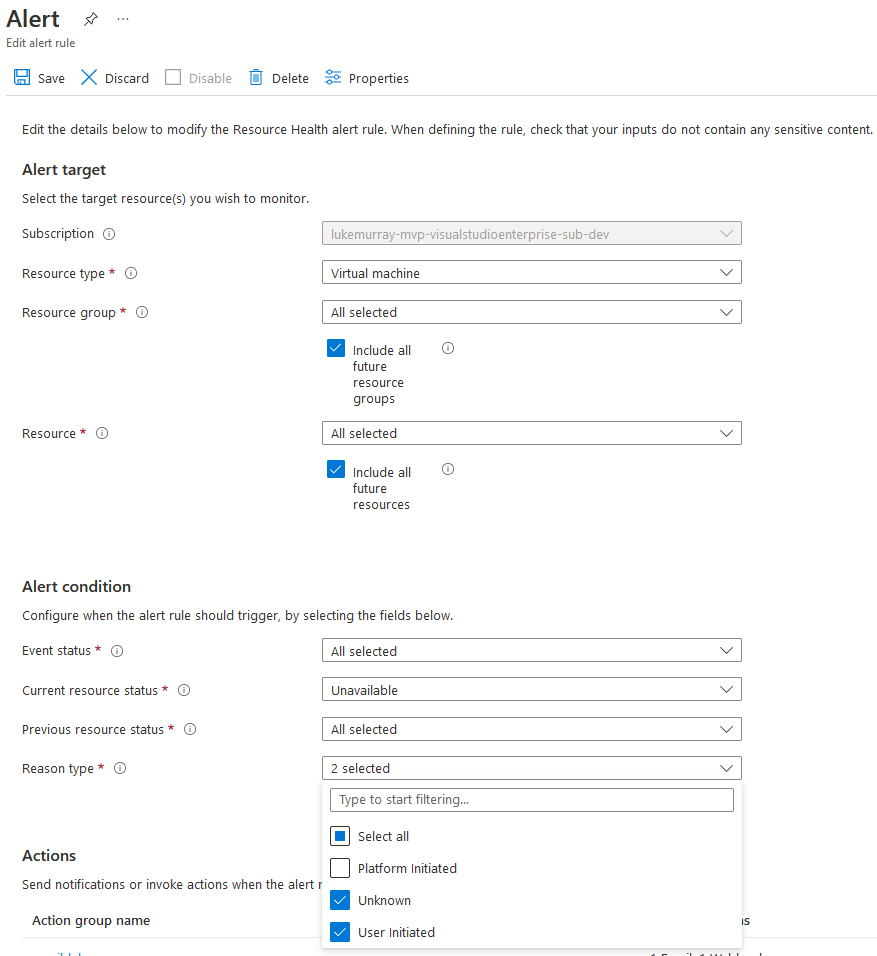
- Now that we have the Alert rule configured, we need to set up an Action group. That will get triggered when the alert gets fired.
- Click Select Action groups.
- Click + Create action group
- Select your subscription and resource group (this is where the Action alert will go, I recommend your Azure Management/Monitoring resource group that may have a Log Analytics workspace as an example).
- Give your Action Group a name, i.e. AzureAutomateActionGroup
- The display name will be automatically generated, but feel free to adjust it to suit your naming convention
- Click Next: Notifications
- Under Notifications, you can trigger an email alert, which can be handy in determining how often the runbook runs. This can be modified and removed if it is running, especially during testing.
- Click Next: Actions
- Under Action Type, select Webhook
- Paste in the URI created earlier when setting up the Webhook
- Select Yes to enable the common alert schema (this is required as the JSON that the runbook is parsing is expecting it to the in the schema, if it isn't the runbook will fail)

- Click Ok
- Give the webhook a name.
- Click Review + create
- Click Create
- Finally, enter in an Alert name and description, specify the resource group for the Alert to go into and click Save.
Test Deallocate Solution
So now we have stood up our:
- Azure automation account
- Alert
- Action Group
- Azure automation runbook
- Webhook
It is time to test! I have a VM called: VM-D01, running Windows (theoretically, this runbook will also run against Linux workloads, as its relying on the Azure agent to send the correct status to the Azure Logs, but in my testing, it was against Windows workloads) in the same subscription that the alert has been deployed against.
As you can see below, I shut down the Virtual Machine. After a few minutes (be patient, Azure needs to wait for the status of the VM to be triggered), an Azure Alert was fired into Azure Monitor, which triggered the webhook and runbook, and the Virtual Machine was deallocated, and the Azure Alert was closed.

