Azure Container Registry Continuous Patching for Security
Last year, I blogged about Container Patching with Azure DevOps, Trivy and Copacetic, and how to use Azure DevOps to automate the patching of your container images using Trivy and Copacetic. This was a great solution, but it required a lot of manual work to set up and maintain. Today, I am going to take a look at Continuous Patching with Azure Container Registry (ACR) and how to use it to automate the patching of your container images.
🛡️ What is ACR Continuous Patching?
At the time of writing, this is a Preview feature, so the experience we run through today may change in the future or the feature may be removed entirely.
The following limitations apply:
- Windows-based container images aren't supported.
- Only "OS-level" vulnerabilities that originate from system packages will be patched. This includes system packages in the container image managed by an OS package manager such as "apt” and "yum”. Vulnerabilities that originate from application packages, such as packages used by programming languages like Go, Python, and NodeJS, cannot be patched.
- End of Service Life (EOSL) images are not supported by Continuous Patching. EOSL images refer to images where updates, security patches, or technical support are no longer available for the underlying operating system. Examples include images based on older operating system versions, such as Debian 8 and Fedora 28. EOSL images will be skipped from the patch, despite having vulnerabilities. The recommended approach is to upgrade the underlying operating system of your image to a supported version.
Azure Container Registry's Continuous Patching feature automates the detection and remediation of operating system(OS) level vulnerabilities in container images. By scheduling regular scans with Trivy and applying security fixes using Copa, you can maintain secure, up-to-date images in your registry, without requiring access to source code or build pipelines. Simply customize the schedule and target images to keep your Azure Container Registry(ACR) environment safe and compliant.
Here are a few scenarios to use Continuous Patching:
- Enforcing container security and hygiene: Continuous Patching enables users to quickly fix OS container CVEs without the need to rebuild from upstream fully.
- Speed of Use: Continuous Patching eliminates the dependency on upstream updates for specific images by automatically updating packages. Vulnerabilities can appear every day, while popular image publishers may only release new content once a month. With Continuous Patching, you can ensure that container images within your registry are patched as soon as the latest set of OS vulnerabilities is detected.
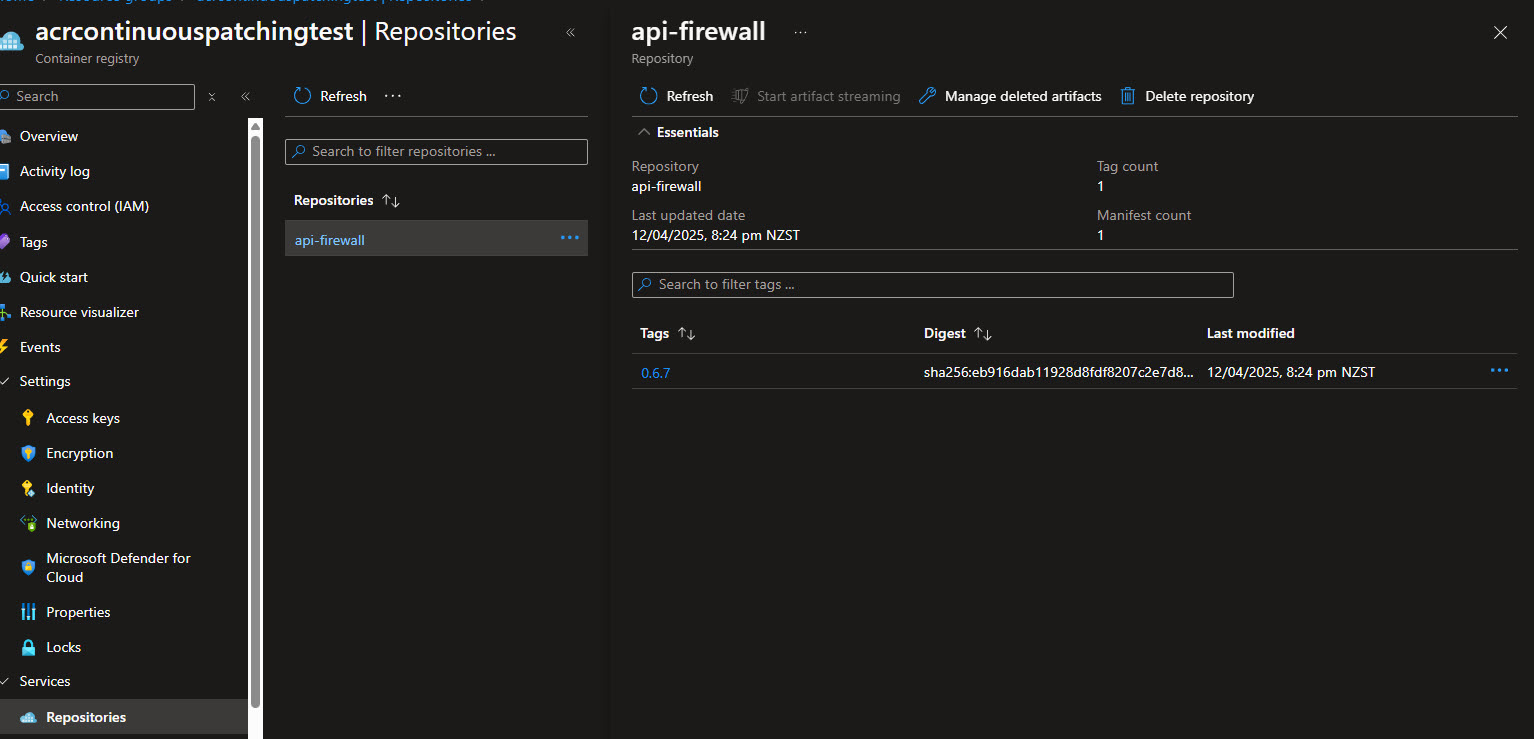
🧪 Test Environment Setup
In my testing, I am going to use the api-firewall image, version 0.6.16 that I have pushed to my Azure Container Registry.
⚙️ How Continuous Patching Works
Let's take a look at how this will work.
Continuous Patching in ACR creates a new image per patch. ACR relies on a tag convention to version and identify patched images. The two main approaches are incremental and floating.
| Feature | Incremental Tagging | Floating Tagging |
|---|---|---|
| How It Works | Adds numerical suffix (-1, -2, etc.) to original tag | Uses single mutable tag "-patched" that always points to latest version |
| Example | If base is python:3.11:- First patch: python:3.11-1- Second patch: python:3.11-2 | If base is python:3.11:- All patches use: python:3.11-patched |
| Special Rules | - Tags -1 to -999 are considered patch tags- Tags with -x where x > 999 are treated as original tags- Avoid pushing your tags ending with -1 to --999- Errors if -999 versions are reached | Tag automatically updates with each new patch |
| Version History | Preserved (each patch gets unique tag) | Not preserved (single tag is updated) |
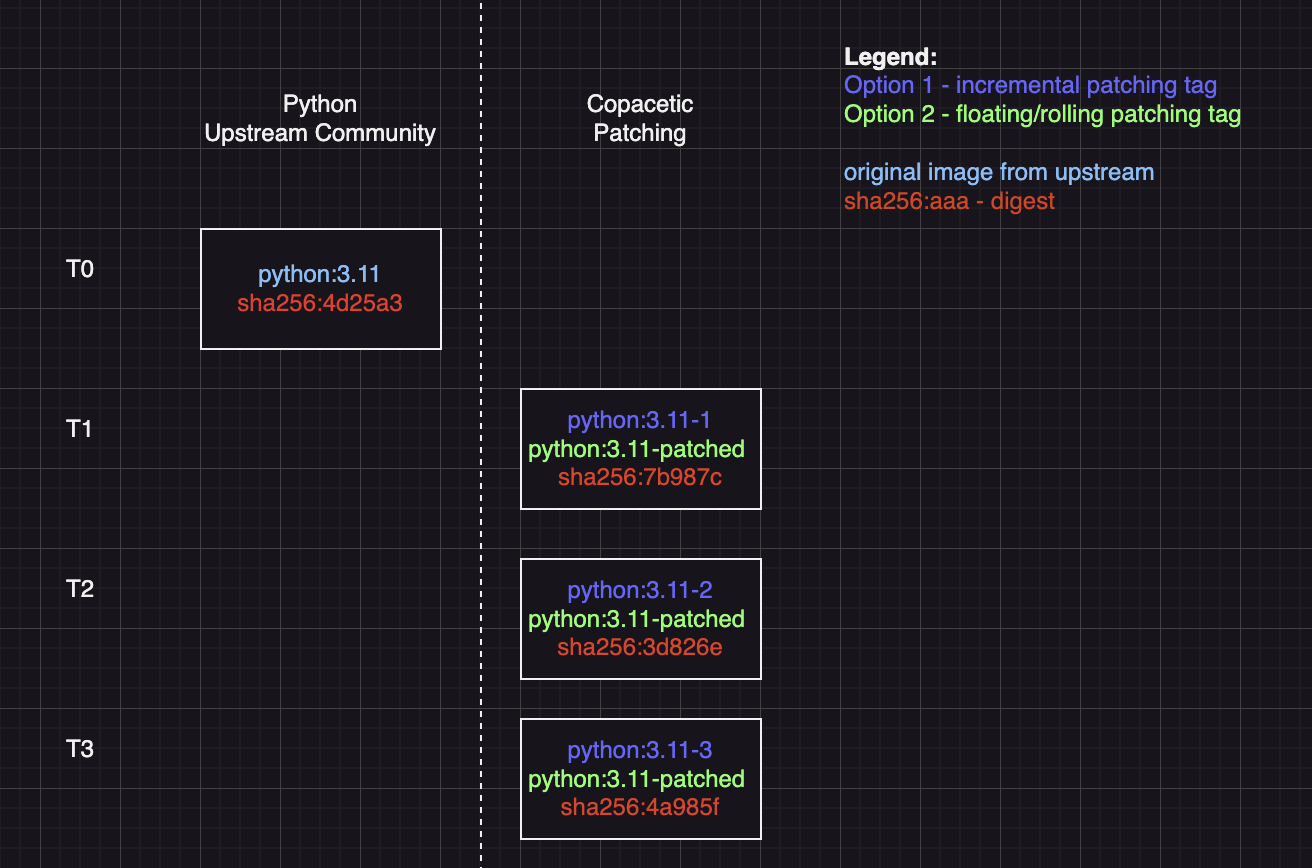
Incremental (default) is ideal for environments where auditability and rollbacks are crucial, as a unique tag identifies each new patch.
Floating is ideal if you prefer a single pointer to the latest patch for your CI/CD pipelines. Reduces complexity by eliminating the need to update references in downstream applications with each patch, but sacrifices strict versioning, making it challenging to roll back.
🚀 Getting Started with Continuous Patching
So let us get started. To begin, I will utilize my Codespace_IaC_Coding Codespace configuration, which already meets the prerequisites I need, specifically Azure CLI.
📦 Installing the Required Extension
To start, we need to install the CLI extension for ACR Continuous Patching:
az extension add -n acrcssc

Then we need to log in to our Azure Container Registry:
az login
az acr login -n <myRegistry>

📝 Configuring the Continuous Patching Schema
Now we need to prepare the JSON schema that we will use to configure our Continuous Patching.
This schema defines which repositories and tags to patch, when to patch them, and how to tag the patched images.
The schema includes these key components:
version- Used by the ACR team to track schema versions. Don't modify this unless instructed.tag-convention- Optional field that specifies the tagging method. Values can be "incremental" (default) or "floating".repositories- An array of objects containing:repository- The name of the repository to patchtags- Array of specific tags to patch (use wildcard*to include all tags)enabled- Boolean (true/false) to enable or disable patching for this repository
For example:
{
  "version": "v1",
  "tag-convention": "incremental",
  "repositories": [
    {
      "repository": "api-firewall",
      "tags": ["0.6.7", "latest"],
      "enabled": true
    }
  ]
}
So let us create the file as below:
cat <<EOF > continuouspatching.json
{
  "version": "v1",
  "tag-convention": "incremental",
  "repositories": [
    {
      "repository": "api-firewall",
      "tags": ["0.6.7", "latest"],
      "enabled": true
    }
  ]
}
EOF
🧐 Running a Dry Run
Next, we can run a dry run of the supply-chain workflow to validate that our repository and tags are correct:
az acr supply-chain workflow create -r myRegistry -g myResourceGroup -t continuouspatchv1 --config ./continuouspatching.json --schedule 1d --dry-run

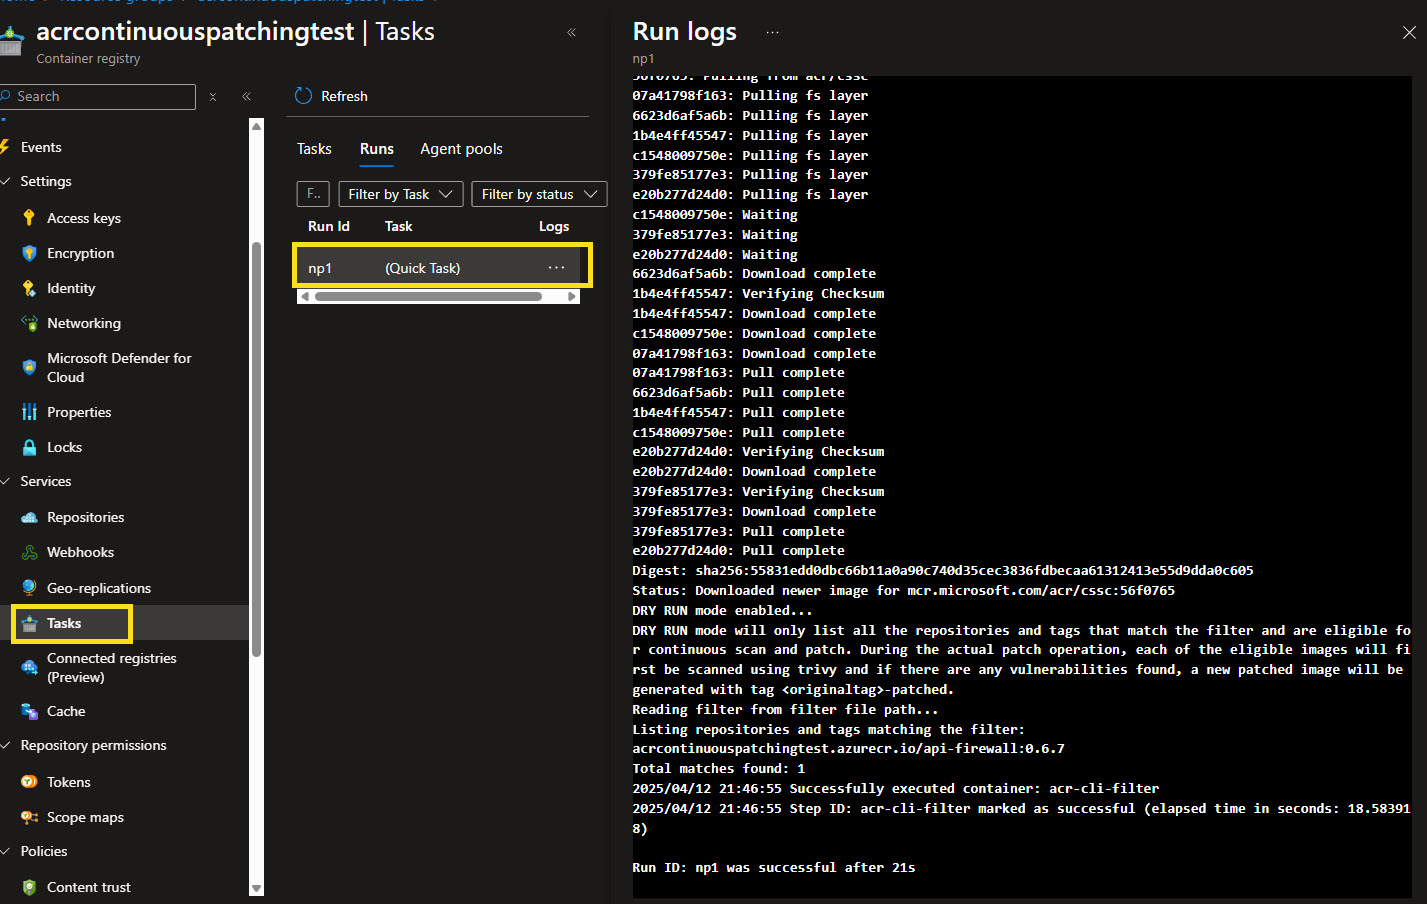
You can also view the run in the Azure Portal, and see it pull the CSSC (Microsoft's Containers Secure Supply Chain (CSSC) framework) image to run the workflow.
You can use the az acr supply-chain workflow update command to update the workflow configuration, if needed, at a later stage.
📅 Understanding the Scheduling System
Before we do, let's understand how scheduling works in ACR Continuous Patching.
The scheduling system works like a calendar with fixed dates each month, not like a countdown timer!
The --schedule parameter sets how many days between patch runs, but these always align to fixed days counting from the 1st of each month. Think of it like marking specific dates on a calendar.
For example, if you choose --schedule 7d, patching will run on the 1st, 8th, 15th, 22nd, and 29th of each month (every 7 days from the 1st).
Here's what happens with different schedule values:
| Schedule | Runs on these days each month | Example |
|---|---|---|
1d | Every day | Patches run daily |
3d | 1st, 4th, 7th, 10th, 13th, 16th, 19th, 22nd, 25th, 28th, 31st | If today is the 5th, next run is on the 7th |
7d | 1st, 8th, 15th, 22nd, 29th | If today is the 10th, next run is on the 15th |
14d | 1st, 15th, 29th | If today is the 20th, next run is on the 29th |
30d | 1st, 31st (if month has 31 days) | Runs at the beginning and end of the month |
When you add the --run-immediately flag, a patch happens right away, and then the next one follows the regular schedule.
Remember: The schedule always resets at the beginning of each month. So if your last patch in January was on the 29th with a 7d schedule, the next one will be on February 1st, not February 5th.
▶️ Executing the Workflow
Now let's run the workflow:
az acr supply-chain workflow create -r myRegistry -g myResourceGroup -t continuouspatchv1 --config ./continuouspatching.json --schedule 14d --run-immediately --verbose
If you get the following warning:
Failed to validate and deploy template: (DeploymentFailed) At least one resource deployment operation failed. Please list deployment operations for details. Please see https://aka.ms/arm-deployment-operations for usage details. Code: DeploymentFailed Message: At least one resource deployment operation failed. Please list deployment operations for details. Please see https://aka.ms/arm-deployment-operations for usage details. Target: /subscriptions/11b74992-d520-46e1-a9e9-b55c57d2e890/resourceGroups/acrcontinuouspatchingtest/providers/Microsoft.Resources/deployments/continuouspatchingdeployment Exception Details: (RoleAssignmentUpdateNotPermitted) Tenant ID, application ID, principal ID, and scope are not allowed to be updated. Code: RoleAssignmentUpdateNotPermitted Message: Tenant ID, application ID, principal ID, and scope are not allowed to be updated. (RoleAssignmentUpdateNotPermitted) Tenant ID, application ID, principal ID, and scope are not allowed to be updated.
It may mean that the Tasks have existed before, but if the Tasks were deleted in the portal, then it won't have removed the permission assignments.
You can check the permissions in the Access control (IAM) portal, and if they exist, you can delete them manually from the portal.
If you run the following workflow delete command (preferred), it will delete the assigned RBAC permissions as well:
az acr supply-chain workflow delete -r myRegistry -g myResourceGroup -t continuouspatchv1 --yes
You can add the --verbose flag to the command to get more detailed output during the workflow creation process and the --debug flag to get even more detailed output, including the HTTP requests and responses sent to Azure.
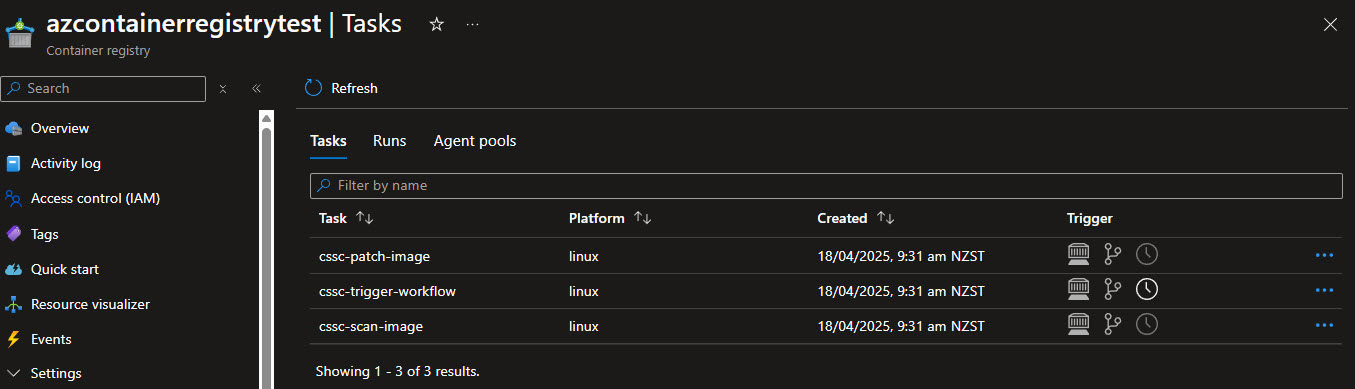
🔧 Reviewing the Created Tasks
Now that the Tasks have been created, you can see them in the Azure Portal.
You can also run the following command to see the state of the workflows:
az acr supply-chain workflow show -r myRegistry -g myResourceGroup -t Continuouspatchv1 -o table
The workflow creates three tasks in your Azure Container Registry:
| Task Name | Description | Purpose |
|---|---|---|
| cssc-trigger-workflow | Triggers the continuous patching workflow based on your configured schedule | This is the main scheduler that runs on your defined schedule (every 14 days in our example). It checks which repositories match your configuration and initiates the scanning process. |
| cssc-scan-image | Performs vulnerability scanning using Trivy | This task scans your container images for OS-level vulnerabilities. If vulnerabilities are found, it automatically triggers the patching task. |
| cssc-patch-image | Applies security patches using Copacetic | This task does the actual patching work, fixing OS vulnerabilities in your container images without needing to rebuild them from source. |
These three tasks work together to form a complete patching pipeline: the trigger starts on schedule, the scanner identifies vulnerabilities, and the patcher automatically fixes them.
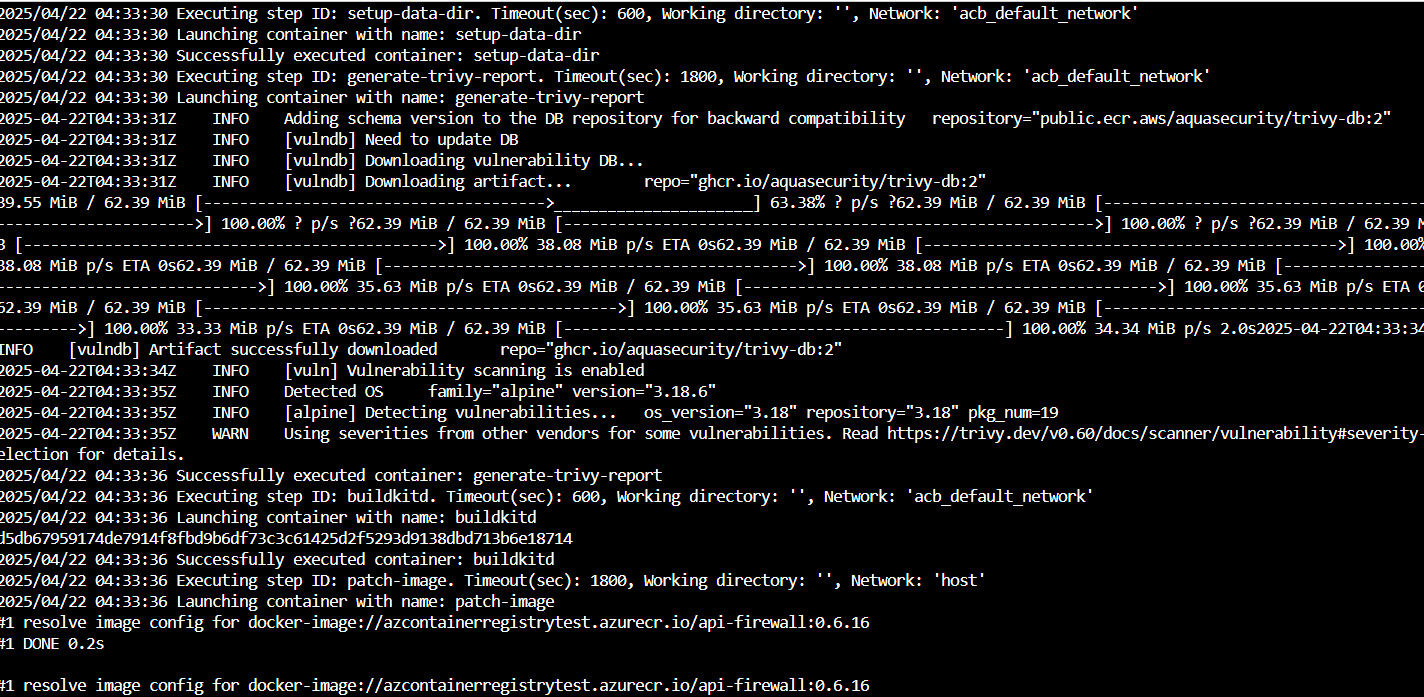
📊 Monitoring Task Execution
You can check the logs of the run by looking up the recent Runs:
az acr task logs --registry myRegistry
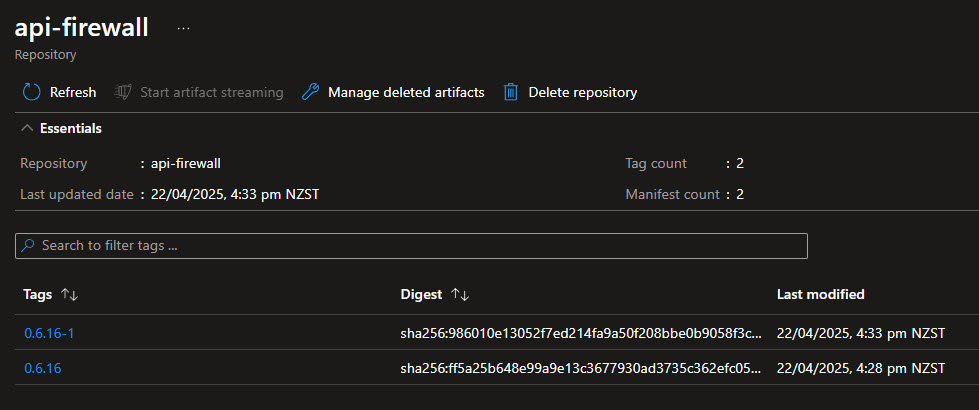
🎯 Viewing the Results
Now, if we go into the repositories in the Azure Portal, we can see that the image has been patched with the incremental tag.