Azure Image Builder Image Build with Bicep and Azure DevOps
Azure Image Builder is an Azure managed service (running Packer underneath) that allows you to create customised Virtual Machine images.
By using standardized virtual machine (VM) images, your organization can more easily migrate to the cloud and help ensure consistency in your deployments. Images ordinarily include predefined security, configuration settings, and any necessary software. Setting up your own imaging pipeline requires time, infrastructure, and many other details. With Azure VM Image Builder, you only need to create a configuration that describes your image and submit it to the service where it is built and distributed. With VM Image Builder, you can migrate your image customization pipeline to Azure as you continue using existing scripts, commands, and processes. You can integrate your core applications into a VM image so that your VMs can take on workloads after the images are created. You can even add configurations to build images for Azure Virtual Desktop as virtual hard discs (VHDs) for use in Azure Stack or for ease of exporting.
Overview
With the AIB (Azure Image Builder) service, you can quickly and easily create machine images for Azure environments using standardized virtual machine (VM) images, create a configuration that describes your image and submit it to the service for building and distribution.
When you submit the configuration to the service, Azure creates an image template resource. When the image template resource is made, a staging resource group is created in your Azure subscription in the following format: IT_DestinationResourceGroupTemplateName(GUID). The staging resource group contains files and scripts, which are referenced in the File, Shell, and PowerShell customization in the ScriptURI property.
To run the build, you invoke Run on the VM Image Builder template resource. The service then deploys additional resources for the build, such as a VM, network, disk, and network adapter. If you build an image without using an existing virtual network, VM Image Builder also deploys a public IP and network security group, and it connects to the build VM using Secure Shell (SSH) or Windows Remote Management (WinRM) protocol. If you select an existing virtual network, the service is deployed via Azure Private Link, and a public IP address isn't required.
When the build finishes, all resources are deleted except for the staging resource group and the storage account. You can remove them by deleting the image template resource or leaving them in place to run the build again.
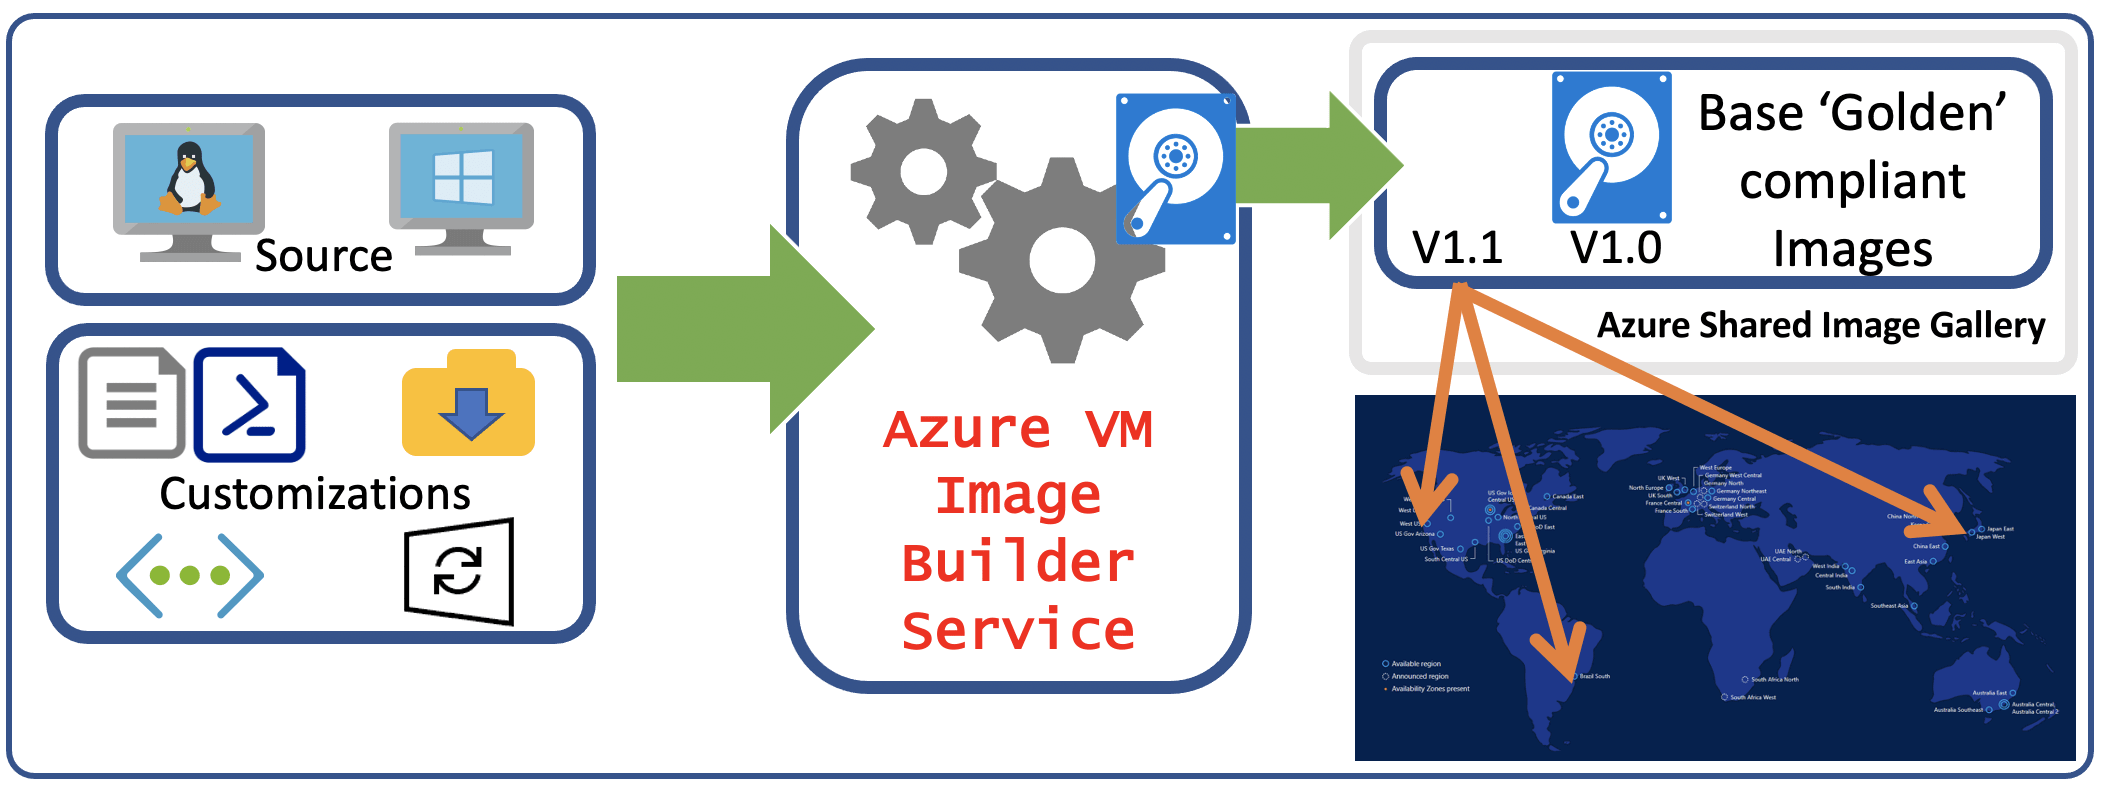
To use Azure Image Builder, you need to create a configuration that describes your image and submit it to the service where it is built and distributed. A high-level workflow is illustrated in the following diagram:
Today, we will be using Azure Bicep to create the following:
- Azure Compute Gallery (this will be used to hold our Image Template, so we can build our Virtual Machines from it)
- Image definition (for the purpose, we will using a Windows Server 2022 Marketplace image, with additional customisations)
- Image Template (this will include our customisations)
- User Assigned Managed Identity (the user assigned managed identity will be used to build the image and read the blobs from the Azure storage account)
- Azure Storage account (the Azure storage account, will hold our Application install files)
And then an Azure DevOps pipeline to deploy and build our template, including an application install of Azure Storage Explorer and bginfo.
All the code can be found on my public GitHub repository here: lukemurraynz/AzureImageBuilder
The Azure DevOps pipeline will complete the following steps:
- Create a new Azure Resource Group (if required)
- Create an Azure storage account (with public access enabled, and anonymous blob access)
- Copy the app install files in the /apps/ directory in git to the Azure storage account (if they don't already exist)
- Deploy the Azure Image Builder infrastructure and Template
- Trigger an Azure CLI command to run the template build
- Adjust public access to the Azure storage account to disable.
The git repository is laid out like so:
| Folder | Description |
|---|---|
| .pipelines | Contains CI/CD pipeline configurations and scripts. |
| apps | Houses application code and related resources. |
| iac | Stores Infrastructure as Code (IaC) configurations. |
| scripts | Contains utility scripts and other automation tools. |
Within the iac folder is a customizations.bicep file. This file is intended for your image customisations; I intended to keep this separate from the infrastructure for easy modification without impacting any other file.
Azure DevOps Configuration
Create Project
Before we can build an image using Bicep and Azure DevOps, we need to create a project to hold our code.
- Login to your Azure DevOps instance
- Click + New Project
- Type in a name for the project (ie AIB (short for Azure Image Builder))
- Click Create
Initialize Repo
Now that we have our project, we can initialize the repository by cloning the lukemurraynz/AzureImageBuilder repository, containing all the code we need.
Note: Due to git limitations, the Azure Storage Explorer install file is unable to be stored in the GitHub repository, for my demo. I will upload it to Azure DevOps after the clone. It's not recommended to store the binary files for large installs in Git directly for production and to store them in an Azure storage account. This process can be modified to skip the copy application step and install existing files from the Azure storage account.
- Login to your Azure DevOps instance
- Navigate to your AIB project
- Click Repos
- Click Import
- Make sure the repository type is: Git and clone URL is: https://github.com/lukemurraynz/AzureImageBuilder
- Click Import
Create Azure Service Connection
Now that we have our repository and the base code - we need a service connection. This connection will allow our Azure DevOps pipeline authorization to our Microsoft Azure subscription. To do this, we will use, the new Workload Identity Federation, which allows us to authenticate to Azure, without worrying about secret management.
- Login to your Azure DevOps instance
- Navigate to your AIB project
- Click on Project Settings
- Click on Service connections
- Click on Create service connection
- Select Azure Resource Manager
- Click Next
- Click Workload Identity federation (automatic)
- Click Next
- Select your Subscription (after authenticating to Azure), and give it a name (you will need the name for the Pipeline).
- Click Save
Note: Consider scoping your Service Connection to the individual Image Builder Resource Group for the least permissions.
Import Pipeline
Now that we have our Service Connection let us import our pipeline, which will be used to run our image build.
- Login to your Azure DevOps instance
- Navigate to your AIB project
- Click Pipelines
- Click Create pipeline
- Specify Azure Repos Git
- Select your repository (ie AIB)
- Select Existing Azure Pipelines YAML file
- Under the dropdown list for the Path, select: /.pipelines/azure-pipelines.yml
- Click Continue
- Click on the ellipsis and select Save
Edit Pipeline to use service connection
Now that the pipeline has been imported, we need to edit it to use the Azure resource manager service connection we created earlier. Make sure you know the name of your service connection (ie ServiceConnection-AIB)
-
Login to your Azure DevOps instance
-
Navigate to your AIB project
-
Click Pipelines
-
Click on your Pipelines, select Edit
-
The Service Connection has been created as a Variable, named serviceconnection in the pipeline, so we need to update the section:
serviceconnection: azserviceconnections
To match the name of our service connection:
serviceconnection: ServiceConnection-AIB
Then click Save
Note: The Pipeline, by default, is set to run automatically; when it triggers a new commit to the main branch of the repo, you can adjust this to None else. It will try to run and fail (as its missing variables, etc). If you do this, you can trigger the pipeline manually, but it depends on your requirements; as part of the testing - I liked that it automatically ran on every change to the code without having been manually triggered.

Edit Pipeline to add variables
Here is where some of the customisation comes into play. The pipeline is looking for the following variables:
- imagetemplatename
- location
- resourceGroupName
- storageaccountname
These variables will be consumed by the Azure CLI, to create the Resource Group and Azure Bicep, to create the Image template and Azure storage account, in your preferred region.
Because in my demo, I am creating a 'Windows Server 2022' image in Australia East, my variables and values will be as follows:
| Variables | Values |
|---|---|
| storageaccountname | saccimg4545 |
| resourceGroupName | azimagebuild-rg |
| location | australiaeast |
| imagetemplatename | server2022template |
So let us add them.
- Login to your Azure DevOps instance
- Navigate to your AIB project
- Click Pipelines
- Click on your Pipelines, select Edit
- Click Variables
- Select New Variable
- Add the required variables, make sure they are unique to your own environment (ie the storage account name, needs to be globally unique)
- Click Save

There is an Azure DevOps Task, to do the build, however its in preview and doesn't support elements such as a Virtual Machine restart at this time, so in my Pipeline, I am triggering the build using the Azure CLI.
Bicep Configuration
You can modify the Bicep according to your own environment; items in the 'main.bicep' file you may want to change (that I didn't turn into a variable) are:
- Compute Gallery Name
- Compute Gallery image name
- Paired region that the image template will be replicated to. This is set to the same region as my source.
- Name of the User Assigned Managed Identity
To reduce build time, the build VM size I am using is custom: Standard_D4ds_v5. If you remove this, it will default to the Standard_D2ds_v4 size, as you only pay for the time that the VM is building and sys prepping; I found the extra cores useful.
I separated the Image Template customization components, into its own Bicep module, that gets called into the main variable, I intend the customizations.bicep to be separate from the Azure Image Builder infrastructure components, to reduce impact or data loss, and make it easier for a first timer to customize the image separately, allowing you to revert any changes to the image build itself easily.
You may also want to test Image Optimization; I have this enabled; however, it does add time to the image build process, but could improve your Virtual Machine creation time, could be useful to use in conjunction with a service, like Azure Virtual Desktop.
This is the main file you will want to start modifying for your own image customization; I recommend starting small (i.e. create a folder), then adding the apps and customisations one after the other.
As part of the image build, I am:
- Creating a c:\Apps\ folder
- Setting the timezone (although this gets overwritten by the sysprep back to UTC)
- Install the latest Windows Updates
- Restart
- Copy bginfo from the storage account (this has been copied to the Azure storage account as part of the pipeline step) to the apps folder. As it is small in size, I am using the File Packer provider to do the copy.
- Copy the Azure Storage Explorer install file from the storage account (this has been copied to the Azure storage account as part of the pipeline step) to the apps folder. As this is a larger file, the File packer provider locked up when attempting to copy, so I am leveraging Invoke-RestMethod to download it to the apps folder.
- Extract the bginfo zip file
- Install the Azure Storage Explorer
- Do a final Windows Update install (in a past life, I've found new updates - ie Visual Studio can popup after application installs, if your image build time is quite long, feel free to remove this step, for me its a personal preference)
- Do a final restart
As you can see, everything is mostly PowerShell-driven. Be aware of the double backslashes needed as well; for directories, using a single backslash will cause issues, as it is classed as an escape character. When editing the Bicep file, make sure you make sure of the Bicep Visual Studio code extension. I have also created a base Codespace in the GitHub repo that you could work from as well.
Then, ideally, you can delete your previous image template every month and create a new one with the latest Windows Updates. Hopefully, this has given you enough of a sample to work from.
Run image build deployment
So, we have modified our Bicep and have our pipeline ready to go! It's time to run the build and create our Azure resources. We do this from Azure DevOps.
- Login to your Azure DevOps instance
- Navigate to your AIB project
- Click Pipelines
- Click on your Pipeline
- Select Run pipeline
- Before the pipeline runs, we need to verify that the Pipeline has permission to use the service connection
- Select Verify
- Select Approve to allow the pipeline stages, the ability to use the service principal
If your build Build fails halfway through with the following error when attempting to create the Azure Image Builder resources: ERROR: {"code": "InvalidTemplateDeployment", "message": "Deployment failed with multiple errors: 'Authorization failed for template resource 'e6eaf07c-bb64-57d4-a69a-6d1463a77bdb' of type 'Microsoft.Authorization/roleAssignments'. The client '1d06bec0-6bb8-4ba2-b33b-98a4eafd5b84' with object id '1d06bec0-6bb8-4ba2-b33b-98a4eafd5b84' does not have permission to perform action 'Microsoft.Authorization/roleAssignments/write This is due to the Service Connection not having Owner rights to the Azure subscription. Owner rights are created for the User Assigned Managed identity role assignments. You can fix this by copying the Object ID of the error, navigating to Entra ID Enterprise Apps, and search by your Object ID. This will find an Enterprise Application, that is used by Azure DevOps to talk to Azure. Copy the Name, and navigate to your Azure subscription, and Access Control (IAM) blade, and add in your Enterprise Application as Owner.
It can take 30+ minutes to build a Virtual Machine; the more customisations, the longer it will take, so please be patient, after the build has kicked off. As part of the build, you can also download and review the packer logs directly from the Storage account that was created in the IT resource group. I highly recommend testing one customization before proceeding to the next until you have the implementation downpack. The build step, if completed, will move to Optimizing, then Distributing to the Compute Gallery before it can be used.
Build Virtual Machine
Now that we have successfully built our Windows Server 2022 image, entirely automated using Bicep and Azure DevOps pipeline, let us create a Virtual Machine using the image that now resides in our Compute Gallery. To do this, we will simply use the Azure Portal to build and test from the Compute Gallery.
- Login to the Azure Portal
- Navigate to your Azure Compute Gallery
- Click your Image definition, which should now have a version associated with it (ie 1.0.0 (latest version))
- Click + Create VM
- Navigate through the normal steps to create your virtual machine using your custom template.

As you can see, the Virtual Machine has the Apps folder, Azure Storage Explorer installed and the bginfo executable stored as part of the image template.
Code
All the code can be found on my public GitHub repository here: lukemurraynz/AzureImageBuilder. This is the master (and happy to take any contributions to it; just open a Pull Request),; for reference the code can be reviewed below:
main.bicep
// Define parameters for the Bicep template
param location string = resourceGroup().location
param imagetemplatename string
param azComputeGalleryName string = 'myGallery'
@description('The name of the Storage account.')
param stgaccountname string
param azUserAssignedManagedIdentity string = 'useri'

// Define the details for the VM offer
var vmOfferDetails = {
  offer: 'WindowsServer'
  publisher: 'MicrosoftWindowsServer'
  sku: '2022-datacenter-azure-edition'
}

// Include the customizations module
module customizationsModule 'customizations.bicep' = {
  name: 'customizationsModule'
  params: {
    stgaccountname: stgaccountname
  }
}

// Create a user-assigned managed identity
resource uami 'Microsoft.ManagedIdentity/userAssignedIdentities@2023-01-31' = {
  name: azUserAssignedManagedIdentity
  location: location
}

// Create a Compute Gallery
resource azComputeGallery 'Microsoft.Compute/galleries@2022-03-03' = {
  name: azComputeGalleryName
  location: location
  properties: {
    description: 'mygallery'
  }
}

// Assign the Contributor role to the managed identity at the resource group scope
resource uamicontribassignment 'Microsoft.Authorization/roleAssignments@2022-04-01' = {
  name: guid(resourceGroup().id, 'contributor')
  properties: {
    principalId: uami.properties.principalId
    principalType: 'ServicePrincipal'
    roleDefinitionId: resourceId('Microsoft.Authorization/roleDefinitions', 'b24988ac-6180-42a0-ab88-20f7382dd24c') // Contributor
  }
  scope: resourceGroup()
}

// Assign the Storage Blob Data Reader role to the managed identity at the resource group scope
resource uamiblobassignment 'Microsoft.Authorization/roleAssignments@2022-04-01' = {
  name: guid(resourceGroup().id, 'blobreader')
  properties: {
    principalId: uami.properties.principalId
    principalType: 'ServicePrincipal'
    roleDefinitionId: resourceId('Microsoft.Authorization/roleDefinitions', '2a2b9908-6ea1-4ae2-8e65-a410df84e7d1') // Storage Blob Data Reader
  }
  scope: resourceGroup()
}

// Create an image in the Compute Gallery
resource azImage 'Microsoft.Compute/galleries/images@2022-03-03' = {
  name: '${azComputeGallery.name}/myImage'
  location: location
  properties: {
    description: 'myImage'
    osType: 'Windows'
    osState: 'Generalized'
    hyperVGeneration: 'V2'
    identifier: {
      publisher: vmOfferDetails.publisher
      offer: vmOfferDetails.offer
      sku: vmOfferDetails.sku
    }
  }
  dependsOn: [
    uami
  ]
}

// Create an image template
resource azImageTemplate 'Microsoft.VirtualMachineImages/imageTemplates@2022-07-01' = {
  name: imagetemplatename
  location: location
  identity: {
    type: 'UserAssigned'
    userAssignedIdentities: {
      '${uami.id}': {}
    }
  }
  properties: {
    buildTimeoutInMinutes: 360
    distribute: [
      {
        type: 'SharedImage'
        galleryImageId: azImage.id
        runOutputName: 'myImageTemplateRunOutput'
        replicationRegions: [
          'Australia East'
        ]
      }
    ]
    source: {
      type: 'PlatformImage'
      publisher: vmOfferDetails.publisher
      offer: vmOfferDetails.offer
      sku: vmOfferDetails.sku
      version: 'latest'
    }
    customize: customizationsModule.outputs.customizationsOutput
    vmProfile: {
      vmSize: 'Standard_D4ds_v5'
      osDiskSizeGB: 0 // Leave size as source image size.

    }

    optimize: {
      vmBoot: {
        state: 'Enabled'
      }
    }
  }
}
}
storageaccount.bicep
// Define the location parameter for all resources
@description('Location for all resources.')
param location string = resourceGroup().location

// Define the parameter for the Storage account name
@description('The name of the Storage account.')
param stgaccountname string

// Define the parameter for the public access setting of the Storage account
@description('Sets the public access of the storage account.')
param publicaccess bool

// Create a Storage account
resource storgeaccount 'Microsoft.Storage/storageAccounts@2023-01-01' = {
  name: toLower(stgaccountname) // Convert the Storage account name to lowercase
  location: location // Set the location of the Storage account
  kind: 'StorageV2' // Use the 'StorageV2' kind
  sku: {
    name: 'Standard_LRS' // Use the 'Standard_LRS' SKU
  }
  properties: {
    accessTier: 'Hot' // Set the access tier to 'Hot'
    allowBlobPublicAccess: publicaccess // Set the public access setting
  }
}

// Create a Blob service for the Storage account
resource blobService 'Microsoft.Storage/storageAccounts/blobServices@2022-09-01' = {
  parent: storgeaccount // Set the parent resource to the Storage account
  name: 'default' // Use the 'default' name
  properties: {
    isVersioningEnabled: true // Enable versioning

  }
}

// Create a container in the Blob service
resource appcontainer 'Microsoft.Storage/storageAccounts/blobServices/containers@2022-09-01' = {
  name: 'iac' // Set the container name to 'iac'
  parent: blobService // Set the parent resource to the Blob service
  properties: {
    publicAccess: publicaccess ? 'Blob' : 'None' // Set the public access setting
  }
}

// Output the ID of the Storage account
output storgeaccountid string = storgeaccount.id

// Output the name of the Storage account
output storgeaccountname string = storgeaccount.name

// Output the name of the container
output containername string = appcontainer.name
customizations.bicep
// Define the parameter for the Storage account name
@description('The name of the Storage account.')
param stgaccountname string

// Get the environment-specific metadata
var environmentMetadata = environment()

// Define the customizations for the image
var customizations = [
  // Create a apps directory on the OS drive
  {
    type: 'PowerShell'
    name: 'Create Apps Directory on OS drive'
    runElevated: false
    runAsSystem: false
    inline: [
      // Use double backslashes to represent a single backslash in the file path
      'New-Item -ItemType Directory -Force -Path $env:SystemDrive\\apps\\'
    ]
  }

  // Set the timezone to New Zealand Standard Time
  {
    type: 'PowerShell'
    name: 'Set Timezone - New Zealand Standard Time'
    runElevated: true
    runAsSystem: true
    inline: [
      'Set-TimeZone -Id "New Zealand Standard Time"'
    ]
  }

  // Install Windows updates, excluding preview updates
  {
    type: 'WindowsUpdate'
    searchCriteria: 'IsInstalled=0'
    filters: [
      'exclude:$_.Title -like \'*Preview*\'' // Exclude preview updates
      'include:$true'
    ]
    updateLimit: 20
  }

  // Restart the system after Windows updates have completed
  {
    type: 'WindowsRestart'
    restartCheckCommand: 'write-host \'restarting post Windows Updates\''
    restartTimeout: '10m'
  }

  // Copy BGInfo from the Storage account to the temporary directory
  {
    type: 'File'
    name: 'Copy BGInfo from Storage account'
    sourceUri: 'https://${stgaccountname}.blob.${environmentMetadata.suffixes.storage}/iac/bginfo/BGInfo.zip'
    destination: '$env:SystemDrive\\apps\\BGInfo.zip'
  }

  // Copy Storage Explorer from the Storage account to the temporary directory
  {
    type: 'PowerShell'
    name: 'Copy Storage Explorer from Storage account'
    runElevated: true
    runAsSystem: true
    inline: [
      // Use double backslashes to represent a single backslash in the file path
      'Invoke-RestMethod  https://${stgaccountname}.blob.${environmentMetadata.suffixes.storage}/iac/storageexplorer/StorageExplorer-windows-x64.exe -OutFile  $env:SystemDrive\\apps\\StorageExplorer-windows-x64.exe'
    ]
  }

  // Extract BGInfo
  {
    type: 'PowerShell'
    name: 'Extract BGInfo'
    runElevated: true
    runAsSystem: true
    inline: [
      // Use double backslashes to represent a single backslash in the file path
      'Expand-Archive -LiteralPath $env:SystemDrive\\apps\\BGInfo.zip -DestinationPath $env:SystemDrive\\apps\\'
    ]
  }

  // Install Storage Explorer
  {
    type: 'PowerShell'
    name: 'Install Storage Explorer'
    runElevated: true
    runAsSystem: true
    inline: [
      // Use double backslashes to represent a single backslash in the file path
      // Check if the executable file exists
    '$exePath = "$env:SystemDrive\\apps\\StorageExplorer-windows-x64.exe"'
    'if (Test-Path $exePath) {'
    '  & $exePath /VERYSILENT /SUPPRESSMSGBOXES /NORESTART /ALLUSERS'
    '} else {'
    '  Write-Output "The file $exePath does not exist."'
    '}'
    ]
  }

   // Install any Windows updates, that are left or needed after app installs
   {
    type: 'WindowsUpdate'
    searchCriteria: 'IsInstalled=0'
    filters: [
      'exclude:$_.Title -like \'*Preview*\'' // Exclude preview updates
      'include:$true'
    ]
    updateLimit: 20
  }

  // Restart the system after Windows updates have completed and fresh restart before sysprep.
  {
    type: 'WindowsRestart'
    restartCheckCommand: 'write-host \'restarting post image customisation\''
    restartTimeout: '10m'
  }

]

// Output the customizations array
output customizationsOutput array = customizations
azure-pipelines.yml
# Define the pipeline name and trigger
name: Azure Image Builder - Build and Publish Image Template
trigger:
- main

# Define pipeline variables
variables:
  serviceconnection: azserviceconnections
  overwrite: false

# Define the VM image for the pipeline
pool:
  vmImage: ubuntu-latest

# Define the stages of the pipeline
stages:

  # First stage: Deploy Azure Storage Account
- stage: ImageBuilderDeploy
  jobs:
  - deployment: Bicepstgaccount
    displayName: 'Deploy Azure Storage Account to Azure for Apps'
    environment: 'AzureDeployment'
    strategy:
      runOnce:
        deploy:
          steps:
          - checkout: self
           # Deploy the Bicep template for the Azure Storage account
          - task: AzureCLI@2
            displayName: 'Deploy Bicep - Azure Storage account and IaC App Container'
            inputs:
              azureSubscription: $(serviceconnection) # replace with your service connection name
              scriptType: 'pscore'
              scriptLocation: 'inlineScript'
              inlineScript: |
                az group create --name $(ResourceGroupName) --location $(location)
                az deployment group create `
                        --template-file $(Build.SourcesDirectory)/iac/storageaccount.bicep `
                        --resource-group $(resourceGroupName) `
                        --parameters location=$(location) stgaccountname=$(storageaccountname) publicaccess=true

          # Copy the app install files to the Azure Storage account
          - task: AzureCLI@2
            displayName: 'Copy App install files to Azure Storage Account'
            inputs:
              azureSubscription: $(serviceconnection)
              scriptType: 'bash'
              scriptLocation: 'inlineScript'
              inlineScript: |
                az storage blob upload-batch -d 'iac' --account-name $(storageaccountname) -s $(Build.SourcesDirectory)/apps --type block --overwrite $(overwrite) --verbose
                blobs=$(az storage blob list --account-name $(storageaccountname) --container-name 'iac' --query '[].{name:name, url:properties.url}' -o tsv)
                echo $blobs

  # Second job: Deploy Azure Image Builder Infrastructure
  - job: ImageBuilderDeployment
    dependsOn: Bicepstgaccount
    displayName: 'Deploy Azure Image Builder Infrastructure'
    steps:
     # Build the Azure Image Builder template
      - task: AzureCLI@2
        displayName: ' Build Azure Image Builder Template'
        inputs:
          azureSubscription: $(serviceconnection) # replace with your service connection name
          scriptType: 'pscore'
          scriptLocation: 'inlineScript'
          inlineScript: |
            az group create --name $(ResourceGroupName) --location $(location)
            az deployment group create `
                    --template-file $(Build.SourcesDirectory)/iac/main.bicep `
                    --resource-group $(resourceGroupName) `
                    --parameters location=$(location) imagetemplatename=$(imagetemplatename) stgaccountname=$(storageaccountname) # Add more parameters as needed

# Second stage: Run Azure Image Builder Template Build
- stage: ImageBuilderRun
  jobs:
  - job: ImageBuilderRun
    displayName: 'Run Azure Image Builder Template Build'
    steps:
      # Run the Azure Image Builder
      - task: AzureCLI@2
        displayName: 'Run Azure Image Builder'
        inputs:
          azureSubscription: $(serviceconnection) # replace with your service connection name
          scriptType: 'pscore'
          scriptLocation: 'inlineScript'
          inlineScript: |
            az image builder run -n $(imagetemplatename) -g $(resourceGroupName) --no-wait --verbose
                        az image builder wait -n $(imagetemplatename) -g $(resourceGroupName) --custom "lastRunStatus.runState!='Running'" --verbose

      - task: AzureCLI@2
        displayName: 'Deploy Bicep - Set Azure Storage account public access to false'
        inputs:
              azureSubscription: $(serviceconnection) # replace with your service connection name
              scriptType: 'pscore'
              scriptLocation: 'inlineScript'
              inlineScript: |
                az group create --name $(ResourceGroupName) --location $(location)
                az deployment group create `
                        --template-file $(Build.SourcesDirectory)/iac/storageaccount.bicep `
                        --resource-group $(resourceGroupName) `
                        --parameters location=$(location) stgaccountname=$(storageaccountname) publicaccess=false