Azure Arc Bridge - Implementation and Testing
Azure Arc Bridge(currently in preview) is part of the core Azure Arc Hybrid Cloud platform.
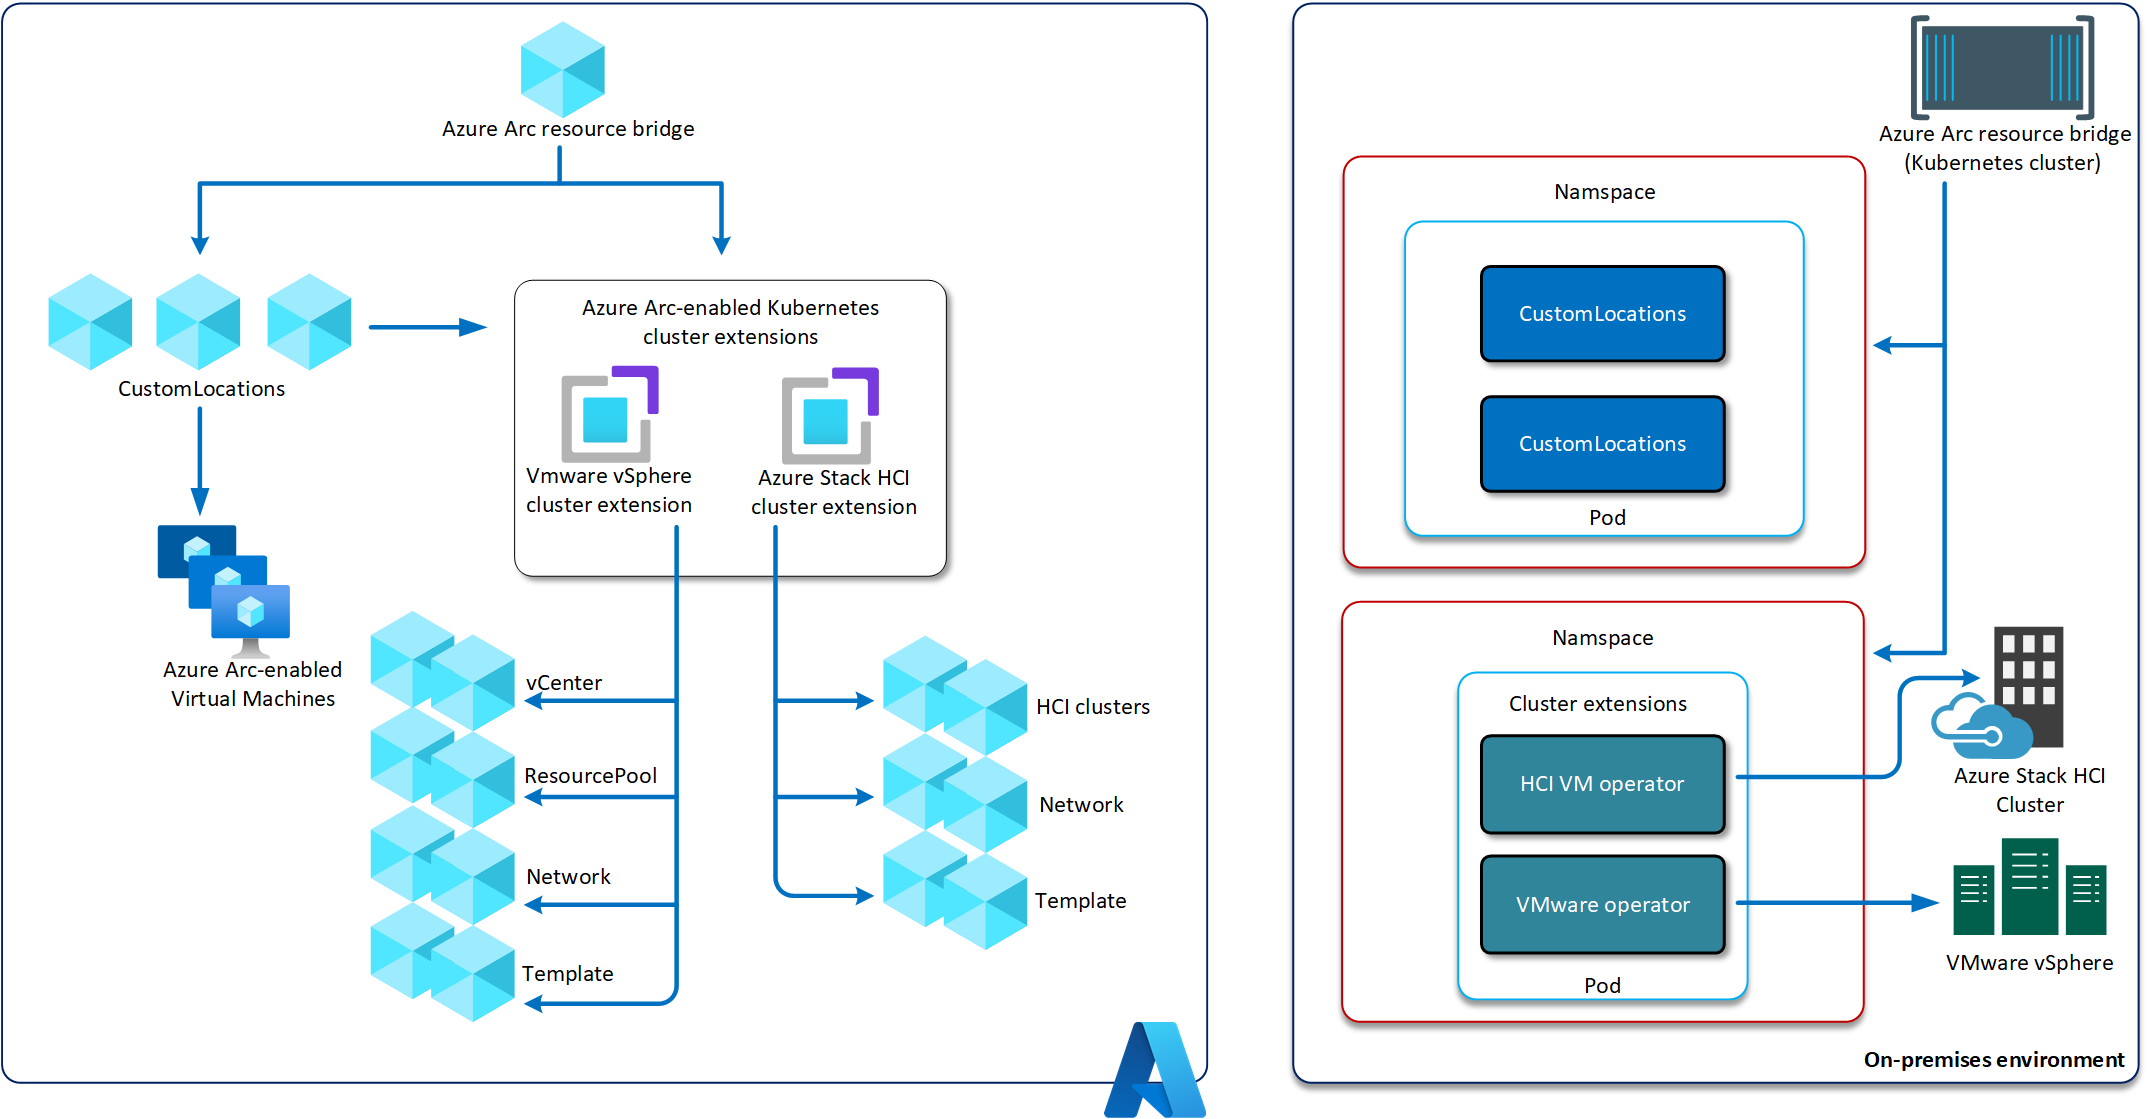
Overview
The Azure Arc resource bridge allows for VM (Virtual Machine) self-servicing and managing on-premises Azure Stack HCI and VMWare virtualised workloads, supporting Linux and Windows.
Along with standard integration of Azure Arc workloads, such as support for Azure Policy and Azure extensions, Azure Update Management and Defender for Cloud support. The Azure Arc resource bridge offers the following self-service functionality direct from the Microsoft Azure portal, offering a single pane of a glass of your workloads, whether they exist on-premises or in Azure:
- Start, stop and restart a virtual machine
- Control access and add Azure tags
- Add, remove, and update network interfaces
- Add, remove, and update disks and update VM size (CPU cores and memory)
- Enable guest management
- Install extensions
- Azure Stack HCI - You can provision and manage on-premises Windows and Linux virtual machines (VMs) running on Azure Stack HCI clusters.
The resource bridge is a packaged virtual machine, which hosts a management Kubernetes cluster that requires no user management. This virtual appliance delivers the following benefits:
- Enables VM self-servicing from Azure without having to create and manage a Kubernetes cluster
- It is fully supported by Microsoft, including update of core components.
- Designed to recover from software failures.
- Supports deployment to any private cloud hosted on Hyper-V or VMware from the Azure portal or using the Azure Command-Line Interface (CLI).
All management operations are performed from Azure, no local configuration is required on the appliance.
Azure Arc resource bridge currently supports the following Azure regions:
- East US
- West Europe
These regions hold the Resource Bridge metadata for the resources.
Today, we will stand up an Azure Arc Bridge that supports VMWare vSphere.
I will be running vSphere 6.7 on a single host in my home lab, connected to my Visual Studio subscription.
Prerequisites
Private cloud environments
The following private cloud environments and their versions are officially supported for the Azure Arc resource bridge:
- VMware vSphere version 6.7
- Azure Stack HCI
Note: You are unable to set this up on vSphere 7.0.3, as it is not currently supported - I tried!
Permissions
- Contributor rights to the Resource Group that the Azure Arc bridge resource will be created.
- vSphere account (with at least Read and modify VM rights)
Required Azure resources
- Resource Group for your Azure Arc Resource Bridge
Required On-premises resources
- Resource pool with a reservation of at least 16 GB of RAM and four vCPUs. It should also have access to a datastore with at least 100 GB of free disk space.
- A workstation with rights to run PowerShell and install Python and the Azure CLI, with a line of sight to vCenter.
Networking
- The Arc resource bridge communicates outbound securely to Azure Arc over TCP port 443
- At least one free IP (Internet Protocol) address on the on-premises network (or three if there isn't a DHCP server). Make sure this isn't a used IP; you will need to enter this during the bridge provisioning script.
Create Azure Arc Resource Bridge
Create Resource Bridge
- Log in to the Azure Portal
- In the search box up the top, type in: Azure Arc
- Click Azure Arc
- Click on: VMware vCenters (preview)
- Click Add

- Click: Create a new resource bridge

- Click Next: Basics
- Enter the following information to suit your environment:
- Name (of the Resource Bridge resource)
- Select the region for your Metadata
- Create a Custom Location(that matches your on-premises location, where your resources are stored, i.e. could be a data centre prefix that matches your naming convention)
- Enter in the name of your vCenter resource (this will represent your vCenter in Azure, so make sure it is easily identifiable)
-

-
Click Next: Tags
-
A list of default tags has been supplied; feel free to enter or change these to suit your environment.
-

-
Click Next: Download and run the script.
-
Click on Register to register the Azure Arc Provider to your subscription. Please wait for this process to complete (it may take a minute or two, you will see: Successfully register your subscription(s) when completed).
-
Once completed, download the onboarding PowerShell script
-
Run the PowerShell script from a computer that has access to Azure and vCenter. This script will download the necessary dependencies (Azure CLI, Python) and, if necessary, authenticate to Azure.
Set-ExecutionPolicy -Scope Process -ExecutionPolicy Bypass
./resource-bridge-onboarding-script.ps1 -
When the script runs, you will be prompted for the following information.
- Proxy information (if the Workstation is behind a proxy)
- UAC (User Access Control) approval for the script to install Azure CLI/Python on the workstation
- Azure authentication
- vCenter FQDN/Address
- vCenter Username & Password
- vCenter datastore
- vCenter folder (to place the template in)
- IP address
-

Link vCenter to Azure Arc
You may not need to do the below, but my Bridge was in a 'running' state but hadn't added in the connection to vCenter.
- Log in to the Azure Portal
- In the search box up the top, type in: Azure Arc
- Click Azure Arc
- Click on: Resource bridges (preview)
- Click on your Azure Arc Bridge and verify the status is 'Running' (if it is not, make sure it has been started on-premises)
- In the Azure Portal, click on VMWare vCenters (preview)
- Click Add
- Click Use an existing resource bridge
- Click Next: Basics
- Create your Custom Location, then enter in the on-premises vCenter details

- On the next blade, enter in your appropriate Tags, then click Create
- Wait for the deployment to complete; this could take 2-5 minutes.
- In the search box up the top, type in: Azure Arc
- Click Azure Arc
- Click on: VMware vCenters (preview)
- You should now see your vSphere instance in a Connected state.

Enable vCenter resources to be managed in Microsoft Azure
Now that the Bridge has been created, we need to allow resources (such as Virtual Machines, Datastores, Networks).
- Log in to the Azure Portal
- In the search box up the top, type in: Azure Arc
- Click Azure Arc
- Click on: VMware vCenters (preview)
- Click on your vCenter instance
- Under vCenter Inventory, select Virtual Machines

- Select the Virtual Machines you want to enable for management in Azure and click 'Enable in Azure'
- Select your applicable Subscription and Resource Group (this is where the Azure Arc VM resources will be placed)
- Make sure 'Enable Guest management' is selected.
- Enter in your Administrator (this is the Admin Username and password of the workloads you want to install the Azure guest management too)

- Click Enable
- It can take a few minutes to onboard these clients. If it fails, pick a single Virtual Machine and attempt to onboard that.
- You can now repeat the process to onboard Networks, Resource Pools etc.
Manage Virtual Machines in Microsoft Azure
Now that you have set up an Azure Arc Bridge and onboarded vCenter resources. You can now see and manage your vCenter Virtual Machines in Azure, examples below.
- Ensure that you have VMWare Tools installed and up-to-date to help full functionality, such as Restart, or there may be issues managing these.
Stop/Stop Virtual Machines

Resize Virtual Machines - CPU/Memory

Resize Virtual Machines - Disk

Troubleshooting
- The 'resource-bridge-onboarding-script.ps1' script contains an output file, named: arcvmware-output.log. This log file exists in the same directory as the script and is useful for investigating any errors.
- If you get no Folders, listed when the script prompts you to select a folder (i.e. Please select folder):
- Right-click the Datacenter in vSphere
- Select New Folder
- Select New VM and Templates folder
- Create a folder
- If your Center becomes unavailable, it is most likely because you specified the same IP for the Azure Arc Appliance; if this is the case, log in to the host containing your Azure Arc Bridge and stop/delete the resources from the disk and remove from inventory. Then rerun deployment, this time selecting an appropriate IP.