Azure NAT Gateway - Implementation and Testing
With most Cloud resources being accessible over the internet, each publically accessible resource has its own public IP address, this makes it a lot more challenging to administer the security and access rules to access third party services.
Think along the lines of - you or your organisation might use software-as-a-service CRM product. That product is only accessible from your organisations IP for compliance/security reasons, you might access the CRM product from various Azure Virtual Desktop hosts, each with its public IP or a random Microsoft Azure datacenter IP, or you want to control Multifactor authentication/conditional access policies for users using Azure services.
The administration of this, particularly in scenarios where other people or teams can create and manage resources, can be complex, sure; you can use Standard Load Balancers, which would help, but you have to manage and pay for it, which is sometimes overkill.
Tunnelling outbound traffic through to a specific IP address or IP addresses to 'known controllable IP addresses' for Azure resources (both IaaS and PaaS) which sit in the same Virtual Network is where the Azure NAT Gateway comes in, allowing you to easily allow and control what IPs your traffic is coming from. NAT Gateway replaces the default Internet destination in the virtual network’s routing table for the subnets identified
"The Azure NAT gateway is a fully managed, highly resilient service built into the Azure fabric, which can be associated with one or more subnets in the same Virtual Network, that ensures that all outbound Internet-facing traffic will be routed through the gateway. As a result, the NAT gateway gives you a predictable public IP for outbound Internet-facing traffic. It also significantly increases the available SNAT ports in scenarios where you have a high number of concurrent connections to the same public address/port combination."
My Testing
Now lets get testing the Azure NAT Gateway! To test the gateway, I created:
- Virtual Network
- NAT Gateway
- IP Public Address prefix
- 1 Windows VM (Windows Server 2019) with Public IP
- 1 Linux (Ubuntu 18.04) VM with Public IP
- 1 Windows VM (Windows Server 2019) as a backend pool for an Azure Load Balancer
- Virtual Machine Scale Set with four instances (each with Windows Server 2019)
Note: Each VM has RDP opened to allow inbound traffic from my network using the Public IP and a NAT rule allowing RDP traffic on the Load Balancer. There is no point-to-site or site-to-site VPN; RDP connections are directly over the internet to Australia East, from New Zealand.
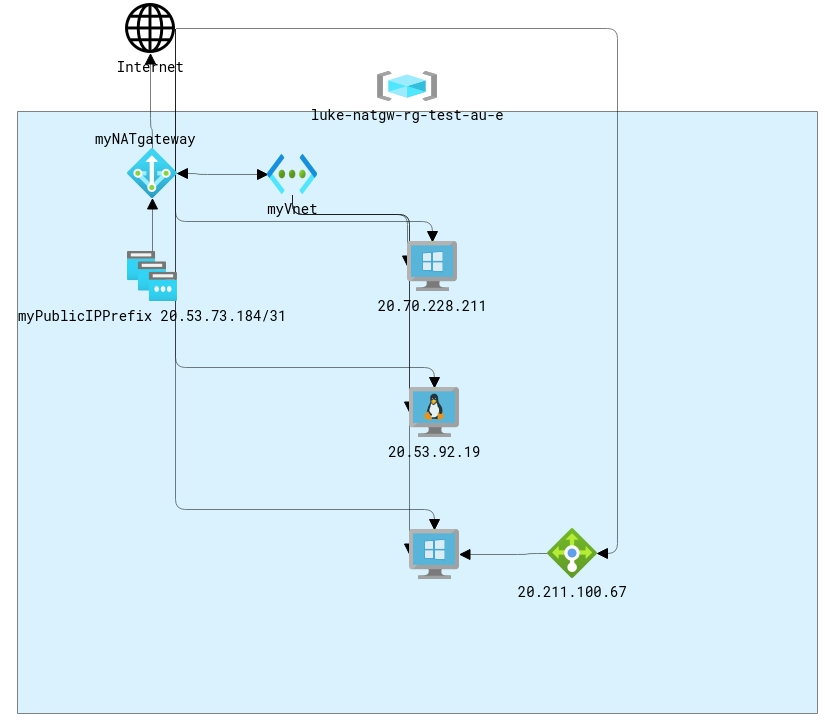
Once the Azure resources were created, I then connected to each machine using RDP/SSH on their Public IP address and tested:
Linux Machine with Public IP for RDP
- Inbound Public IP: 20.53.92.19
- Outbound IP: 20.53.73.184
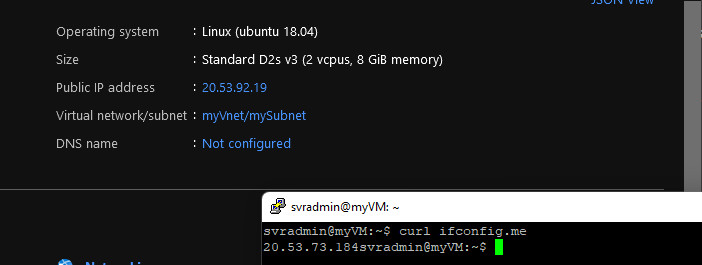
As you can see, I connected to the Linux VM's public IP via SSH and did a curl to: https://ifconfig.me/ to grab my public IP. The public IP of my Linux box was my NAT Gateway Public IP prefix!
Windows Machine with Public IP for RDP
- Inbound Public IP: 20.70.228.211
- Outbound IP: 20.53.73.184
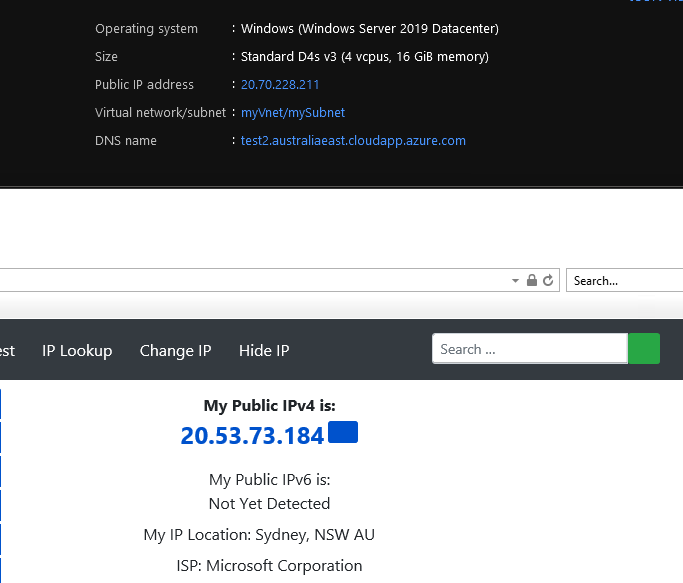
Using RDP to the public IP of the Windows Server, I navigated to: https://www.whatismyip.com/. As you can see, the Public IP of my outbound IP address was my NAT Gateway Public IP prefix!
Windows Machine behind an Azure Load Balancer
- Inbound Public IP: 20.211.100.67
- Outbound IP: 20.53.73.185
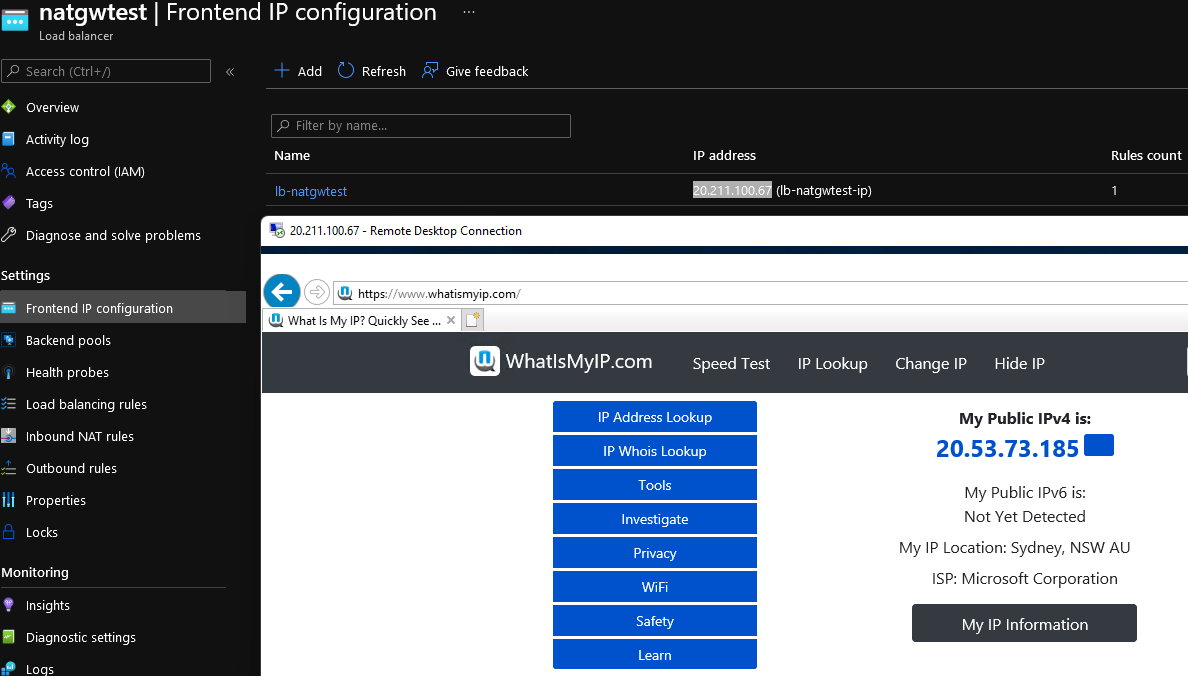
This was the last of the 3 test machines; I stood up. Using RDP to the public IP of the Azure Load BalancerI navigated to: https://www.whatismyip.com/. As you can see, the Public IP of my outbound IP address was my NAT Gateway Public IP prefix; however, this was '20.53.73.185', which was the second IP address available in my /31 IP address prefix.
Windows Machine behind a VM Scale Set
Although not in the diagram, I decided to add a VM Scale Set of 4 Virtual Machines into my testing (to save on cost, they are just Standard_B2ms machines but more than enough for my testing).
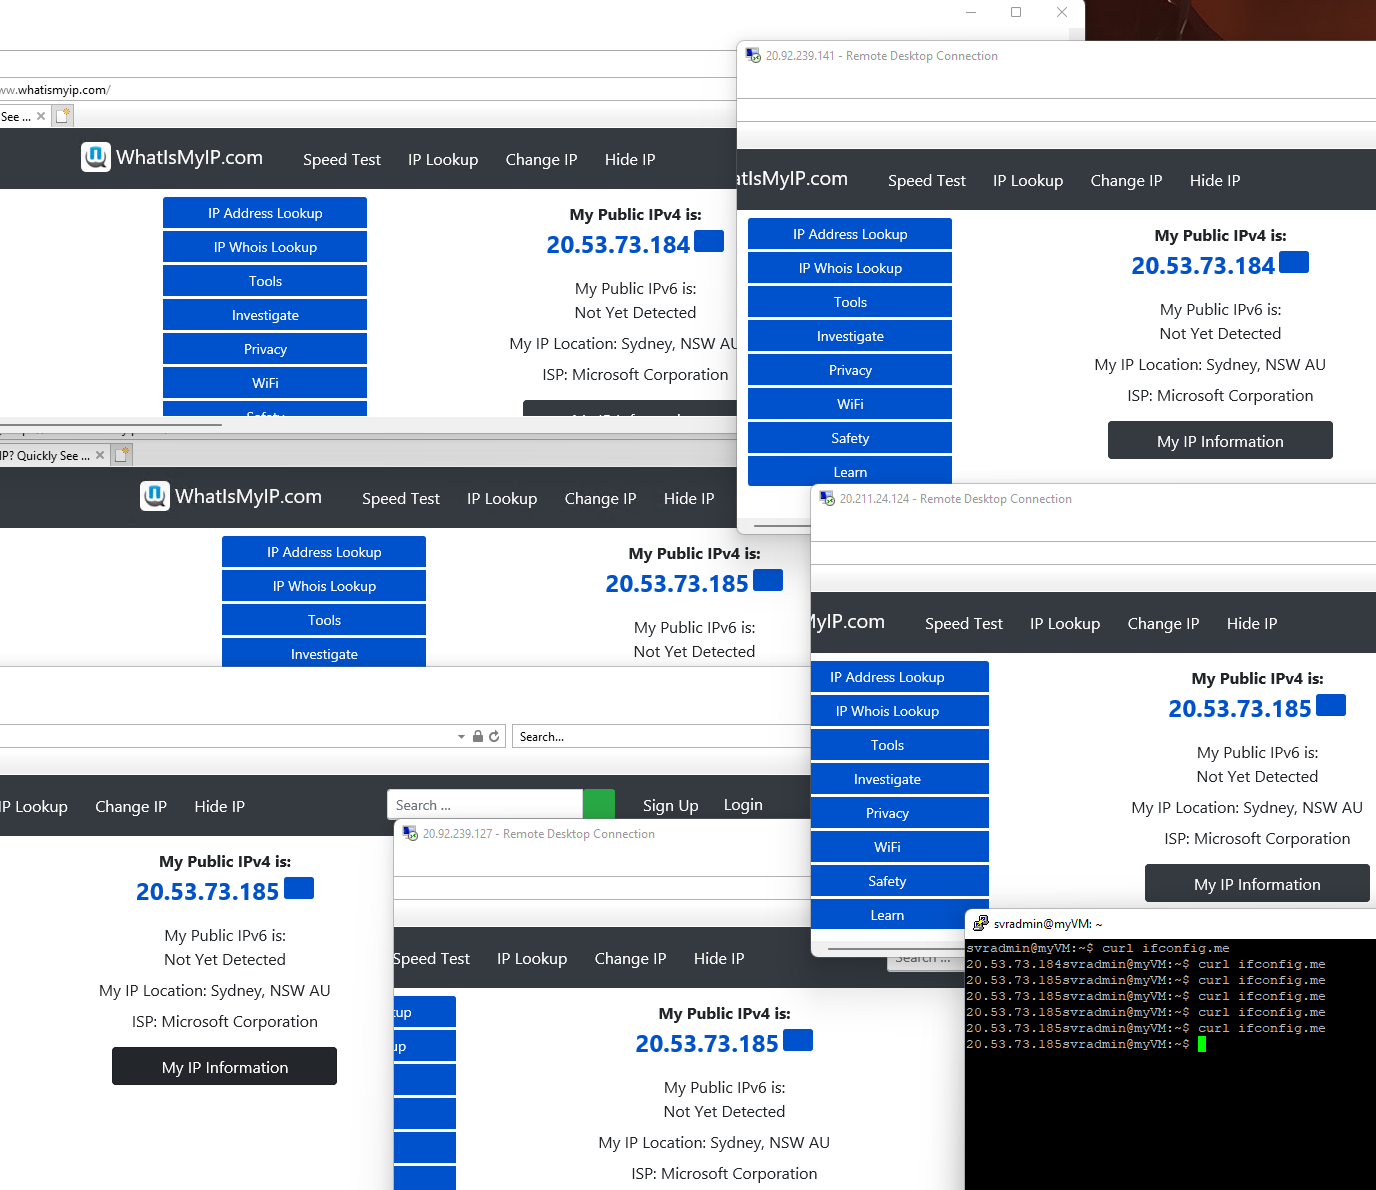
As you can see from the mess that is my screenshot above, all machines had completely different inbound Public IP addresses. Still, the outbound public IP addresses came from the NAT Gateway as expected.
Findings and Observations
- The outbound public IP did seem to change between the workloads; if I refreshed 'whatismyip' and 'ifconfig', the public IP changed between 184 and 185. However, no loss of connectivity occurred to the Virtual Machines. This was linked to the '4-minute idle timeout' configured on the NAT Gateway; I saw no reason to change the default timeout value; if I were that worried about the same IP address - I would have chosen with a Public IP vs a Public IP prefix on the NAT Gateway.
- Any Public IP used on the same subnet as a NAT Gateway needs to be Standard.
- If I had both a Public IP address and a Public IP prefix on my NAT gateway, the Prefix seemed to take precedence.
- You cannot use a Public IP Prefix that is in use by the NAT Gateway for any other workload, i.e. any inbound Public IPs. It would be best if you had another Public IP prefix resource.
- A single NAT gateway resource supports from 64,000 up to 1 million concurrent flows. Each IP address provides 64,000 SNAT ports to the available inventory. Therefore, you can use up to 16 IP addresses per NAT gateway resource. The SNAT mechanism is described here in more detail.
Create a NAT Gateway
To create my NAT Gateway, I used the ARM Quickstart template, located here: https://learn.microsoft.com/en-us/azure/virtual-network/nat-gateway/quickstart-create-nat-gateway-template.
Then I created the additional Virtual Machines and Load Balancers and added them to the same VNET created as part of the NAT Gateway.
To create a NAT Gateway using the Azure Portal
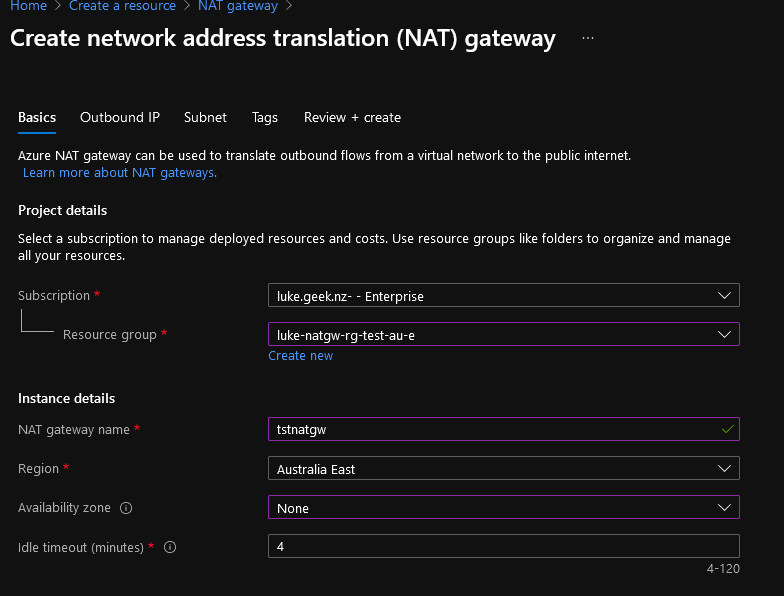
- Log in to the Azure Portal and navigate to Create a resource, NAT Gateway (this link will get you there: Create-NATGateway).
- Select your Subscription
- Enter your NAT Gateway name
- Enter your Region
- Enter your availability zone
- Set your idle timeout (I suggest leaving this at 4 minutes, you can change it later if it presents issues)
- Click Next: Outbound IP
- We are just going to create a new Public IP address (it has to be Standard and Static, the Azure Portal automatically selects this for you - although you can create your Public IP prefix here for scalability, you don't need it both).
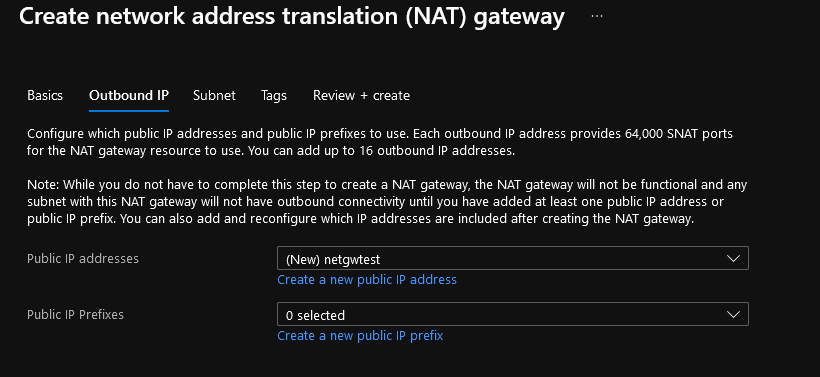
- Click Next: Subnet
- Create or link your existing Virtual Network and subnets and click Next: Tags
- Enter in any tags that may be relevant (Creator, Created on, Created for, Support Team etc.)
- Click Next: Review + Create
- Verify everything looks ok then click Create
Congratulations, you have now created your NAT Gateway!
To create a NAT Gateway using Azure Bicep
Just a quick Bicep snippet I created to create the NAT Gateway resource only:
//Target Scope is: Resource Group

targetScope = 'resourceGroup'

//Set Variables and Parameters

@allowed([
  'Prod'
  'Dev'
])
param environment string = 'Prod'
param location string = resourceGroup().location

param dateTime string = utcNow('d')
param resourceTags object = {
  Application: 'Azure NAT Gateway/Azure Network Management'
  CostCenter: 'Operational'
  CreationDate: dateTime
  Environment: environment
}

//// Resource Creation

/// Create - NAT Gateway

resource NATGW 'Microsoft.Network/natGateways@2021-03-01' = {
  name: 'aznatgw'
  tags: resourceTags

  location: location
  sku: {
    name: 'Standard'
  }

  properties: {
    idleTimeoutInMinutes: 4
  }
}
It can be deployed by opening PowerShell (after Bicep is installedusing the PowerShell method)and logging into your Azure and running the following(replace RGNAME with the name of the Resource Group you will be deploying it to):
When you are actually ready to deploy, remove the -Whatif at the end. Then you can go into the resource and add the Public IP/prefix. PowerShell will prompt you for the name of the NAT Gateway and be created in the same location as the Resource Group by default.
New-AzResourceGroupDeployment -Name NatGwDeployment -ResourceGroupName RGNAME -TemplateFile .\Create_NATGateway.bicep -whatif
