Implement WebJEA for self-service Start/Stop of Azure Virtual Machines
WebJEA allows you to build web forms for any PowerShell script dynamically. WebJEA automatically parses the script at page load for description, parameters and validation, then dynamically builds a form to take input and display formatted output!
The main goals for WebJEA:
- Reduce delegation of privileged access to users
- Quickly automate on-demand tasks and grant access to less-privileged users
- Use your existing PowerShell knowledge to build web forms and automate on-demand processes
- Encourage proper script creation by parsing and honouring advanced function parameters and comments
Because WebJEA is simply a Self-Service Portal for PowerShell scripts, anything you can script with PowerShell you can run through the Portal! Opening a lot of opportunities for automation without having to learn third party automation toolsets! Anyone who knows PowerShell can use it! Each script can be locked down to specific users and AD groups!
You can read more about WebJEA directly on the GitHub page: https://github.com/markdomansky/WebJEA.
This guide will concentrate on setting up WebJEA for self-service Azure VM management. However, WebJEA can be used to enable much more than what this blog article covers, from things such as new user onboarding, to resource creation.

We will use a Windows Server 2019, running in Microsoft Azure, to run WebJEA from.
Prerequisites
- Domain Joined server running Windows 2016+ Core/Full with PowerShell 5.1
- The server must have permission to go out over the internet to Azure and download PowerShell modules.
- CPU/RAM Requirements will depend significantly on your usage, start low (2-vCPU/4GB RAM) and grow as needed.
I've created a Standard_B2ms (2vCPU, 8GB RAM) virtual machine, called: WEBJEA-P01 in an Azure Resource Group called: webjea_prod
This server is running: Windows Server 2019 Datacenter and is part of my Active Directory domain; I've also created a service account called: webjea_services.
Setup WebJEA
Once we have a Windows Server, now it's time to set up WebJEA!
Setup Self-Signed Certificate
If you already have a certificate you can use, skip this step. In the case of this guide, we are going to use a self-signed certificate.
Log into the WebJEA Windows server using your service account (in my case, it is: luke\webjea_services).
Open PowerShell ISE as Administrator, and after replacing the DNS name to suit your own environment, run the following to create the Root CA and Self-Signed certificate:
Now that the Root CA is created and trusted, we want to create the actual self-signed certificate:
#Create RootCA
$rootCA = New-SelfSignedCertificate -Subject "CN=MyRootCA"  `
-KeyExportPolicy Exportable  `
-KeyUsage CertSign,CRLSign,DigitalSignature  `
-KeyLength 2048  `
-KeyUsageProperty All  `
-KeyAlgorithm 'RSA'  `
-HashAlgorithm 'SHA256'  `
-Provider "Microsoft Enhanced RSA and AES Cryptographic Provider"  `
-NotAfter (Get-Date).AddYears(10)

#Create Self-Signed Certificate
$cert = New-SelfSignedCertificate -Subject "CN=WEBJEA-P01.luke.geek.nz"  `
-Signer $rootCA  `
-KeyLength 2048  `
-KeyExportPolicy Exportable  `
-DnsName WEBJEA-P01.luke.geek.nz, WEBJEA, WEBJEA-P01  `
-KeyAlgorithm 'RSA'  `
-HashAlgorithm 'SHA256'  `
-Provider "Microsoft Enhanced RSA and AES Cryptographic Provider"  `
-NotAfter (Get-Date).AddYears(10)
$certhumbprint = $cert.Thumbprint

#Add Root CA to Trusted Root Authorities
New-Item -ItemType Directory 'c:\WebJea\certs' -Force
Export-Certificate -Cert $rootCA -FilePath "C:\WebJEA\certs\rootCA.crt" -Force
Import-Certificate -CertStoreLocation 'Cert:\LocalMachine\Root' -FilePath "C:\WebJEA\certs\rootCA.crt"

Write-Host -ForegroundColor Green -Object "Copy this: $certhumbprint - The Thumbprint is needed for the DSCDeploy.ps1 script"
Copy the Thumbprint (if you do this manually, make sure it is the Thumbprint of the certificate, not the Trusted Root CA certificate); we will need that later.
Setup a Group Managed Service Account
This is the account we will use to run WebJEA under; it can be a normal Active Directory user account if you feel more comfortable or want to assign permissions to.
I am using a normal AD (Active Directory) service account in this guide because I am using Microsoft Entra ID Domain Services as my Domain Controller, and GMSA is not currently supported. I have also seen some scripts require the ability to create and read user-specific files. However, it's always good to follow best practices where possible.
Note: Group Managed Services accounts automatically renew and update the passwords for the accounts; they allow for additional security. You can read more about them here: Group Managed Service Accounts Overview.
#Create A group MSA account
Add-kdsrootkey -effectivetime ((get-date).addhours(-10))
New-ADServiceAccount -name webjeagmsa1 -dnshostname (get-addomaincontroller).hostname -principalsallowedtoretrievemanagedpassword WEBJEA-P01.luke.geek.nz

#Create AD Group
New-ADGroup -Name "WebJEAAdmins" -SamAccountName WebJEAAdmins -GroupCategory Security -GroupScope Global -DisplayName "WebJEA - Admins" -Description "Members of this group are WebJEA Admins"

Install-adserviceaccount webjeagmsa1
Add-ADGroupmember -identity "luke.geek.nz\WebJEAAdmins" -members (get-adserviceaccount webjeagmsa1).distinguishedname
Add the WebJEAAdmins group to the Administrators group of your WebJEA server.
Install WebJEA
Download the latest release package (zip file) onto the WebJEA Windows server
Extract it, and you should have 2 files and 2 folders:
-
Site\
-
StarterFiles\
-
DSCConfig.inc.ps1
-
DSCDeploy.ps1
Open PowerShell ISE as Administrator and open DSCDeploy.ps1
WebJEA uses PowerShell DSC (Desired State Configuration) to set up a lot of the setup.
DSC will do the following for us:
- Install IIS
- Create the App Pool and set the identity
- Create and migrate the Site files to the IIS website folder
- Configure SSL (if we were using it)
- Update the WebJEA config files to point towards the script and log locations
Even though most of the work will be automated for us by Desired State Configuration, we have to do some configurations to work in our environment.
I am not using a Group Managed Service Account. Instead, I will use a normal AD account as a service account (i.e. webjea_services), but if you use a GMSA, you need to put the username in the AppPoolUserName; no credentials are needed (make sure the GMSA has access to the server).
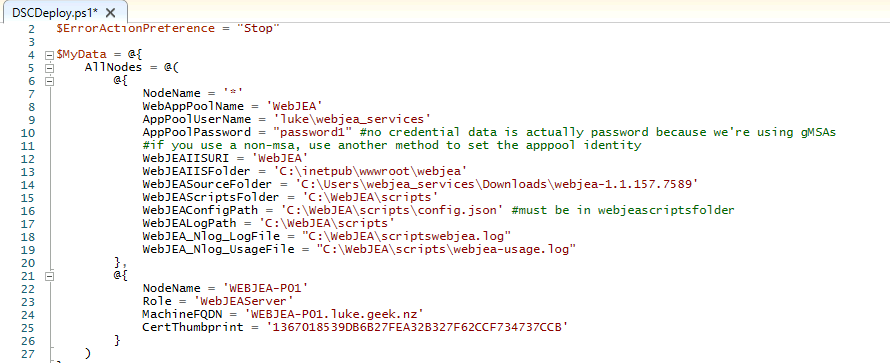
Change the following variables to suit your setup; in my case, I have moved WebJEA resources to their own folder, so it's not sitting directly on the OS drive, but until its own Folder.
| Variable | Note |
|---|---|
| NodeName | This is a DSC variable, leave this. |
| WebAppPoolName | WebApp Pool Name, it may be best to leave this as: WebJEA, however you can change this. |
| AppPoolUserName | Add in your GMSA or Domain Service account username |
| AppPoolPassword | If using a Domain Account, add the password in here, if GSMA leave bank |
| WebJEAIISURI | This is the IIS URL, ie server/WebJEA. You can change this if you want. |
| WebJEAIISFolder | IIS folder location, this can be changed if you wanted to move IIS to another drive or location. |
| WebJEASourceFolder | The source folder, this is the source folder for the WebJEA files when they are first downloaded and extracted (ie Downloads directory) |
| WebJEAScriptsFolder | This is where the scripts folder will be placed (ie WebJEA installed) |
| WebJEAConfigPath | This is where the config file will be placed (ie WebJEA installed - it needs to be the same location as the Scripts folder) |
| WebJEALogPath | WebJEA log path |
| WebJEA_Nlog_LogFile | WebJEA system log location |
| WebJEA_Nlog_UsageFile | WebJEA usage log location |
One thing to note is that the DSCDeploy.ps1 is calling (dot sourcing) the DSCConfig deploy script; by default, it is looking for it in the same folder as the DSCDeploy.ps1 folder.
If you just opened up PowerShell ISE, you may notice that you are actually in C:\Windows\System32, so it won't be able to find the script to run; you can either change the script to point directly to the file location, or you can change the directory you are into to match the files, in my case in the Script pane I run the following:
cd 'C:\Users\webjea_services\Downloads\webjea-1.1.157.7589'
Now run the script and wait.
If you get an error saying that the script is not digitally signed, run the following in the script pane:
Set-ExecutionPolicy -Scope Process -ExecutionPolicy Bypass
This is because the PowerShell execution policy hasn't been set; depending on the scripts you are running, you may have to update the execution policy for the entire system, but for now, we will set it to Bypass for this process only, now re-run the script again, you should see DSC kick-off and start your configuration and setup of IIS and the WebJEA site.

You should also see the files/folders starting to be created!
Note: If you need to make a configuration change, please change it in the DSCDeploy.ps1, DSC will ensure that the configuration is applied as per your configuration and rerun the script, i.e. if you need to replace the certificate from a self-signed certificate to a managed PKI certificate.
Once DSC has been completed, your server should now be running IIS and the WebJEA site
To add the IIS Management Tool, this is not required but will help you manage IIS, run the following PowerShell cmdlet:
Enable-WindowsOptionalFeature -Online -FeatureName IIS-ManagementConsole
Open an Internet Browser and navigate to (your equivalent of): https://webjea-p01.luke.geek.nz/WebJEA.
If you need assistance finding the Website path, open the Internet Information (IIS) Manager, installed and uncollapse Sites, Default WebSite, right-click WebJEA, Manage Application and select Browse.

If successful, you should get a username and password prompt:
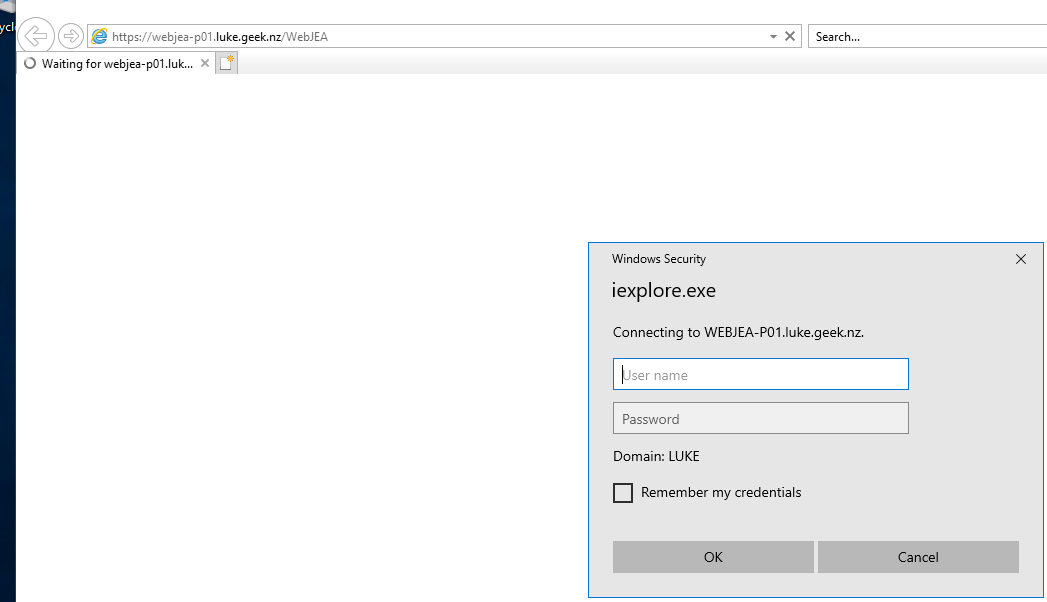
That's normal - it means you haven't been given access and now need to configure it.
Configure WebJEA
Now that WebJEA has been set up, it is time to configure it; the first thing we need to do is create a Group for WebJEA admins (see all scripts).
Create an Active Directory group for:
- WebJEA-Admins
- WebJEA-Users
Add your account to the: WebJEA-Admins group.
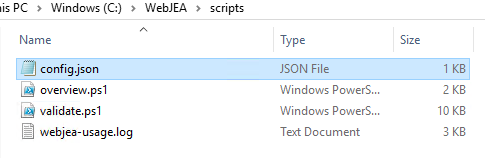
Navigate to your WebJEA scripts folder; in my case, I set it up under c:\WebJEA\Scripts:
Before we go any further, take a Backup of the config.json file, rename it to "config.bak".
I recommend using Visual Studio Code to edit the config.json to help avoid any syntax issues.
Now right click config.json and open it to edit
This file is the glue that holds WebJEA together.
We are going to make a few edits:
- Feel free to update the Title to match your company or Teams
- Add in the WebJEA-Admins group earlier (include the Domain Name) into the permitted group's session - this controls access for ALL scripts.
Note the: \\ for each path that is required. If you get a syntax error when attempting to load the WebJEA webpage, this is most likely missing.

Save the config file and relaunch the WebJEA webpage. It should now load without prompting for a username and password.
Set the PowerShell execution policy on the machine to Unrestricted so that you can run any PowerShell scripts on it:
Set-ExecutionPolicy -ExecutionPolicy Unrestricted -Scope LocalMachine
If you get an: AuthorizationManager check failed error, it is because the PowerShell scripts are still in a blocked state from being downloaded from the internet, run the following command to unblock them, then refresh the WebJEA webpage:
Get-ChildItem -Path 'C:\WebJEA\scripts\' -Recurse | Unblock-File
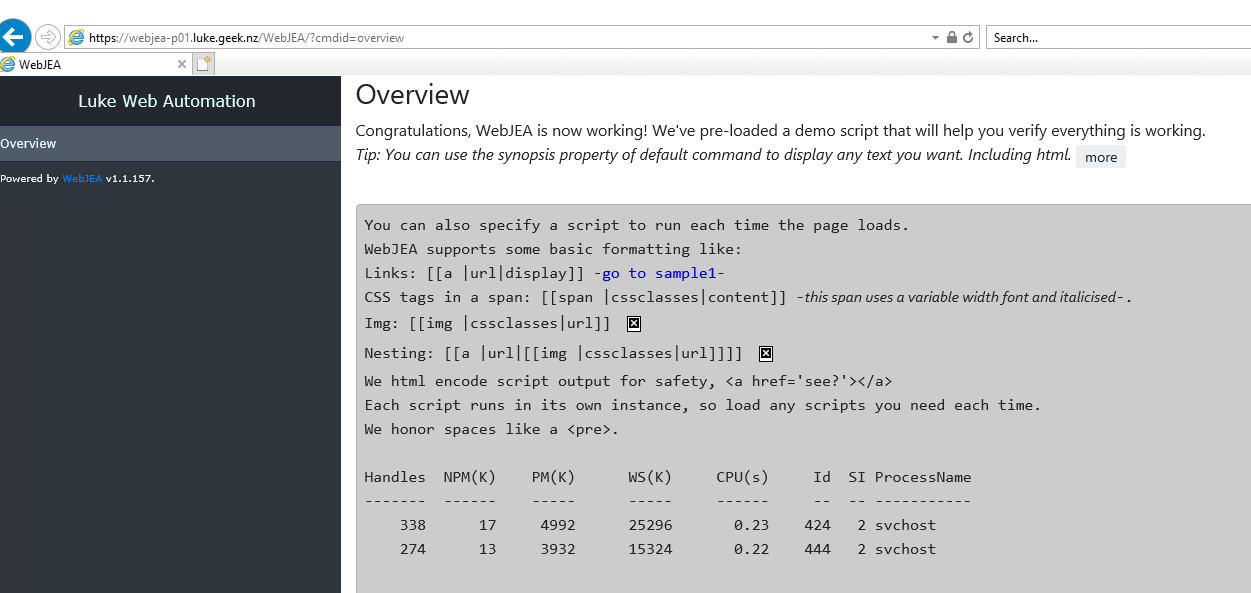
You now have a base WebJEA install! By default, WebJEA comes with 2 PowerShell files:
- overview.ps1
- validate.ps1
You may have noticed these in the config.json file; WebJEA has actually run the overview.ps1 file as soon as the page loads, so you can have scripts run before running another one, which is handy when you need to know the current state of something before taking action.
The validate.ps1 script is an excellent resource to check out the parameter types used to generate the forms.
Setup Azure Virtual Machine Start/Stop
Now that we have a working WebJEA install, it's time to set up the Azure VM Start/Stop script for this demo.
On the WebJEA server, we need to install the Azure PowerShell modules, run the following in Powershell as Administrator:
Install-Module Az -Scope AllUsers
Create Service Principal
Once the Az PowerShell modules are installed, we need to set a Service Principal for the PowerShell script to connect to Azure to manage our Virtual Machines.
Run the following PowerShell cmdlet to connect to Azure:
Connect-AzAccount
Now that we are connected to Azure, we now need to create the SPN, run the following:
$sp = New-AzADServicePrincipal -DisplayName WebJEA-AzureResourceCreator -Role Contributor
$BSTR = [System.Runtime.InteropServices.Marshal]::SecureStringToBSTR($sp.Secret)
$UnsecureSecret = [System.Runtime.InteropServices.Marshal]::PtrToStringAuto($BSTR)
Now you have created an SPN called: WebJEA-AzureResourceCreator. We now need to grab the Tenant ID, run the following:
Get-AzContext | Select-Object Tenant
Now that we have the SPN and Tenant ID, it's time to test connectivity.
# Login using service principal
$TenantId = 'TENANTIDHERE'
$ApplicationId = 'APPLICATIONIDHERE'
$Secret = ConvertTo-SecureString -String 'SECRETSTRINGHERE' -AsPlainText -Force
$Credential = [System.Management.Automation.PSCredential]::New($ApplicationId, $Secret)
Connect-AzAccount -ServicePrincipal -Credential $Credential -TenantId $TenantId
Copy the TenantID into the TenantID section
Type:
$sp.ApplicationID
To retrieve the ApplicationID created from the SPN in the previous step and add it into the ApplicationID part.
Type in:
$UnsecureSecret
To retrieve the Secret, created in the SPN and add it to the String.
Now run the snippet, and you should be successfully connected to Azure.
Create Get-VM script
One of the features of WebJEA is the ability to run scripts on page load. So, we will get the current Power State of our Azure VMs, in the WebJEA scripts directory to create a new PS1 file called: Get-VM.ps1.
Add the following script to it:
# Login using service principal
$TenantId = 'TENANTIDHERE'
$ApplicationId = 'APPLICATIONIDHERE'
$Secret = ConvertTo-SecureString -String 'SECRETSTRINGHERE' -AsPlainText -Force
$Credential = [System.Management.Automation.PSCredential]::New($ApplicationId, $Secret)
Connect-AzAccount -ServicePrincipal -Credential $Credential -TenantId $TenantId
Get-AzVM -Status | Select-Object Name, PowerState, ResourceGroupName
Save the file.
Create Set-VM script
Now, it's time to create the Script to Start/Stop the Virtual Machine. In the WebJEA scripts directory, create a new PS1 file called: Set-VM.ps1
Add the following script to it:
#Variables
[CmdletBinding(SupportsShouldProcess=$True,ConfirmImpact='Low')]
param
(
[Parameter(Position=1, mandatory=$true,
HelpMessage='What is the name of the Azure Virtual Machine?')]
$VMName,
[Parameter(Position=2, mandatory=$true,
HelpMessage='What is the name of the Azure Resource Group that the Virtual Machine is in?')]
$RGName,
[Parameter(Position=3, mandatory=$true,
HelpMessage='What action do you want to do?')]
[VALIDATESET('Start','Stop')]
$VMAction
)
# Login using service principal
$TenantId = 'TENANTIDHERE'
$ApplicationId = 'APPLICATIONIDHERE'
$Secret = ConvertTo-SecureString -String 'SECRETSTRINGHERE' -AsPlainText -Force
$Credential = [System.Management.Automation.PSCredential]::New($ApplicationId, $Secret)
Connect-AzAccount -ServicePrincipal -Credential $Credential -TenantId $TenantId
Get-AzVM -Status | Select-Object Name, PowerState, ResourceGroupName
if ($VMAction -eq "Start")
{
     Start-AzVM -Name $VMName -ResourceGroupName $RGName -Confirm:$false  -Force
    return
}
elseif ($VMAction -eq "Stop")
{
       Stop-AzVM -Name $VMName -ResourceGroupName $RGName -Confirm:$false  -Force
}
Save the file.
Set VM in WebJEA Config
Now that the scripts have been created, it's time to add them to WebJEA to use.
Navigate to your scripts file and make a backup of the config.json file, then edit: config.json
On the line beneath the "onloadscript": "overview.ps1" file, add:
},
Then add in:
{
"id": "StartStopAzVM",
"displayname": "StartStop-AzVM",
"synopsis": "Starts or Stops Azure Based VMs",
"permittedgroups": [".\\Administrators", "luke.geek.nz\\WebJEAAdmins"],
"script": "Set-VM.ps1",
"onloadscript": "Get-VM.ps1"
 }
So your config.json should look similar to:
{
    "Title": "Luke Web Automation",
    "defaultcommandid": "overview",
    "basepath": "C:\\WebJEA\\scripts",
    "LogParameters": true,
    "permittedgroups": [".\\Administrators", "luke.geek.nz\\WebJEAAdmins"],
    "commands": [
{
        "id": "overview",
        "displayname": "Overview",
        "synopsis": "Congratulations, WebJEA is now working!  We've pre-loaded a demo script that will help you verify everything is working.  <br/><i>Tip: You can use the synopsis property of default command to display any text you want.  Including html.</i>",
        "permittedgroups": [".\\Administrators"],
        "script": "validate.ps1",
        "onloadscript": "overview.ps1"
    },
{
        "id": "StartStopAzVM",
        "displayname": "StartStop-AzVM",
        "synopsis": "Starts or Stops Azure Based VMs",
        "permittedgroups": [".\\Administrators", "luke.geek.nz\\WebJEAAdmins"],
        "script": "Set-VM.ps1",
        "onloadscript": "Get-VM.ps1"
    }

]
}
Test Azure Virtual Machine Start/Stop
Now that the scripts have been created open the WebJEA webpage.
Click on the StartStop-AzVM page (it may take a few seconds to load, as it is running the Get-VM script). You should be greeted by a window similar to below:
Congratulations, you have now set up WebJEA and can Start/Stop any Azure Virtual Machines using self-service!
Additional Notes
- There is room for improvement around error checking, doing more with the scripts, such as sending an email when triggered, etc., to remind the server to be powered off.
- Because most of the configuration is JSON/PowerShell files, you could have the entire scripts folder in a git repository to make changes, roll back and keep version history.
- Remove any hard coding of any secrets to connect to Azure (as an example) from the scripts and implement a password management tool with API access or even the Windows Credential Manager. You want a system where you can easily update the passwords of accounts, limit access and prevent anything from being stored in plain text.
- Using the permitted group's section of the config.json file, you can restrict the ability for certain groups to run scripts this way, and you can set granular control on who can do what.
- If you use a normal Active Directory user account as the service account - then for added security, make sure that the WebJEA server is the only device that - that account can be logged in as and only has the permissions assigned that it needs to, look at implementing PIM (Privilaged Access Management) for some tasks so it only has access at the time that it needs it.