Full end to end encryption on an Azure WebApp using Cloudflare
Cloudflare offers many capabilities; one of the capabilities it offers is SSL offloading and CNAME flattening.
When setting up an Azure Web App using default settings, it is set up using HTTP, not HTTPS, so we will set the WebApp to your custom domain, then use Cloudflare to protect traffic from your user's browsers to Cloudflare, then encrypt traffic from Cloudflare to your website.
We will go through both setups, with the result being full end-to-end encryption of your Azure WebApp using Cloudflare and your custom domain.
Using Cloudflare without a backend Certificate

Using Cloudflare with a backend Certificate

By default, Azure WebApps have a wildcard cert for the following domains:
- *.azurewebsites.net
- With Subject alternative names for:
- *.scm.azurewebsites.net
- *.azure-mobile.net
- *.scm.azure-mobile.net
- *.sso.azurewebsites.net

This certificate allows you to use HTTPS using the default azurewebsites URL, which gets created when you create your Azure WebApp and is completely managed by Microsoft and the Azure ecosystem. Still, if you want to use your own Custom Domain, then these certificates won't work.
Prerequisites
- Azure WebApp (supports Custom Domain SSL support, Custom Domains/SSL support are available from ‘B1’ plans and upwards.)
- Cloudflare account (can be free)
- Domain (an actual custom domain to use for your website that is already setup to use Cloudflare nameservers)
- PfxCreator
Add a Custom Domain to your Azure WebApp using Cloudflare
- Login into the Azure Portal
- Navigate to your App Service.
- Underneath Settings on the left-hand side blade of the App Settings, look for Custom Domains and select it.
- Click on ‘Add Custom Domain’.
- type in your custom domain (in my example, I am using a domain I own called: badasscloud.com)
- Select Validate; you will have a similar seen to me below; select CNAME.

- Now we need to validate that you are the one who owns the domains and can use it for your WebApp, so we will need to create some records to verify that you own the domain and redirect the website to the Azure Websites.
- Login to Cloudflare
- Select SSL/TLS and make sure that ‘Flexible’ SSL has been selected.
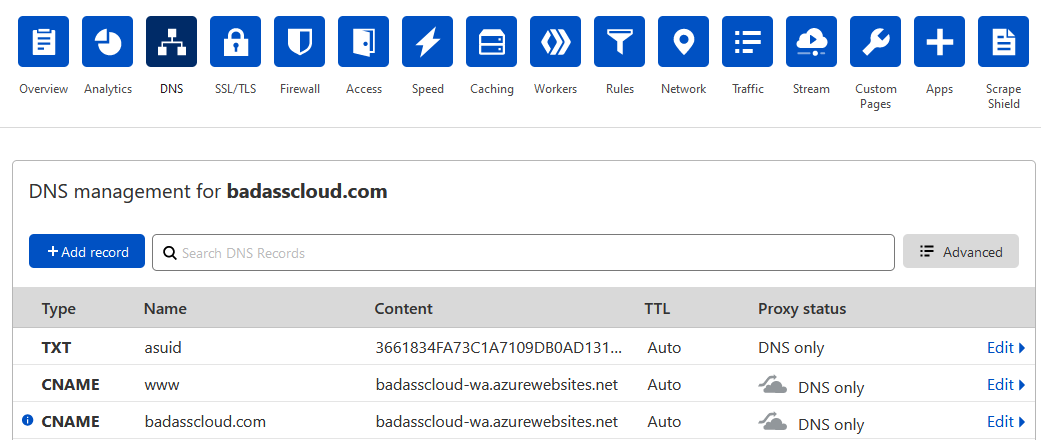
- Select DNS Note: You may need to remove any A records for ‘www’ or the root domain ‘@’ you have set; please make sure you have a reference to them in case you need to roll back any changes because we will be redirecting the main URL to an Azure DNS alias, we will be using Cloudflare CNAME flattening at the root level, so anyone going to ‘badasscloud.com’ will be redirected to the Azure WebApp.
- You can also use the txt record to validate the domain and do some reconfiguration without changing the domain and redirecting traffic ahead of your change to avoid downtime.
- Add in the records to Cloudflare (please note that verification will fail if Cloudflare proxy is turned on, so make sure that the proxy status is set to DNS only)
- Navigate back to the Azure Portal.
- Click on Validate again and select CNAME.
- Hostname availability and Domain ownership should be both green.
- Add Custom Domain.

- If they are still Red, wait a few minutes for Cloudflare to replicate the changes across its Networks and Azure to clear any server-side caching, verification can fail if you try to verify straight away.
- Now that Domain verification has been completed navigate Cloudflare and enable the Cloudflare proxy for your root domain and www record.

- Navigate and test your website. Now that the domain has been added to the Azure WebApp and Cloudflare proxy has been enabled, your website will now have a certificate supplied by Cloudflare. You have now set up Flexible SSL traffic to your website, so traffic between users’ browsers to Cloudflare is now encrypted.

Update your WebApp to support ‘Full’ end-to-end using Cloudflare origin certificate
Adding your domain to Cloudflare was only the first part of the puzzle; although traffic between the browser and Cloudflare is now encrypted, traffic between Cloudflare and your WebApp is not; to encrypt this traffic, we are going to use the Cloudflare origin certificate.
Cloudflare Origin Certificates are free SSL certificates issued by Cloudflare for installation on your origin server to facilitate end-to-end encryption for your visitors using HTTPS. Once deployed, they are compatible with the Strict SSL mode. By default, newly generated certificates are valid for 15 years, but you can change this to 7 days.
- Log in to Cloudflare
- Click on SSL/TLS
- Click on Origin Server
- Click on Create Certificate

- Verify that the Private Key Type is RSA (2048)
- Make sure that the Hostnames you want to be covered under the origin cert is covered.
- Verify certificate validity, in my example, and I am going with 15 years; remember to keep this certificate validated and updated.

- Click Create
- Cloudflare will now generate your Origin certificate and Private key (save these somewhere secure, the private key will not be shown again).
- Now we need to create a certificate PFX file to upload to the Azure WebApp, run PfxCreator.exe (see Prerequisites for download link)
- Paste the Origin Certificate into the: Certificate (PEM)
- Paste the Private Key into the Private Key (PEM)

- Type in a password for the certificate
- Click Save PFX… and save your certificate.
- Login into the Azure Portal
- Navigate to your App Service.
- Underneath Settings on the left-hand side blade of the App Settings, look for Custom Domains and select it.
- You should see the SSL state of your domain as ‘Not Secure’, and under SSL Binding, you will have an option to Add Binding, click on Add Binding.
- Select your Custom Domain and click Upload PFX Certificate
- Click File and browse for your certificate.
- Type in the password you entered PFXCreator earlier.

- Click on Upload.
- Once uploaded, select your Custom Domain.
- Select the Cloudflare Origin Certificate
- Make sure the TLS/SSL type is: SNI SSL and click Add Binding.

- The SSL State of your Custom Domain should now have been changed to Secure.
- Click on HTTPS Only
Note: You may see constant redirect issues with your website until the following Cloudflare changes have been made.

- Login to Cloudflare
- Select SSL/TLS and make sure that ‘Full (Strict)’ has been selected.
- Give it 30 seconds to a minute to take effect, and you have now successfully encrypted traffic end-to-end on your website, from the browser to Cloudflare and from Cloudflare to your Azure WebApp.
#ProTip - If you want to be more secure, you can look into blocking access to your website from Cloudflare and a few select IPs for testing only to avoid traffic from bypassing Cloudflare and going to the azure websites URL.