Azure Blob and Azure Lifecycle Management
Azure Blob storage (Platform-as-a-service (PaaS)) is used for streaming and storing documents, videos, pictures, backups, and other unstructured text or binary data… however the functionality extends beyond just a place to “store stuff”, it can save you money and time by automating the lifecycle of your data using Azure Blob Lifecycle Management and access tiers.
As of January 2021, Blob storage now supports the Network File System (NFS) 3.0 protocol. This support provides Linux file system compatibility at object storage scale and prices and enables Linux clients to mount a container in Blob storage from an Azure Virtual Machine (VM) or a computer on-premises.
Blobs - “Highly scalable, REST-based cloud object store”
- Data sharing, Big Data, Backups
- Block Blobs: Read and write data in blocks. Optimized for sequential IO. Most cost-effective Storage. Ideal for files, documents & media.
- Page Blobs: Optimized for random access and can be up to 8 TB in size. IaaS VM OS & data disks and backups are of this type.
- Append Blobs: Like block blobs and optimized for append operations. Ideal for logging scenarios and total size can be up to 195 GB.
Aren’t there only 2 access tiers?
When you create an Azure Storage account, you get presented with 2 options for the Access Tier:
- Hot
- Cool
Hot access tier
The hot access tier has higher storage costs than cool and archive tiers, but the lowest access costs. Example usage scenarios for the hot access tier include:
- Data that is in active use or is expected to be read from and written to frequently.
- Data that is staged for processing and eventual migration to the cool access tier
Cool access tier
The cool access tier has lower storage costs and higher access costs compared to hot storage. This tier is intended for data that will remain in the cool tier for at least 30 days. Example usage scenarios for the cool access tier include:
- Short-term backup and disaster recovery
- Older data not used frequently but expected to be available immediately when accessed.
- Large data sets need to be stored cost-effectively, while more data is being gathered for future processing.
These options are set globally for your Azure Storage account blobs, however, there is a third tier, the Archive Access Tier:
Archive access tier
The Archive access tier has the lowest storage cost, but higher data retrieval costs compared to hot and cool tiers.
Data must remain in the archive tier for at least 180 days or be subject to an early deletion charge. Data in the archive tier can take several hours to retrieve depending on the specified rehydration priority.
While a blob is in archive storage, the blob data is offline and cannot be read or modified. To read or download a blob in the archive, you must first rehydrate it to an online tier.
How is this charged?
Depending on which tier your data is in, depends on the costs, Azure Blob Storage is charged on Read/Write and list operation and other factors, for example:
- Hot Tier: Lower access prices for frequent use
- Cool Tier: Lower storage prices for high volume
- The volume of data stored per month.
- Quantity and types of operations performed, along with any data transfer costs.
- Data redundancy option selected.
More information here: https://azure.microsoft.com/en-us/pricing/details/storage/blobs/
What is data lifecycle management?
There are many versions of it, but at its core, there are 5 stages to simple data lifecycle management:
- Creation – When the data is first created.
- Storage -Where the data is stored.
- Usage – When the data is useful and relevant and used.
- Archival – When the data is not as useful, but still helpful to have around due to knowledge or legal requirements.
- Destruction – When the data is completely irrelevant and there is no need to store or use it anymore.
Right... so, tell me more about the Azure Blob Lifecycle Management?
Azure Blob Storage has a lifecycle management feature built-in. Azure Blob Storage lifecycle management offers a rich, rule-based policy for General Purpose v2 and blob (and Premium Block blob) storage accounts.
- Imagine you working on a project, such as purchasing a new company you not only want somewhere to store that data, but you want to make sure it is accessible quickly, so you put it in an Azure Blob Storage account under the Hot Tier.
- You’ve then spent some time working on new documents using the data you acquired when you purchased the ‘new’ company, but don’t touch them anymore, you don’t want them sitting on fast storage costing you additional money, so they get migrated to a ‘Cool’ access tier.
- A few months later, you realized that you needed some of the original data from the company acquisition, you find the files and use them, it took a bit longer to open as the data needed to be migrated to the ‘hot tier’ but you are happy because the data that you want was there.
- A year later, you are onto acquiring another company and the data from the company acquisition which seemed a lifetime ago is forgotten about, however, you know you might need it for legal or finance auditing purposes, the data goes into the Archive tier, costing you less than the cool tier, but could be reacquired at a later date if needed (for an extra charge).
- 7 years down the track, you’re now a multi-million-dollar firm, and have completely forgotten or no longer need the data from your original acquisition, the data then gets deleted, saving you money and data management costs.
Microsoft Azure and Lifecycle Management for Blob Storage automate the entire lifecycle for you.
How do I enable or configure Azure Blob Lifecycle Management?
- Log in to the Azure Portal
- Find the Azure storage account you want to configure Lifecycle Management on
- On the Storage account left-hand side Blade, under Blob Service click on Lifecycle Management
- Click on Add a rule
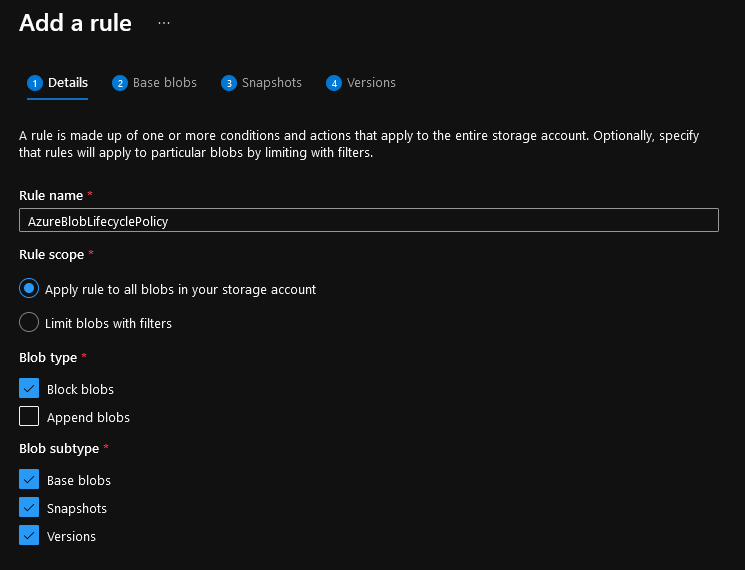
- Enter in a Rule name any name that suits your naming standards, for example, AzureBlobLifecyclePolicy.
 Note: Make sure Append Blobs is unselected, this is un-supported for moving access tiers (however supports being deleted after x amount of days).
 - Click Next
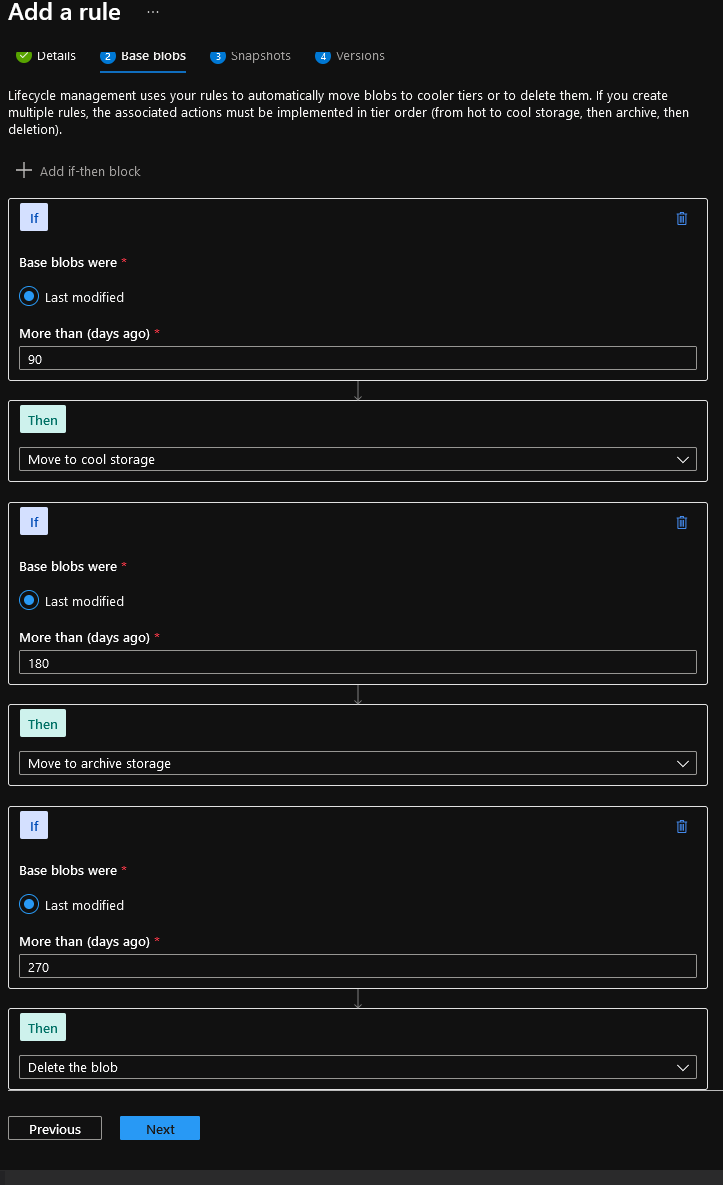
- This is where the magic happens, we are going to go with the following:

- Base Blobs that were last modified 90 days ago will be moved to Cool storage.
- Click on + Add if-then block, now we will select the Archive Storage, the example we will now archive data that has been in Cool storage for 90 days, so we enter in: 180 days. Note: Migrating the data between Access Tiers, does not change the last modified date of the file, so it's 90 days for migrating to Cool, then another 90 days to move to archive.
- Click on + Add if-then block, now we will select the Delete the blob, data that has been in Archive storage for 90 days will now be deleted, so we enter in: 270 days.
- Click Next and do the same for Snapshots and versions and click Save.
- Congratulations, you have now created an Azure Blob Lifecycle policy!
Once the Policy has been saved, it is Enabled by default. You can disable it by selecting the Policy and select Disable on the top banner.
!Azure Blob Lifecycle Management
#ProTip - You can also view the policy as Code in Code View, which is a simple and quick way of documenting and modifying your lifecycle policy.
#ProTip - You can have multiple Lifecycle Policies on a single storage account.
#ProTip - You can learn more about Lifecycle policies by going to the Microsoft documentation here: Optimize costs by automating Azure Blob Storage access tiers.
#ProTip - If you are looking for integration with Azure AD or Active Directory NTFS permissions, replicating data from fileservers, you are better off looking at Azure File Shares and not blob storage.
