This post is a part of Azure Spring Clean, which is a community event focused on Azure management topics from March 14-18, 2022.
Thanks to Joe Carlyle and Thomas Thornton for putting in the time and organising this event.
This article, along with others of its kind (Articles, Videos etc.), cover Azure Management topics such as Azure Monitor, Azure Cost Management, Azure Policy, Azure Security Principles or Azure Foundations!
Today I will be covering the Azure Optimization Engine.

Overview
The Azure Optimization Engine (AOE) is an extensible solution designed to generate optimization recommendations for your Azure environment, like a fully customizable Azure Advisor.
The first custom recommendations use-case covered by this tool was augmenting Azure Advisor Cost recommendations, particularly Virtual Machine right-sizing, with a fit score based on VM (Virtual Machine) metrics and properties.
The Azure Optimization Engine can…
- Enable new custom recommendation types
- Augment Azure Advisor recommendations with richer details that better drive action
- Add fit score to recommendations.
- Add historical perspective to recommendations (the older the recommendation, the higher the chances to remediate it)
- Drive continuous automated optimisation
Azure Optimisation Engine combines multiple data sources to give you better data-driven decisions and recommendations, outside of that usually deployed by the inbuilt Azure Advisor, example use-cases and data sources can be seen below:
- Azure Resource Graph (Virtual Machine and Managed Disks properties)
- Azure Monitor Logs (Virtual Machine performance metrics)
- Azure Consumption (consumption/billing usage details events)
- Extracts data periodically to build a recommendations history
- Joins and queries data in an analytics-optimised repository (Log Analytics)
- Virtual Machine performance metrics collected with Log Analytics agent
- Can leverage existing customer setup
- Requires only a few metrics collected with a frequency >= 60 seconds
Besides collecting all Azure Advisor recommendations, AOE includes other custom recommendations that you can tailor to your needs:
- Cost
- Augmented Advisor Cost VM right-size recommendations, with fit score based on Virtual Machine guest OS metrics (collected by Log Analytics agents) and Azure properties
- Underutilized VM Scale Sets
- Unattached disks
- Standard Load Balancers without backend pool
- Application Gateways without backend pool
- VMs deallocated since a long time ago (forgotten VMs)
- Orphaned Public IPs
- High Availability
- Virtual Machine high availability (availability zones count, availability set, managed disks, storage account distribution when using unmanaged disks)
- VM Scale Set high availability (availability zones count, managed disks)
- Availability Sets structure (fault/update domains count)
- Performance
- VM Scale Sets constrained by lack of compute resources
- Security
- Service Principal credentials/certificates without expiration date
- NSG rules referring to empty or non-existing subnets
- NSG rules referring to orphan or removed NICs
- NSG rules referring to orphan or removed Public IPs
- Operational Excellence
- Load Balancers without backend pool
- Service Principal credentials/certificates expired or about to expire
- Subscriptions close to the maximum limit of RBAC (Role Based Access Control) assignments
- Management Groups close to the maximum limit of RBAC assignments
- Subscriptions close to the maximum limit of resource groups
- Subnets with low free IP space
- Subnets with too much IP space wasted
- Empty subnets
- Orphaned NICs
Feel free to skip to the Workbook and PowerBI sections to look at some of the outs of box data and recommendations.
The Azure Optimisation Engine is battle-tested
- Providing custom recommendations since Nov 2019
- Serving Azure customers worldwide
- From smaller 50-500 VMs customers to larger ones with more than 5K VMs
- Several customer-specific developments (custom collectors and recommendation algorithms)
- Flexibility options include (multi-subscription and multi-tenant capability)
- Based on cheap services (Azure Automation, Storage, small SQL Database)
A few hours after setting up the engine, you will get access to a Power BI dashboard and Log Analytic Workbooks with all Azure optimisation opportunities, coming from both Azure Advisor and tailored recommendations included in the engine.
These recommendations are then updated every seven days.
It is worth noting that Azure Optimisation Engine is NOT an official Microsoft Product, and as such is under no offical support, it was created and maintened by: Hélder Pinto, a Senior Customer Engineer for Microsoft and would like to take the opportunity to thank Hélder the amazing work he is doing with this product on a continous basis, and giving me his blessing to write this article, on which he has already done an amazing job documenting on Github.
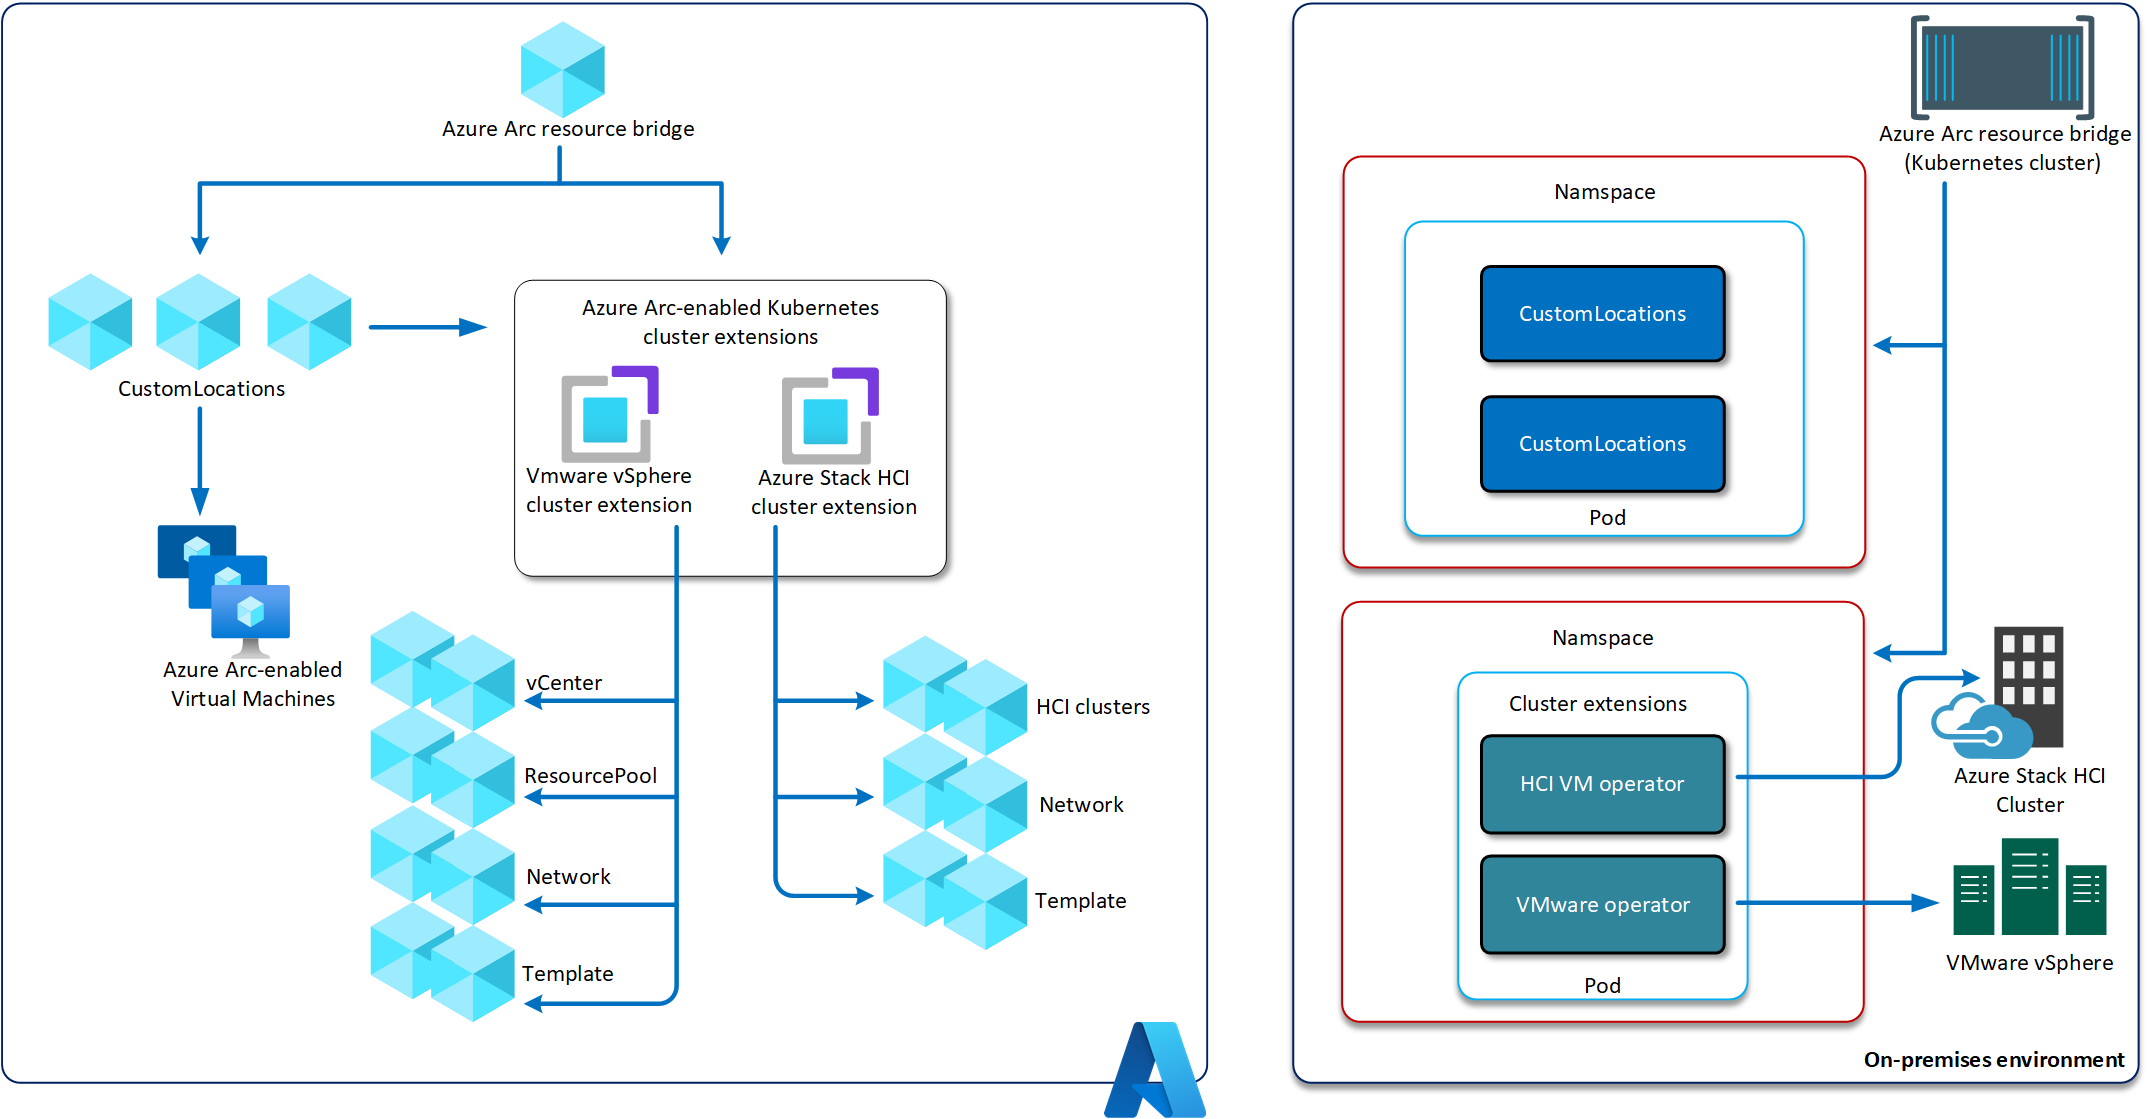
Architecture

Azure Optimization Engine runs on top of Azure Automation (Runbooks for each data source) and Log Analytics. It is supplemented by a storage account to store JSON and Azure SQL database to help control ingestion (last processed blob and lines processed).
Install
Prerequisites
Taken directly from the Git repository readme, the prerequisite for Azure Optimization Engine are:
- A supported Azure subscription (see the FAQson Github)
- Azure Powershell 6.6.0+(Azure Bicep support is not currently available but is being worked on).
- Microsoft.Graph.Authentication and Microsoft.Graph.Identity.DirectoryManagement PowerShell modules
- A user account with Owner permissions over the chosen subscription, so that the Automation Managed Identity is granted the required privileges over the subscription (Reader) and deployment resource group (Contributor)
- (Optional) A user account with at least Privileged Role Administrator permissions over the Azure AD tenant, so that the Managed Identity is granted the required privileges over Azure AD (Global Reader)
During deployment, you'll be asked several questions. It would be best if you planned for the following:
- Whether you're going to reuse an existing Log Analytics Workspace or create a new one. IMPORTANT: you should ideally reuse a workspace where you have VMs onboarded and already sending performance metrics (
Perf table); otherwise, you will not fully leverage the augmented right-size recommendations capability. If this is not possible/desired for some reason, you can still manage to use multiple workspaces (see Configuring Log Analytics workspaces).
- An Azure subscription to deploy the solution (if you're reusing a Log Analytics workspace, you must deploy into the same subscription the workspace is in).
- A unique name prefix for the Azure resources being created (if you have specific naming requirements, you can also choose resource names during deployment)
- Azure region
If the deployment fails for some reason, you can repeat it, as it is idempotent (i.e. they can be applied multiple times without changing the result). The exact process is used to upgrade a previous deployment with the latest version. You have to keep the same deployment options, so make sure you document them.
We will now go through and install the prerequisites from scratch; as in this article, I will be deploying the Azure Optimization Engine from our local workstation.
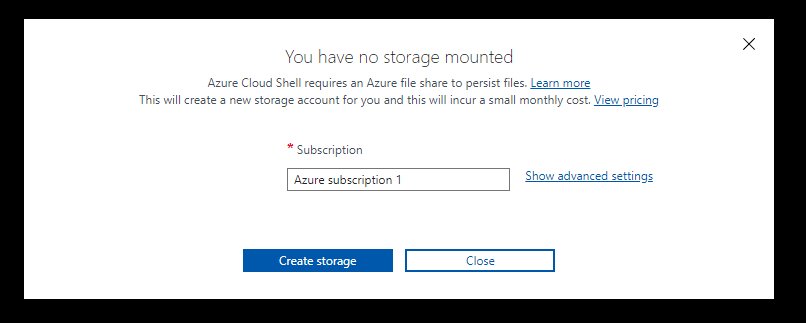
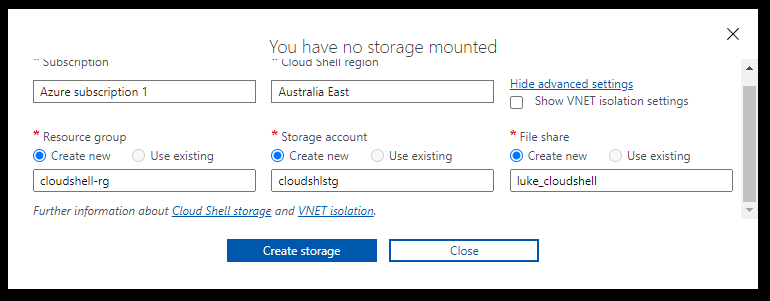
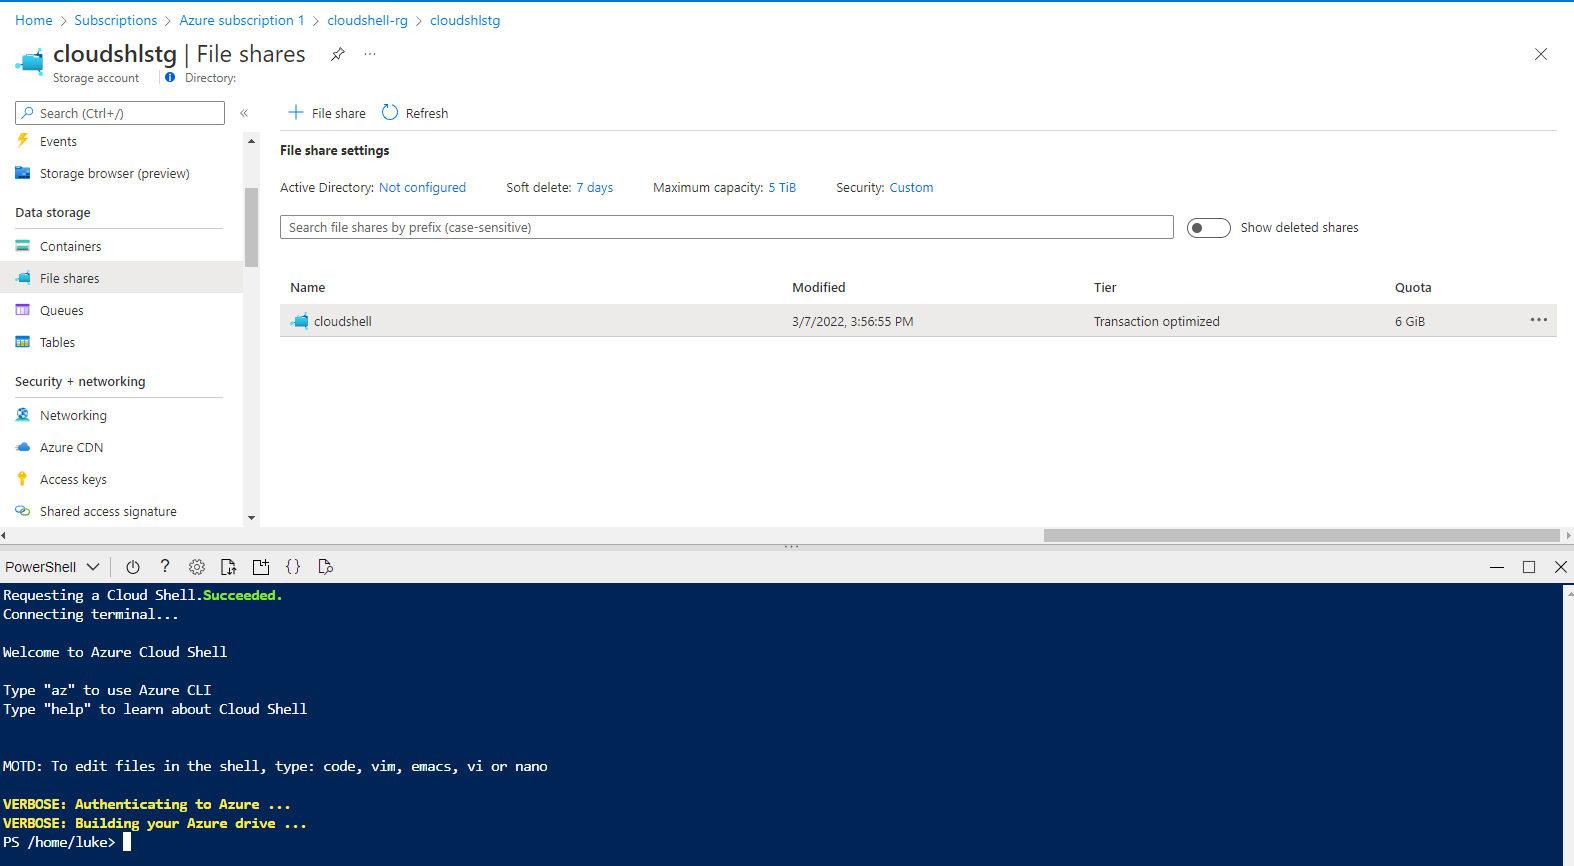
You can also install from the Azure Cloud Shell,
Install Azure PowerShell & Microsoft Graph modules
-
Open Windows PowerShell
-
Type in:
Install-Module -Name Az,Microsoft.Graph.Authentication,Microsoft.Graph.Identity.DirectoryManagement -Scope CurrentUser -Repository PSGallery -Force
Install
Now that we have the prerequisites installed! Let's set up Azure Optimization Engine!
-
In your favourite web browser, navigate to the AzureOptimizationEngine GitHub repository.
-
Select Code, Download Zip
-

-
Download and extract the ZIP file to a location you can easily navigate to in PowerShell (I have extracted it to C:\temp\AzureOptimizationEngine-master\AzureOptimizationEngine-master)
-
Open PowerShell (or Windows Terminal)
-
Because the scripts were downloaded from the internet, we will need to Unblock these so that we can run them, open PowerShell and run the script below (changing your path to the path that the files were extracted)
Get-ChildItem -r 'C:\temp\AzureOptimizationEngine-master\AzureOptimizationEngine-master' | Unblock-File
-
Now that the script and associated files have been unblocked change the directory to the location of the Deploy-AzureOptimizationEngine.ps1 file.
-
Run: .\Deploy-AzureOptimizationEngine.ps1
-

-
A browser window will then popup, authenticate to Azure (connect to the Azure tenant that has access to the Azure subscription you wish to set up Azure Optimization Engine on).
-
Once authentication, you will need to confirm the Azure subscription to which you want to deploy Azure Optimization Engine.
-

-
Once your subscription is selected, it's time to choose a naming prefix for your resources (if you choose Enter, you can manually name each resource); in my case, my prefix will be: aoegeek. Because Azure Optimization Engine will be creating resources that are globally available, make sure you select a prefix that suits your organisation/use-case as you may run into issues with the name already being used.
-

-
If you have an existing Log Analytics workspace that your Virtual Machines and resources are connected to, you can specify 'Y' here to select your existing resource; I am creating this from fresh so that I will choose 'N.'
-

-
The Azure Optimization Engine will now check that the names and resources are available to be deployed to your subscriptions and resources (nothing is deployed during this stage - if there is an error, you can fix the issue and go back).
-
Once validation has passed, select the region that Azure Optimization will be deployed to; I will deploy to australiaeast, so I choose 1.
-
Azure Optimization Engine now requires the SQL Admin username; for the SQL server and database it will create, I will go with: sqladmin
-

-
Now enter the password for the sqladmin account and press Enter
-
Verify that everything is correct, then press Y to deploy Azure Optimization Engine!
-

-
Deployment could take 10-25 minutes... (mine took 22 minutes and 51 seconds)
-
While leaving the PowerShell window open, log into the Azure Portal; you should now have a new Resource Group, and your resources will start getting created... you can click on Deployments (under Settings navigation bar) in the Resource Group to review the deployment status.
-

-
If you notice a failure, in the Deployment tab for: 'PolicyDeployment' you can ignore this, as it may have failed if the SQL Server hasn't been provisioned yet; once it has been provisioned, you can navigate back to this failed deployment and click 'Redeploy', to deploy a SQL Security Alert policy.
Note: The Azure SQL database will have the Public IP from the location the script was deployed from, allowed on the Azure SQL database; you may need to adjust this depending on your requirements.
Onboard Azure VMs to Log Analytics using Azure Policy and PowerShell
Now that Azure Optimization has been installed, let's onboard our current and future Azure Virtual Machines to Azure Optimization Engine, using Azure Policy. This is required if you want to get Azure Advisor Virtual Machine right-size recommendations augmented with guest OS metrics. If you don't collect metrics from the Virtual Machines, you will still have a fully functional Optimisation Engine, with many recommendations, but the Advisor Virtual Machine right-size ones will be served as is.
-
Open PowerShell and login to Azure using: Connect-AzAccount
-
Connect to your Azure subscription that contains the Virtual Machines you want to onboard to Log Analytics
-
Type:
# Register the resource provider if it's not already registered
Register-AzResourceProvider -ProviderNamespace 'Microsoft.PolicyInsights'
-
The PowerShell script below will:
-
Just update the variables to match your setup
#requires -Version 1.0
# Variables
#Enter your subscription name
$subscriptionName = 'luke.geek.nz'
#Enter the name of yuour
$policyDisplayName = 'Deploy - Log Analytics' #Cant Exceed 24 characters
$location = 'australiaeast'
$resourceGroup = 'aoegeek-rg'
$UsrIdentityName = 'AOE_ManagedIdentityUsr'
$param = @{
  logAnalytics = 'aoegeek-la'
}
# Get a reference to the subscription that will be the scope of the assignment
$sub = Get-AzSubscription -SubscriptionName $subscriptionName
$subid = $sub.Id
#Creates User Managed identity
$AzManagedIdentity = New-AzUserAssignedIdentity -ResourceGroupName $resourceGroup -Name $UsrIdentityName
#Adds Contributor rights to User Managed identity to Subscription
#Waits 10 seconds to allow for Azure AD to replicate and recognise Managed identity has been created.
Start-Sleep -Seconds '10'
#Assigns role assignement to managed identity
 New-AzRoleAssignment -Objectid $AzManagedIdentity.PrincipalId -scope ('/subscriptions/' + $subid ) -RoleDefinitionName 'Log Analytics Contributor'
# Get a reference to the built-in policy definition that will be assigned
$definition = Get-AzPolicyDefinition | Where-Object -FilterScript {
  $_.Properties.DisplayName -eq 'Deploy - Configure Log Analytics extension to be enabled on Windows virtual machines'
}
# Create the policy assignment with the built-in definition against your subscription
New-AzPolicyAssignment -Name $policyDisplayName -DisplayName $policyDisplayName -Scope ('/subscriptions/' + $subid ) -PolicyDefinition $definition -IdentityType 'UserAssigned'  -IdentityId $AzManagedIdentity.id -location $location -PolicyParameterObject $param
#Creates R3mediation task, to deploy the extension to the VM
$policyAssignmentID = Get-AzPolicyAssignment -Name $policyDisplayName | Select-Object -Property PolicyAssignmentId
Start-AzPolicyRemediation -Name 'Deploy - LA Agent' -PolicyAssignmentId $policyAssignmentID.PolicyAssignmentId -ResourceDiscoveryMode ReEvaluateCompliance
Note: The default 'Deploy - Configure Log Analytics extension to be enabled on Windows virtual machines' policy doesn't currently support Gen 2 or Windows Server 2022 Virtual Machines; if you have these, then you can copy the Azure Policy definition and then make your own with the new imageSKUs, although this policy may be replaced by the: Configure Windows virtual machines to run Azure Monitor Agent policy. Although I haven't tested it yet, the same script above can be modified to suit.
Onboard Azure VMs to Log Analytics using the Azure Portal
If you do not want to onboard VMs with Policy, you can do it manually via the Azure Portal.
- Open Azure Portal
- Navigate to Log Analytic Workspaces
- Click on the Log Analytic workspace that was provisioned for Azure Optimization Engine
- Navigate to Virtual Machines (under Workspace Data Sources)
- Click on the Virtual Machine you want to link up to the Log Analytics workspace, and click Connect - this will trigger the Log Analytic extension and agent o be installed. Repeat for any further Virtual Machines.

Now that we have Virtual Machines reporting to our Log Analytic instance, it's time to make sure we are collecting as much data as we need to give suitable recommendations, luckily a script has already been included in the Azure Optimisation repository called 'Setup-LogAnalyticsWorkspaces.ps1' to configure the performance counters.
-
Open PowerShell (or Windows Terminal)
-
Change the directory to the location of the Setup-LogAnalyticsWorkspaces.ps1, in the root folder of the repository extracted earlier
-
Run the following PowerShell commands to download the required PowerShell Modules:
Install-Module -Name Az.ResourceGraph
Install-Module -Name Az.OperationalInsights
-
Then run: .\Setup-LogAnalyticsWorkspaces.ps1
-
The script will then go through all Log Analytic workspaces that you have access to and check for performance counters.
-

-
If they are missing from the Log Analytics workspace, then you can run:
./Setup-LogAnalyticsWorkspaces.ps1 -AutoFix
or
 #Fix specific workspaces configuration, using a custom counter collection frequency
./Setup-LogAnalyticsWorkspaces.ps1 -AutoFix -WorkspaceIds "d69e840a-2890-4451-b63c-bcfc5580b90f","961550b2-2c4a-481a-9559-ddf53de4b455" -IntervalSeconds 30
Setup Azure AD-based recommendations by granting permissions to Managed Identity.
Azure Optimization Engine, has the ability to do recommendations based on Microsoft Entra ID roles and permissions, but in order to do that, the System Assigned Identity of the Azure Optimization Engine account needs to be given 'Global Reader' rights. As part of the deployment, you may have gotten the following error:
Cannot bind argument to parameter 'DirectoryRoleId' because it is an empty string.
Could not grant role. If you want Azure AD-based recommendations, please grant the Global Reader role manually to the aoegeek-auto managed identity or, for previous versions of AOE, to the Run As Account principal.
We are going to grant the Azure Automation account 'Global Reader' rights manually in the Azure Portal.
- Open Azure Portal
- Navigate to Automation Accounts
- Open your Azure Optimisation Engine automation account
- Navigate down the navigation bar to the Account Settings section and select: Identity

- Copy the object ID
- Now navigate to Microsoft Entra ID
- Click on Roles and Administrators
- Search for: Global Reader
- Select Global Reader and select + Add assignments
- Paste in the object ID earlier, and click Ok to grant Global Reader rights to the Azure Automation identity.
Azure Automation - Runbooks & Automation
The wind that gives Azure Optimization Engine its lift is Azure Automation and Runbooks, at the time I deployed this - I had x1 Azure Automation account and 33 runbooks!
Looking at the runbooks deployed, you can get a sense of what Azure Optimization Engine is doing...
| NAME | TYPE |
|---|
| aoegeek-auto | Automation Account |
| Export-AADObjectsToBlobStorage (aoegeek-auto/Export-AADObjectsToBlobStorage) | Runbook |
| Export-AdvisorRecommendationsToBlobStorage (aoegeek-auto/Export-AdvisorRecommendationsToBlobStorage) | Runbook |
| Export-ARGAppGatewayPropertiesToBlobStorage (aoegeek-auto/Export-ARGAppGatewayPropertiesToBlobStorage) | Runbook |
| Export-ARGAvailabilitySetPropertiesToBlobStorage (aoegeek-auto/Export-ARGAvailabilitySetPropertiesToBlobStorage) | Runbook |
| Export-ARGLoadBalancerPropertiesToBlobStorage (aoegeek-auto/Export-ARGLoadBalancerPropertiesToBlobStorage) | Runbook |
| Export-ARGManagedDisksPropertiesToBlobStorage (aoegeek-auto/Export-ARGManagedDisksPropertiesToBlobStorage) | Runbook |
| Export-ARGNICPropertiesToBlobStorage (aoegeek-auto/Export-ARGNICPropertiesToBlobStorage) | Runbook |
| Export-ARGNSGPropertiesToBlobStorage (aoegeek-auto/Export-ARGNSGPropertiesToBlobStorage) | Runbook |
| Export-ARGPublicIpPropertiesToBlobStorage (aoegeek-auto/Export-ARGPublicIpPropertiesToBlobStorage) | Runbook |
| Export-ARGResourceContainersPropertiesToBlobStorage (aoegeek-auto/Export-ARGResourceContainersPropertiesToBlobStorage) | Runbook |
| Export-ARGUnmanagedDisksPropertiesToBlobStorage (aoegeek-auto/Export-ARGUnmanagedDisksPropertiesToBlobStorage) | Runbook |
| Export-ARGVirtualMachinesPropertiesToBlobStorage (aoegeek-auto/Export-ARGVirtualMachinesPropertiesToBlobStorage) | Runbook |
| Export-ARGVMSSPropertiesToBlobStorage (aoegeek-auto/Export-ARGVMSSPropertiesToBlobStorage) | Runbook |
| Export-ARGVNetPropertiesToBlobStorage (aoegeek-auto/Export-ARGVNetPropertiesToBlobStorage) | Runbook |
| Export-AzMonitorMetricsToBlobStorage (aoegeek-auto/Export-AzMonitorMetricsToBlobStorage) | Runbook |
| Export-ConsumptionToBlobStorage (aoegeek-auto/Export-ConsumptionToBlobStorage) | Runbook |
| Export-RBACAssignmentsToBlobStorage (aoegeek-auto/Export-RBACAssignmentsToBlobStorage) | Runbook |
| Ingest-OptimizationCSVExportsToLogAnalytics (aoegeek-auto/Ingest-OptimizationCSVExportsToLogAnalytics) | Runbook |
| Ingest-RecommendationsToSQLServer (aoegeek-auto/Ingest-RecommendationsToSQLServer) | Runbook |
| Recommend-AADExpiringCredentialsToBlobStorage (aoegeek-auto/Recommend-AADExpiringCredentialsToBlobStorage) | Runbook |
| Recommend-AdvisorAsIsToBlobStorage (aoegeek-auto/Recommend-AdvisorAsIsToBlobStorage) | Runbook |
| Recommend-AdvisorCostAugmentedToBlobStorage (aoegeek-auto/Recommend-AdvisorCostAugmentedToBlobStorage) | Runbook |
| Recommend-ARMOptimizationsToBlobStorage (aoegeek-auto/Recommend-ARMOptimizationsToBlobStorage) | Runbook |
| Recommend-LongDeallocatedVmsToBlobStorage (aoegeek-auto/Recommend-LongDeallocatedVmsToBlobStorage) | Runbook |
| Recommend-UnattachedDisksToBlobStorage (aoegeek-auto/Recommend-UnattachedDisksToBlobStorage) | Runbook |
| Recommend-UnusedAppGWsToBlobStorage (aoegeek-auto/Recommend-UnusedAppGWsToBlobStorage) | Runbook |
| Recommend-UnusedLoadBalancersToBlobStorage (aoegeek-auto/Recommend-UnusedLoadBalancersToBlobStorage) | Runbook |
| Recommend-VMsHighAvailabilityToBlobStorage (aoegeek-auto/Recommend-VMsHighAvailabilityToBlobStorage) | Runbook |
| Recommend-VMSSOptimizationsToBlobStorage (aoegeek-auto/Recommend-VMSSOptimizationsToBlobStorage) | Runbook |
| Recommend-VNetOptimizationsToBlobStorage (aoegeek-auto/Recommend-VNetOptimizationsToBlobStorage) | Runbook |
| Remediate-AdvisorRightSizeFiltered (aoegeek-auto/Remediate-AdvisorRightSizeFiltered) | Runbook |
| Remediate-LongDeallocatedVMsFiltered (aoegeek-auto/Remediate-LongDeallocatedVMsFiltered) | Runbook |
| Remediate-UnattachedDisksFiltered (aoegeek-auto/Remediate-UnattachedDisksFiltered) | Runbook |
A lot of the runbooks, such as the Log Analytics workspace ID, link up to Azure Automation variables, such as this period in Days to look back for Advisor recommendations, by default, this is '7' but you can change this variable to suit your organisation's needs.

Azure Automation - Schedules
Along with containing the variables and configurations used by the Runbooks, it also contains the schedules for the ingest of data into the storage account and SQL databases, most of these are Daily, but schedules such as ingesting from the Azure Advisor are weekly, by default these times are in UTC.

When making changes to these schedules (or moving the Runbooks to be run from a Hybrid worker), it is recommended to use the Reset-AutomationSchedules.ps1 script. These times need to be in UTC.

Azure Automation - Credentials
When we set up the Azure SQL database earlier, as part of the Azure Optimisation setup, we configured the SQL Admin account and password, these credentials are stored and used by the Runbooks in the Azure Automation credential pane.

View Recommendations
It's worth noting, that because Azure Optimization Engine stores its data into Log Analytics and SQL, you can use languages such as KQL directly on the Log Analytics workspace to pull out any information you might need and develop integration into other toolsets.
Workbooks
There are x3 Azure Log Analytics workbooks included in the Azure Optimization Engine, these are as follows:
| NAME | TYPE |
|---|
| Resources Inventory | Azure Workbook |
| Identities and Roles | Azure Workbook |
| Costs Growing | Azure Workbook |
They can be easily accessed in the Azure Portal.
- Log in to the Azure Portal
- Navigate to Log Analytics Workspace
- Click on the Log Analytics workspace you set up for Azure Optimization Engine earlier and click on Workbooks (under General).
- Click on: Workbooks filter at the top to display the 3 Azure Optimization Engine

- After a few days of collecting data, you should now be able to see data like below.
Resource Inventory - General

Resource Inventory - Virtual Machines

Resource Inventory - Virtual Machine ScaleSets

Resource Inventory - Virtual Machine ScaleSets Disks

Resource Inventory - Virtual Networks

Identities and Roles - Overview

Power BI
The true power of the Azure Optimisation engine, is the data stored in the SQL database, using PowerBI you can pull the data into dashboards and make it more meaningful, and the recommendations given from PowerBI and SQL.
The Optimisation Engine already has a starter PowerBI file, which pulls data from the database.
Install PowerBI Desktop
- Open Microsoft Store and search for: Power BI Desktop
- Click Get

- Once Downloaded, click Open
In order to connect PowerBI to the Azure SQL database, we need to know the URL of the database and make sure our IP has been opened on the Azure SQL Firewall.
- Open Azure Portal
- Navigate to SQL Servers
- Click on the SQL server created earlier, under the Security heading click on Firewall and Virtual Networks
- Under: Client IP address, make sure your public IP is added and click Save

- Now that we have verified/added our client IP, we need to get the SQL database (not server) URL
- Click on Overview
- Click on the aoeoptimization database (under Available resources, down the bottom)
- Click on Copy to Clipboard for the server Name/URL

Open PowerBI Desktop File
Now that we have PowerBI Desktop installed, it's time to open: AzureOptimizationEngine.pbix. This PowerBI file is located in the Views folder of the Azure Optimization Engine repository.
- Open: AzureOptimizationEngine.pbix in PowerBI Desktop
- On the Home page ribbon, click on Transform Data
- Click Data source settings
- Click Change Source
- Change the default SQL server of aoedevgithub-sql.database.windows.net to your SQL database, copied earlier.
- Click Ok
- Click Ok and press Apply Changes
- It will prompt for credentials, click on Database
- Enter in your SQLAdmin details entered as part of the Azure Optimization Engine setup
- Click Connect
After PowerBI updates its database and queries, your PowerBI report should now be populated with data like below.
PowerBI - Overview

PowerBI - Cost

PowerBI - High Availability

PowerBI - Security

PowerBI - Operational Excellence

Congratulations! You have now successfully stood up and configured Azure Optimization Engine!
Additional Recommended Reading