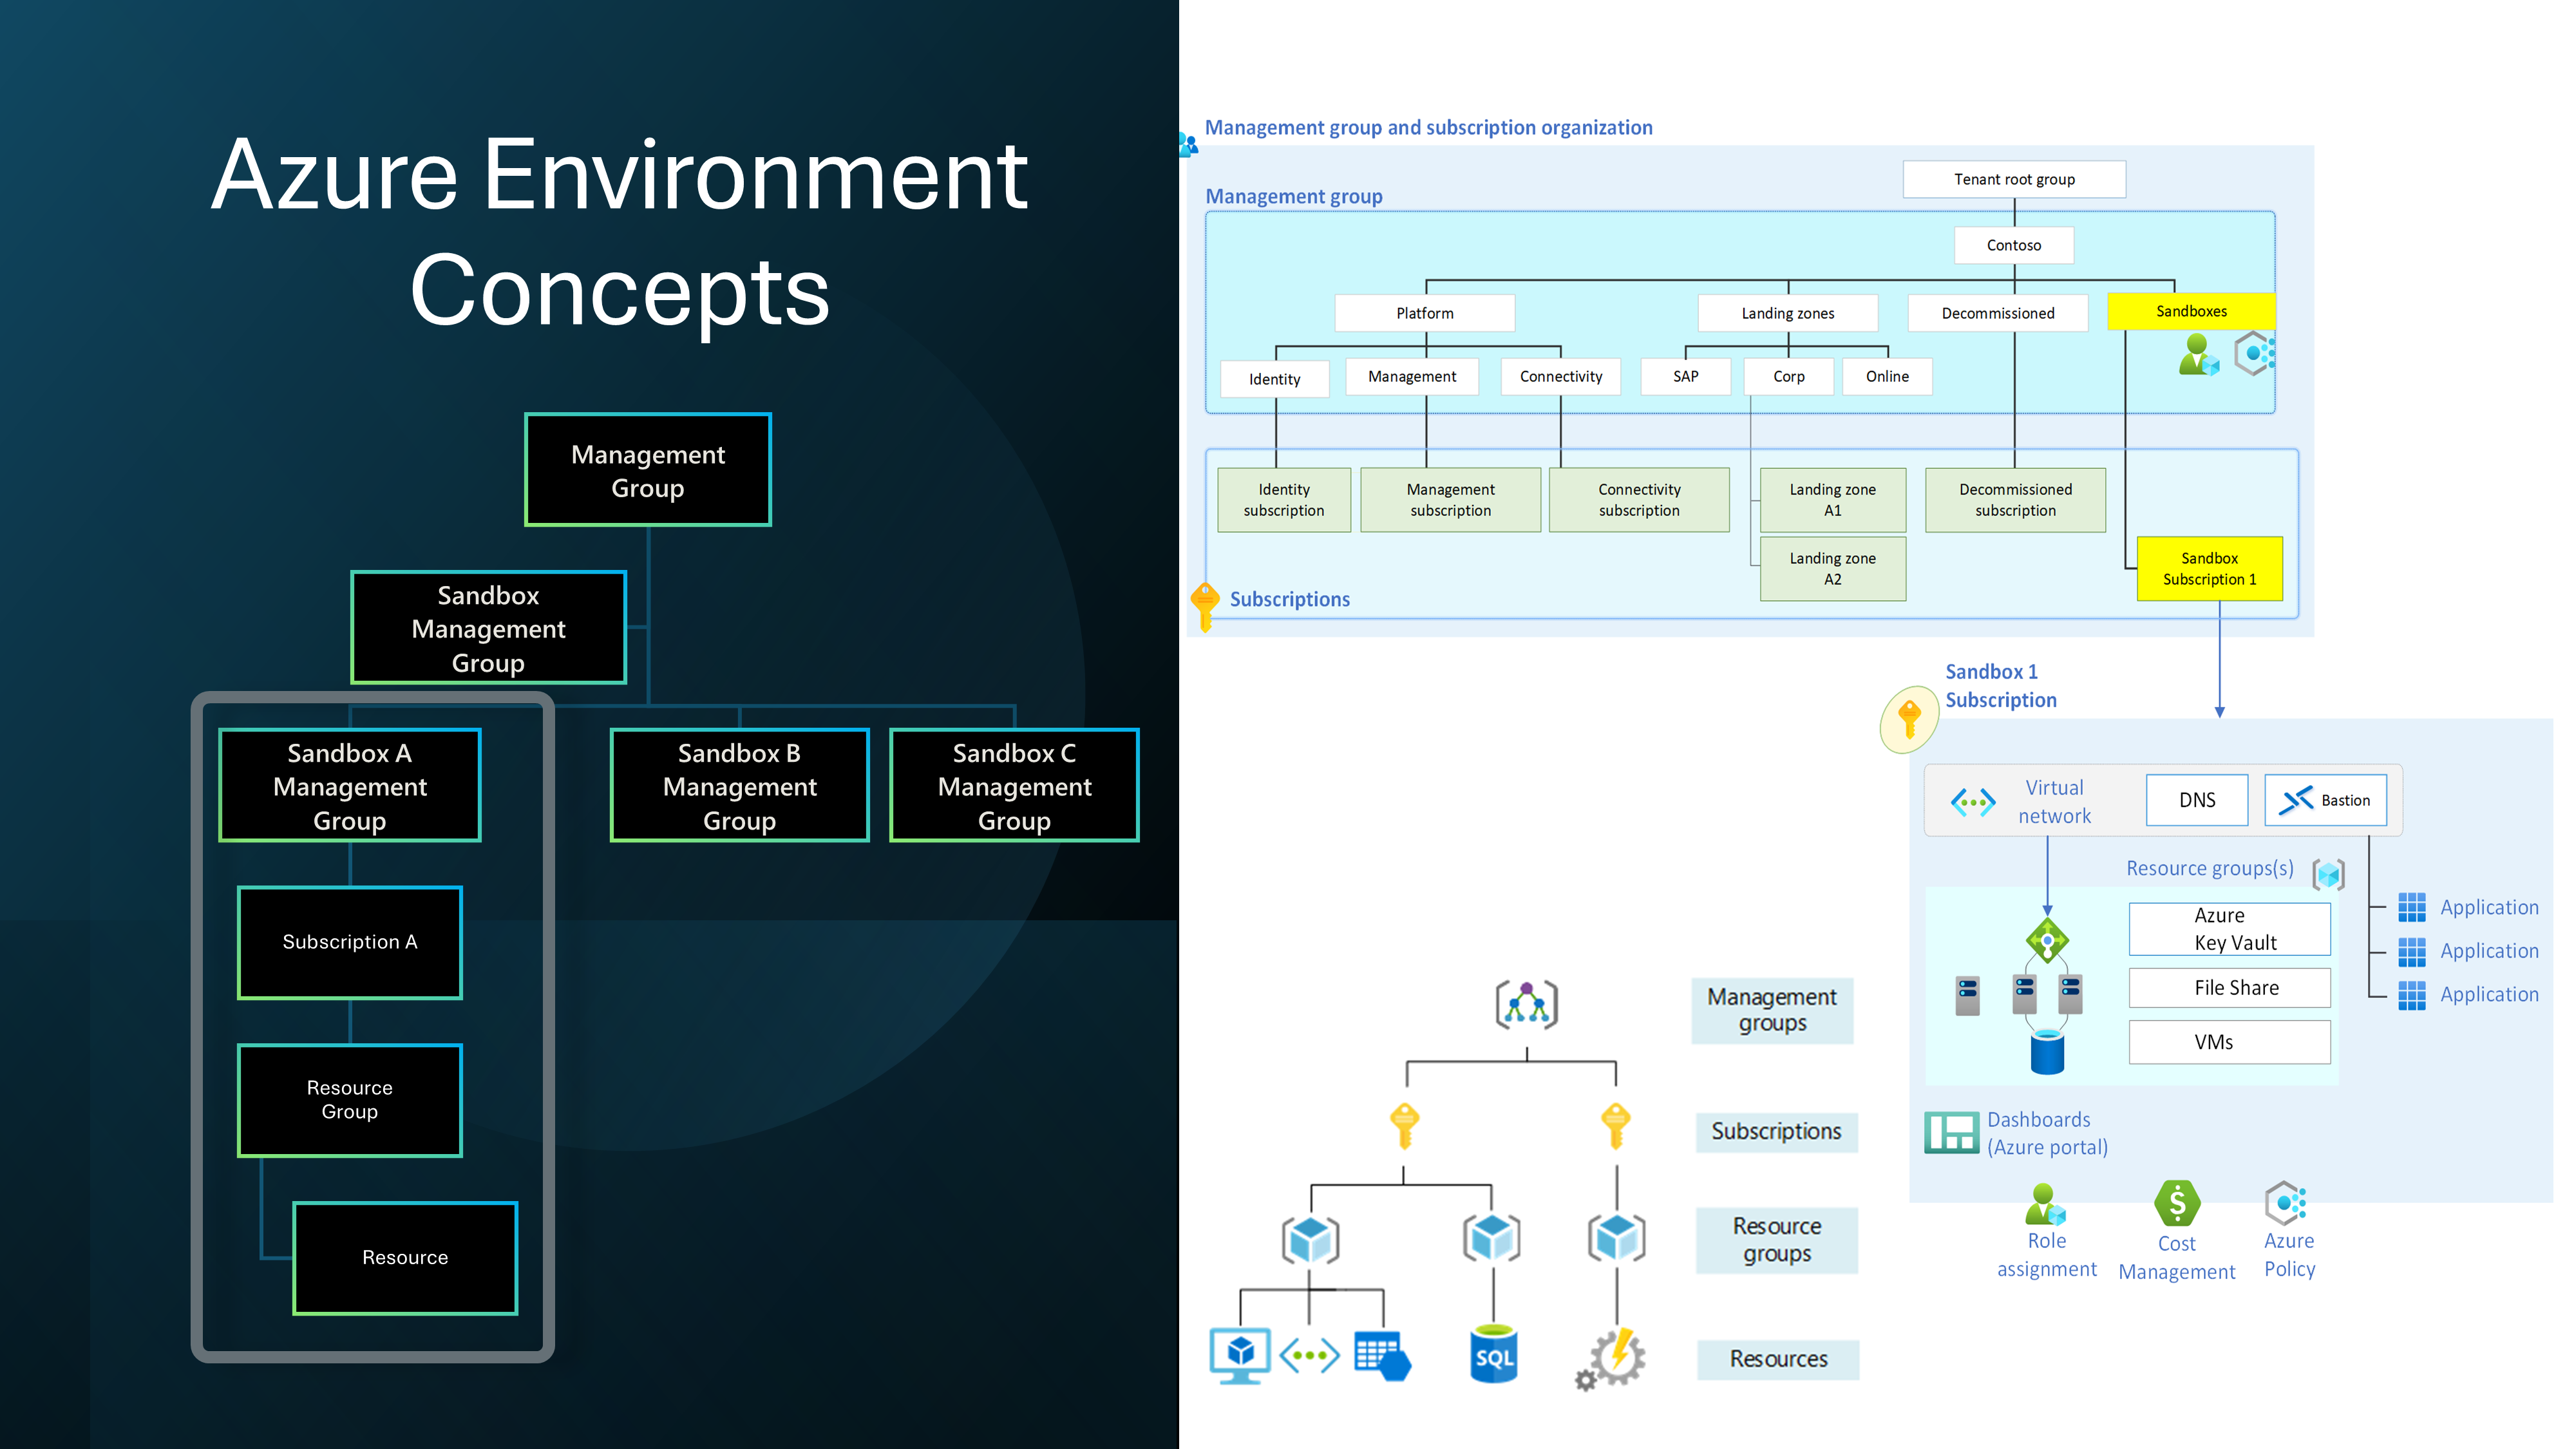
Open multiple Microsoft Teams instances using PowerShell

· 2 min read

There may be circumstances, you need to open up multiple Microsoft Team instances, a reason for this - maybe to chat and join meetings across multiple accounts.

Microsoft are working on a version of Microsoft Teams that supports multiple-accounts, but until thats released - you can use a PowerShell script to open up another version of Microsoft Teams in another profile (or multiple, if you update the profilename).

This script also works within your LocalAppData, so you don't need local administrator rights to run.

# Uses the file name as the profile name
$MSTEAMS_PROFILE = 'CustomProfile'

Write-Host "- Using profile '$MSTEAMS_PROFILE'"

# Set the custom profile path
$USERPROFILE = Join-Path $env:LOCALAPPDATA "Microsoft\Teams\CustomProfiles\$MSTEAMS_PROFILE"

# Set the old user profile
$OLD_USERPROFILE = $env:USERPROFILE

# Launch MS Teams with the custom profile
Write-Host "- Launching MS Teams with profile '$MSTEAMS_PROFILE'"
Set-Location "$OLD_USERPROFILE\AppData\Local\Microsoft\Teams"

$teamsProcessStartInfo = New-Object System.Diagnostics.ProcessStartInfo
$teamsProcessStartInfo.FileName = "$OLD_USERPROFILE\AppData\Local\Microsoft\Teams\Update.exe"
$teamsProcessStartInfo.Arguments = "--processStart ""Teams.exe"""
$teamsProcessStartInfo.WorkingDirectory = "$OLD_USERPROFILE\AppData\Local\Microsoft\Teams"
$teamsProcessStartInfo.EnvironmentVariables["USERPROFILE"] = $USERPROFILE
$teamsProcessStartInfo.UseShellExecute = $false

[System.Diagnostics.Process]::Start($teamsProcessStartInfo) | Out-Null

# Set the user profile back to the old user profile
$env:USERPROFILE = $OLD_USERPROFILE

When the script is ran, a new profile will be created for Microsoft Teams, and then opened. You can then use that second Microsoft Teams instance, to connect to another account or tenancy.

To make it easier, you could also look at turning this script into an executable.

Failed to persist Terraform state using an Azure Blob Storage account

· 2 min read

When attempting to make changes with Terraform, and the state changes are in an Azure storage account, you may come across: Failed to save state.

Error: Failed to save state

Error saving state: blobs:Clien#GetProperties: Failure responding to request: StatusCode=403 -- Original Error: autorest/azure: error response cannot be parsed: {"" '\x00' '\x00'} error: EOF

And: Error: Failed to persist state to backend.

Or Error: Error releasing the state lock.

Terraform - Failed to save state

Recently, encountered this issue when attempting a Terraform deployment; the state file kept locking midway through a deployment, this was traced to the Terraform storage account being in the Terraform code itself - with Public access set to Deny.

So the flow was looking like this: Script ran to allow Azure DevOps IP to the Storage account Firewall, then Terraform would start deploying and Deny access - preventing the state file from saving.

The first thing you need to do is break the lease on the state file.

  1. Navigate to your Azure Storage account that contains the state file
  2. Navigate to the Container that contains the state file
  3. Click on your state file and select Break lease
  4. Azure Storage account - break lease
  5. Once the lease is broken - make sure that your state file is 'Available' and not 'Leased'
  6. Then check your Terraform to make sure that it wasn't changing your Storage account that contained the Terraform state file in any way, then re-run your deployment.

Note: It may be wise, to make sure that the Azure storage account containing your state file is not managed by Terraform, to avoid unintentional mishaps.

Azure Quick Review

· 2 min read

There are a lot of workbooks that help with Microsoft Azure cost optimization, but when having discussions and looking into SLA/SLO and availability scenarios, there are fewer options to select from - today, we are going to look at the deployment and output of Azure Quick Review.

Azure Quick Review (azqr) goal is to produce a high level assessment of an Azure Subscription or Resource Group providing the following information for each Azure Service:

Azure Quick Review (created by Microsoft Senior Cloud Solution Architect Carlos Mendible), can supplement other tools - to give you visibility into your Azure services and answer questions such as:

  • What is my expected SLA?
  • Are my resources protected against zone failures?
  • Am I collecting diagnostic logs for my resources?
  • Is Defender for Cloud-enabled for all my resource types?

Using this tool is pretty simple (and, as the name suggests, Quick), and today we will look at running it from a windows endpoint, but first, we need some prerequisites.

Install the Azure CLI and make sure you have Reader rights across the subscriptions you want to review; in this demo, we will scan all subscriptions I have access to.

The Azure Quick Review (azqr) windows binary is intended to be run from the command line, so let's run it.

  1. Open your Windows Terminal

  2. Navigate to the location of the azqr binary

  3. Azure Quick Review

  4. Login to Azure using the Azure CLI by typing:

    az login
  5. Once you have authenticated, run the executable.

  6. Run azqr-windows-latest

  7. Once it has been completed, there will be an excel spreadsheet in the same folder as the Azure Quick Review executable, with an output that contains something similar to the below:

  8. Azure Quick Review - Overview

  9. Azure Quick Review - Recommedations

  10. Azure Quick Review - Defender for Cloud

Create Azure Bastion with Shareable Link support with PowerShell

· 9 min read

Azure Bastion is a service you deploy that lets you connect to a virtual machine using your browser and the Azure portal or via the native SSH or RDP client installed on your local computer.

Overview

The Azure Bastion service is a fully platform-managed PaaS service you provision inside your virtual network. It provides secure and seamless RDP/SSH connectivity to your virtual machines directly from the Azure portal over TLS.

Because of this, if you don't have line-of-sight access to your Virtual Machines (via express route, Site-to-Site VPN etc.), Bastion becomes your jump box, allowing secure access to your virtual machines without needing a public IP.

There is a downside, though. To connect to a Virtual Machine secured by Bastion, you need access to the Azure Portal, or command line connectivity to Azure, to create the tunnel; this means that you may need to grant people elevated rights and access they may not need to connect.

As of November 2022, Microsoft introduced shareable links into public preview, solving two key pain points:

  • Administrators will no longer have to provide full access to their Azure accounts to one-time VM users—helping to maintain their privacy and security.
  • Users without Azure subscriptions can seamlessly connect to VMs without exposing RDP/SSH ports to the public internet.

The Bastion Shareable Link feature lets users connect to a target resource (virtual machine or virtual machine scale set) using Azure Bastion without accessing the Azure portal.

At the time of this writing, there are some scenarios where shareable links won't work - particularly across Network peering across subscriptions and regions.

Because the service is in Public Preview - native PowerShell cmdlet support, enabling and configuring this feature isn't available - but you can easily allow it via the Azure Portal.

Create Azure Bastion with Shareable Link Support

To get around that, we will leverage the Azure Rest API directly, using PowerShell to enable the Shareable Link feature and create and obtain a shareable link for a Virtual Machine.

Create Azure Bastion

I will assume there is already an Azure Virtual Network created; if not, you can follow the Microsoft documentation to get it up and running!

Also, make sure you have the Az Module installed.

The PowerShell function we will run will require a few parameters to create the Azure Bastion resource and enable Shared Link functionality; these parameters are:

ParametersNote
RGNameThe Resource Group of your Virtual Network
VNetNameThe Virtual Network name
addressPrefixThe address prefix for your new Bastion subnet. For Azure Bastion resources deployed on or after November 2, 2021, the minimum AzureBastionSubnet size is /26 or larger (/25, /24, etc.).
regionThe region, that Azure Bastion is deployed into (this needs to match your Virtual Network)
BastionPubIPNameThe name of the Public IP, used by the Azure Bastion resource (this is the Azure resource name, it doesn't have an external DNS alias, so doesn't need to be globally unique)
BastionResourceNameThe name of your Azure Bastion resource
  1. Copy the script below into a file named: New-AzBastionSharedLinkEnabled.ps1

    function New-AzBastionSharedLinkEnabled {
    <#
    .SYNOPSIS
    Creates an Azure Bastion resource with shared link enabled, on an already existing Azure Virtual Network.
    #>
    [CmdletBinding()]
    param
    (
    [Parameter(Mandatory = $false, Position = 0)]
    [System.String]
    $RGName = "BastionTest",

    [Parameter(Mandatory = $false, Position = 1)]
    [System.String]
    $VNetName = 'vnet-aue-dev',

    [Parameter(Mandatory = $false, Position = 2)]
    [System.String]
    $addressPrefix = '10.2.1.0/26',

    [Parameter(Mandatory = $false, Position = 3)]
    [System.String]
    $region = 'AustraliaEast',

    [Parameter(Mandatory = $false, Position = 4)]
    [System.String]
    $BastionPubIPName = 'VNet1-ip',

    [Parameter(Mandatory = $false, Position = 5)]
    [Object]
    $BastionResourceName = "$VNetName-bastion"
    )

    # Set variable values for Resource Group name, Virtual Network name, address prefix, region, and bastion-related resources.

    # Connect to Azure using Get-AzAccount cmdlet.
    Connect-AzAccount

    # Use Get-AzSubscription cmdlet to get all the subscriptions that the account has access to and allow the user to choose one using Out-GridView.
    Get-AzSubscription | Out-GridView -PassThru | Select-AzSubscription
    $token = (Get-AzAccessToken).Token
    $subscription = Get-AzContext | Select-Object Subscription

    # Use Get-AzVirtualNetwork cmdlet to get the virtual network object and then use Add-AzVirtualNetworkSubnetConfig cmdlet to create a new subnet for Azure Bastion service. Finally, use Set-AzVirtualNetwork cmdlet to update the virtual network configuration.
    $VNET = Get-AzVirtualNetwork -ResourceGroupName $RGName -Name $VNetName
    Add-AzVirtualNetworkSubnetConfig -VirtualNetwork $VNET -Name "AzureBastionSubnet" -AddressPrefix $addressPrefix | Set-AzVirtualNetwork
    $VNET = Get-AzVirtualNetwork -ResourceGroupName $RGName -Name $VNetName

    # Note: If there is an error message, it could indicate that the address prefix for the new subnet overlaps with existing address ranges or is too small.

    # Use New-AzPublicIpAddress cmdlet to create a new public IP address resource for the Bastion service.
    $publicip = New-AzPublicIpAddress -ResourceGroupName $RGName -name $BastionPubIPName -location $region -AllocationMethod Static -Sku Standard
    $publicip = Get-AzPublicIpAddress -ResourceGroupName $RGName -Name $BastionPubIPName
    # Use New-AzBastion cmdlet to create a new Azure Bastion resource with the specified configuration, including the virtual network and public IP address resources created earlier.
    New-AzBastion -ResourceGroupName $RGName -Name $BastionResourceName -PublicIpAddressRgName $publicip.ResourceGroupName -PublicIpAddressName $publicip.Name -VirtualNetwork $VNET -Sku 'Standard'

    #Enable Shareable links for VMs in Azure Bastion.
    $BastionSubnet = Get-AzVirtualNetworkSubnetConfig -Name 'AzureBastionSubnet' -VirtualNetwork $VNET

    $Body = [PSCustomObject]@{
    location = $region
    properties = @{
    enableShareableLink = "true"
    ipConfigurations = @(
    @{
    name = "bastionHostIpConfiguration"
    properties = @{
    subnet = @{
    id = $BastionSubnet.id
    }
    publicIPAddress = @{
    id = $publicip.Id
    }
    }
    }
    )
    }

    } | ConvertTo-Json -Depth 6

    $params = @{
    Uri = "https://management.azure.com/subscriptions/" + $subscription.Subscription.Id +
    "/resourceGroups/$($RGName)/providers/Microsoft.Network/bastionHosts/$($BastionResourceName)?api-version=2022-07-01"
    Headers = @{ 'Authorization' = "Bearer $token" }
    Method = 'Put'
    Body = $body
    ContentType = 'application/json'
    }

    # Invoke the REST API and store the response
    Invoke-RestMethod @Params
    }
  2. Open a Terminal or PowerShell prompt, and navigate to the folder containing the script.

  3. Dot source the script so that you can run it from the session: . .\New-AzBastionSharedLinkEnabled.ps1

  4. . .\New-AzBastionSharedLinkEnabled.ps1

  5. Once it's imported - we can now run it; make sure you replace your parameters that match your environment:

    New-AzBastionSharedLinkEnabled -RGName BastionTest -VNetName vnet-aue-dev -addressPrefix 10.2.1.0/26 -region AustraliaEast -BastionPubIPName VNet1-ip -BastionResourceName net-aue-dev-bastion
  6. The script will then prompt for your credentials to authenticate

  7. You will then need to select the Azure subscription containing your Azure Virtual Network, then select Ok

  8. Select Azure subscription

  9. The script will then go and provision Azure Bastion and enable Shared Links. It will take a few minutes to run while it provisions Bastion. Then you will get JSON output, indicating it has been completed.

  10. Windows PowerShell - New Azure Bastion

  11. Azure Bastion - Shareable Link

Now that we have an Azure Bastion instance and have Shareable Links enabled - it's time to create a Shareable Link for a Virtual Machine; this triggers 2 API endpoints - creating the shareable link and then retrieving the shareable link.

The same assumptions are made, so make sure you have the Az Module installed.

The script relies on the following parameters:

ParametersNote
BastionResourceNameThe name of your Azure Bastion resource
RGNameThe Resource Group of your Bastion resource
VMRGNameThe Resource Group of your Virtual Machine, you want a Shareable Link for
VmnameThe name of the Virtual Machine you want a shareable link for
  1. Copy the script below into a file named: New-AzBastionShareableLink.ps1

    function New-AzBastionShareableLink {
    <#
    .SYNOPSIS
    Creates an Azure Bastion shareable link.
    #>
    [CmdletBinding()]
    param
    (
    [Parameter(Mandatory = $false, Position = 0)]
    [System.String]
    $BastionResourceName = 'vnet-aue-dev-bastion',

    [Parameter(Mandatory = $false, Position = 1)]
    [System.String]
    $RGName = "BastionTest",

    [Parameter(Mandatory = $false, Position = 1)]
    [System.String]
    $VMRGName = "BastionTest",

    [Parameter(Mandatory = $false, Position = 2)]
    [System.String]
    $VMname = "2022ServerVM-2"
    )

    # Connect to Azure using Get-AzAccount
    Connect-AzAccount

    # Get all subscriptions that the account has access to
    Get-AzSubscription | Out-GridView -PassThru | Select-AzSubscription

    $subscription = Get-AzContext | Select-Object Subscription
    # Get the access token for the authenticated user
    $token = (Get-AzAccessToken).Token

    $ID = Get-AzVM -ResourceGroupName $VMRGName -Name $VMName | Select-Object Id -ExpandProperty id

    $body = @{

    vms = @(
    @{
    vm = @{
    id = $ID.Id
    }
    }
    )

    } | ConvertTo-Json -Depth 3

    #creates the shareable link for the VM
    $params = @{
    Uri = "https://management.azure.com/subscriptions/" + $subscription.Subscription.Id +
    "/resourceGroups/$RGName/providers/Microsoft.Network/bastionHosts/$BastionResourceName/createShareableLinks?api-version=2022-07-01"
    Headers = @{ 'Authorization' = "Bearer $token" }
    Method = 'POST'
    Body = $body
    ContentType = 'application/json'
    }

    # Invoke the REST API and store the response
    Invoke-RestMethod @Params

    #Gets the shareable link for the VM

    $params = @{
    Uri = "https://management.azure.com/subscriptions/" + $subscription.Subscription.Id +
    "/resourceGroups/$($RGName)/providers/Microsoft.Network/bastionHosts/$BastionResourceName/getShareableLinks?api-version=2022-09-01"
    Headers = @{ 'Authorization' = "Bearer $token" }
    Method = 'POST'
    # Body = $body
    ContentType = 'application/json'
    }

    # Invoke the REST API and store the response
    $ShareableLink = Invoke-RestMethod @Params
    Write-Output $ShareableLink.value.bsl
    }
  2. Open a Terminal or PowerShell prompt, and navigate to the folder containing the script.

  3. Dot source the script so that you can run it from the session: . .\New-AzBastionShareableLink.ps1

  4. s

  5. Once it's imported - we can now run it; make sure you replace your parameters that match your environment:

    New-AzBastionShareableLink -BastionResourceName net-aue-dev-bastion -RGName BastionTest -VMRGName BastionTest -VMname 2022ServerVM-2
  6. Azure Bastion - Create Shared Link

  7. The script will then prompt for your credentials to authenticate

  8. You will then need to select the Azure subscription containing your Azure Virtual Network, then select Ok

  9. Select Azure subscription

  10. The script will then go and collect the ID of the Virtual Machine, pass that through to the Create a Shareable Link, then wait 10 seconds for the Bastion Resource to update properly, then collect the Shareable Link and output it to the terminal.

  11. Azure Bastion - Shared Link

  12. You can also see the link created in the Azure Portal

  13. Microsoft Azure Portal - Shareable Link

  14. I can then copy the URL into my favourite browser and connect to your Virtual Machine securely!

  15. Microsoft Azure Bastion - Connect

The scripts can also be found directly on GitHub here: https://github.com/lukemurraynz/Azure

Azure Budget Filters: A Key Tool for Effective Cloud Cost Management

· 12 min read

Azure Budgets are a vital tool that can be used to keep on top of your Cloud financial management (FinOps) Microsoft Azure platform potential and actual costs.

The most effective Azure Budgets - are the ones that you use!

 Azure Budgets

In the realm of Cost Management, budgets play a pivotal role in facilitating the planning and implementation of organizational accountability. These tools enable proactive communication regarding expenses and support the management of costs by closely monitoring spending trends over extended periods.

One can set up alerts based on current or projected expenditures to maintain adherence to the established organizational spending limit. Upon surpassing the budget thresholds, notifications are promptly triggered. Such occurrences neither impact any of the available resources nor interrupt any consumption processes.

By leveraging budgets, it becomes possible to perform detailed cost analysis and track expenses effectively.

Azure Back to School - Azure Budget Filters

Be aware of the delay with the Cost & Usage data, as there may be a difference between what you end up seeing in the Portal and the Budget itself - so make sure you account for this to be advised as early as possible:

Cost and usage data is typically available within 8-24 hours and budgets are evaluated against these costs every 24 hours.

Be sure to get familiar with Cost and usage data update specifics. When a budget threshold is met, email notifications are normally sent within an hour of the evaluation.

Note: Azure Budgets are not supported on Subscriptions, where you can't access Microsoft Cost Management, i.e. Azure Sponsorship subscriptions.

A time to clean the windows - Budget Scopes

When creating an Azure Budget, you can specify a Scope. A scope is the level of your hierarchy (i.e., if it's a Resource Group Budget, it cannot report on resources at the Subscription, you would have to create a Subscription or Management Group scoped Budget).

When you create an Azure Budget, they can be made at the following Scopes:

Microsoft Azure Budget Scopes

Most people, when creating scopes, will create a Scope at the Subscription and/or Resource Group level - there is no right or wrong answer when it comes to your Azure Budget Scope - this needs to work for you and your organisation, ie if you have a Project per Resource Group - then it would make sense to create a Budget per Resource Group, the same for Subscriptions.

You can also have multiple Azure Budgets at the same or different scopes, so a combination of Budgets may be the most effective. An example could be a Subscription Budget that may go to a Product Owner, but a Management Group could go to Finance or the Technology teams.

Keep in mind, that Budgets on their own are just a forecasting and alerting tool, they won't stop resources from running, if it goes over an alert threshold, out of the box - the Budget doesn't touch your resources, merely gives you an opportunity to proactively react to them, before costs become a problem.

Time to scrum the floor - Create an Azure Budget

Let's go through the process of creating an Azure Budget, using the Azure Portal.

  1. Log in to the Microsoft Azure Portal
  2. In the Search bar above, search for Budgets
  3. Click on Budgets
  4. Change the Scope
  5. Cost Management - Azure Budget
  6. You can select a Management Group, Subscription, or Resource Group for the Scope, by clicking on each - in my example, I have a Management Group named: mg-landingzones, which I am going to select.
  7. Click Select
  8. Now that the Scope has been set, we can add our Budget to the specified Scope, click + Add
  9. We will come back to Filters, in another section - but for the Budget details you will need:
    • Name this is the name of your Budget, make sure its something meaningful (ie Monthly-Budget_MG-LandingZones)
    • Reset period (Monthly/Quarterly or Annual, this is the period that the Budget resets back to $0 - you can't go wrong with Monthly)
    • Creation date (the date that the Budget will start)
    • Expiration date (the date that the Budget will stop)
  10. Budget Amount(this is the overall; amount that you are planning on your resources to spend)
  11. Azure Portal - Create budget
  12. Once you have entered in your Budget details, click Next to configure your Alert conditions. The alert conditions are where you can specify, what you want to alert on ie 50% or 80% of the overall budget amount. Actual - is when it financially reaches that point and Forecasted - is when current consumption is forecasted to reach that budget.
  13. Specify an email address to send the Alert to and click Create.
  14. Azure Budget Conditions

Time to clean the dishes - Azure Budget Filters

By default, Scoping the Budget to the Subscription or Resource Group is good enough for 95% of the use cases - but using Budget filters, you can enable a bit more flexibility - for scenarios such as:

  • Product-centric alerts
  • Service centric alerts

While the scope is your level of the Azure hierarchy, your filter is your handrail to stop you from falling, currently, Microsoft offers the following filters:

PropertyWhen to useNotes
Availability zonesBreak down AWS costs by availability zone.Applicable only to AWS scopes and management groups. Azure data doesn't include availability zone and will show as No availability zone.
Billing periodBreak down PAYG costs by the month that they were, or will be, invoiced.Use Billing period to get a precise representation of invoiced PAYG charges. Include two extra days before and after the billing period if filtering down to a custom date range. Limiting to the exact billing period dates won't match the invoice. Will show costs from all invoices in the billing period. Use Invoice ID to filter down to a specific invoice. Applicable only to PAYG subscriptions because EA and MCA are billed by calendar months. EA/MCA accounts can use calendar months in the date picker or monthly granularity to accomplish the same goal.
BillingProfileIdThe ID of the billing profile that is billed for the subscription's charges.Unique identifier of the EA enrollment, pay-as-you-go subscription, MCA billing profile, or AWS consolidated account.
BillingProfileNameName of the EA enrollment, pay-as-you-go subscription, MCA billing profile, or AWS consolidated account.Name of the EA enrollment, pay-as-you-go subscription, MCA billing profile, or AWS consolidated account.
Charge typeBreak down usage, purchase, refund, and unused reservation and savings plan costs.Reservation purchases, savings plan purchases, and refunds are available only when using actual costs and not when using amortized costs. Unused reservation and savings plan costs are available only when looking at amortized costs.
DepartmentBreak down costs by EA department.Available only for EA and management groups. PAYG subscriptions don't have a department and will show as No department or unassigned.
Enrollment accountBreak down costs by EA account owner.Available only for EA billing accounts, departments, and management groups. PAYG subscriptions don't have EA enrollment accounts and will show as No enrollment account or unassigned.
FrequencyBreak down usage-based, one-time, and recurring costs.Indicates whether a charge is expected to repeat. Charges can either happen once OneTime, repeat on a monthly or yearly basis Recurring, or be based on usage UsageBased.
Invoice IDBreak down costs by billed invoice.Unbilled charges don't have an invoice ID yet and EA costs don't include invoice details and will show as No invoice ID.
InvoiceSectionIdUnique identifier for the MCA invoice section.Unique identifier for the EA department or MCA invoice section.
InvoiceSectionNameName of the invoice section.Name of the EA department or MCA invoice section.
LocationBreak down costs by resource location or region.Purchases and Marketplace usage may be shown as unassigned, or No resource location.
MeterBreak down costs by usage meter.Purchases and Marketplace usage will show as unassigned or No meter. Refer to Charge type to identify purchases and Publisher type to identify Marketplace charges.
OperationBreak down AWS costs by operation.Applicable only to AWS scopes and management groups. Azure data doesn't include operation and will show as No operation - use Meter instead.
Pricing modelBreak down costs by on-demand, reservation, or spot usage.Purchases show as OnDemand. If you see Not applicable, group by Reservation to determine whether the usage is reservation or on-demand usage and Charge type to identify purchases.
PartNumberThe identifier used to get specific meter pricing.
ProductName of the product.
ProductOrderIdUnique identifier for the product order
ProductOrderNameUnique name for the product order.
ProviderBreak down costs by the provider type: Azure, Microsoft 365, Dynamics 365, AWS, and so on.Identifier for product and line of business.
Publisher typeBreak down Microsoft, Azure, AWS, and Marketplace costs.Values are Microsoft for MCA accounts and Azure for EA and pay-as-you-go accounts.
ReservationBreak down costs by reservation.Any usage or purchases that aren't associated with a reservation will show as No reservation or No values. Group by Publisher type to identify other Azure, AWS, or Marketplace purchases.
ReservationIdUnique identifier for the purchased reservation instance.In actual costs, use ReservationID to know which reservation the charge is for.
ReservationNameName of the purchased reservation instance.In actual costs, use ReservationName to know which reservation the charge is for.
ResourceBreak down costs by resource.Marketplace purchases show as Other Marketplace purchases and Azure purchases, like Reservations and Support charges, show as Other Azure purchases. Group by or filter on Publisher type to identify other Azure, AWS, or Marketplace purchases.
Resource groupBreak down costs by resource group.Purchases, tenant resources not associated with subscriptions, subscription resources not deployed to a resource group, and classic resources don't have a resource group and will show as Other Marketplace purchases, Other Azure purchases, Other tenant resources, Other subscription resources, $system, or Other charges.
ResourceIdUnique identifier of the Azure Resource Manager resource.
Resource typeBreak down costs by resource type.Type of resource instance. Not all charges come from deployed resources. Charges that don't have a resource type will be shown as null or empty, Others, or Not applicable. For example, purchases and classic services will show as others, classic services, or No resource type.
ServiceFamilyType of Azure service. For example, Compute, Analytics, and Security.
ServiceNameName of the Azure service.Name of the classification category for the meter. For example, Cloud services and Networking.
Service name or Meter categoryBreak down cost by Azure service.Purchases and Marketplace usage will show as No service name or unassigned.
Service tier or Meter subcategoryBreak down cost by Azure usage meter subclassification.Purchases and Marketplace usage will be empty or show as unassigned.
SubscriptionBreak down costs by Azure subscription and AWS linked account.Purchases and tenant resources may show as No subscription.
TagBreak down costs by tag values for a specific tag key.Purchases, tenant resources not associated with subscriptions, subscription resources not deployed to a resource group, and classic resources cannot be tagged and will show as Tags not supported. Services that don't include tags in usage data will show as Tags not available. Any remaining cases where tags aren't specified on a resource will show as Untagged. Learn more about tags support for each resource type.
UnitOfMeasureThe billing unit of measure for the service. For example, compute services are billed per hour.

One or a combination of these filters can be used to create your own meaningful Budgets! You can target specific resources, an example is if you have resources in a Shared Resource Group - for example, Networking, and you have a VPN Gateway, that is used for a Site to Site VPN, for a specific application, that is sitting in another resource group or subscription - you can add the Resource directly into the filter of your Budget for the Azure Gateway, and then include a Tag - that may reference the rest of the application dependencies.

Budgets can be created with all sorts of various tools, from the Azure Portal to:

Relaxing beverage time - Tips & Tricks

Finished the day of cleaning! Now is the time to sit back and enjoy your favourite beverages, and read the labels on the bottles!

  • You can use the Azure Mobile Application to display your Cost and Budgets so keep on top of your consumption on the go!
  • The Microsoft Cost Management team are working on new features all the time, including improvements to Cost Management and Budgets! If you like living on the edge - be sure to check out the Preview portal (and add your feedback)!
  • You can use an Action Group, to trigger a Webhook or Azure Automation runbook - to resize or stop resources. Action Groups are currently only supported for subscription and resource group scopes, so you may need to have one Budget for Monitoring at a higher level and one Budget for running automation at a lower level.