
Private Endpoint traffic not appearing in Azure Firewall

· 3 min read

You may have a situation where you have implemented Private endpoints and the traffic from on-premises to those Private Endpoints, either doesn't work, even though on-premises firewalls say otherwise, or is working, but doesn't appear in the Azure Firewall.

I had this recently with Azure Arc, where the endpoints failed to connect once a site-to-site VPN connection (which was working) was replaced with an expressroute connection, but going through the Azure Firewall logs, was unable to see any 443 traffic for Arc, hitting the Firewall even when the connection was working.

Private Endpoint traffic not appearing in Azure Firewall

Traffic flow: Onpremises -- (ER Circuit) -- ER gateway -- Secured hub Azure Firewall -- (Vnet Connection) -- PE (Private Endpoint)

The issue was related to how private endpoint traffic is routed differently.

If the traffic has reached the Expressroute gateway from on-premises, with routing intent, normal traffic will be forced to the AzFW first before reaching its destination, as you would think and expect.

However, for the private endpoint scenario, once a Private Endpoint is deployed to any VNET, there will be an automatic system route with the PE IP and prefix /32 installed on all of the linked NICs. The next hop for this route will be InterfaceEndpoint. This route will allow the traffic to go directly to the PE, bypassing the routing intent and other user-defined routes that are larger than /32. The /32 route propagates to these areas: Any VPN or ExpressRoute connection to an on-premises system.

See: Considerations for Hub and Spoke topology.

In an Azure Virtual Wide Area Network (VWAN), you could see this route in the virtual hub effective routes and which gets propagated to the expressroute gateway.

My traffic from on-premises to the Azure Arc went directly to the private endpoints (bypassing the Azure Firewall). Still, the route back via the Azure Firewall was completely different, leading to asymmetric routing (a packet traverses from a source to a destination in one path and takes a different path when it returns to the source).

To resolve this, we need to enable network security policies for User-Defined Routes on the subnet of the private endpoint(s):

Azure Portal - Private Endpoint - Routes

Once enabled, you should see the traffic connect and flow through your Azure Firewall almost immediately.

Reference:

Empowering Resilience with Azure backup services

· 23 min read

This article is part of Azure Back to School - 2023 event! Make sure to check out the fantastic content created by the community!

Empowering Resilience with Azure backup services

Along with the basics of the Azure Backup solutions, particularly on Virtual Machines running on Microsoft Azure, there have been a lot of changes in the last year, including Immutable vaults, enhanced policies, intelligence tiering, and cross-region restore.

Introduction

Let us start with the basics with a user story; what do we need to achieve:

"As a Cloud Infrastructure Administrator at Contoso, I want to implement an automated backup solution for virtual machines (Windows and Linux) hosted in Microsoft Azure, So that I can ensure data reliability, disaster recovery, and compliance with minimal manual intervention."

With some assumptions around further requirements, we can jump into solutions using native Microsoft Azure services to fulfil the Cloud Administrator's need. 
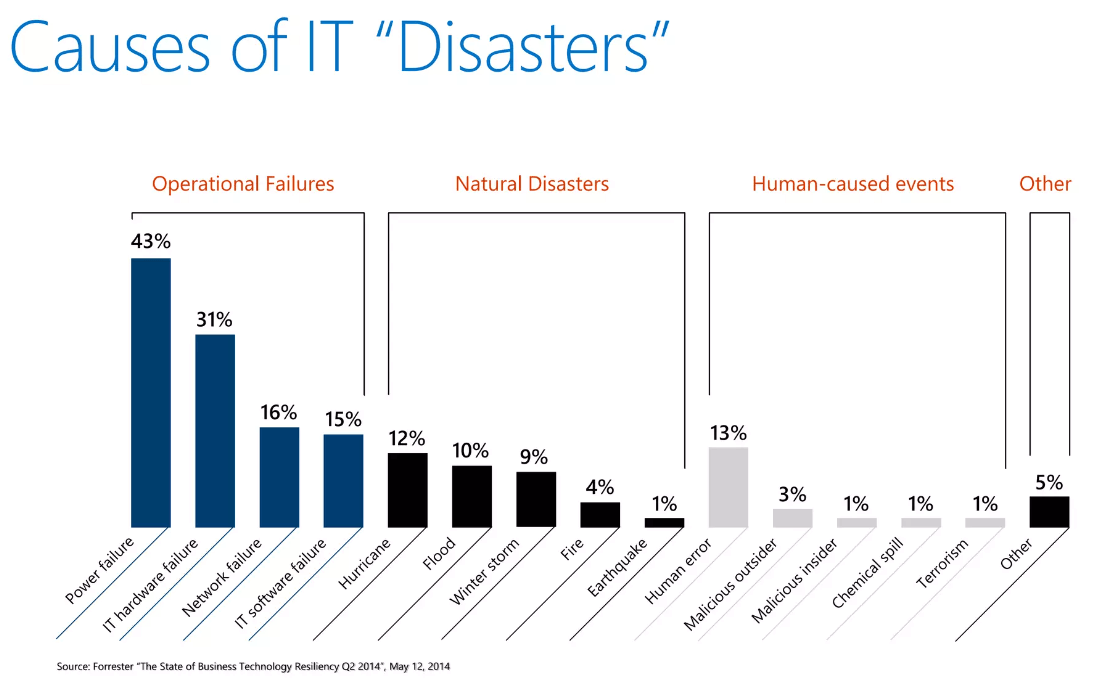
It is worth mentioning, especially around disaster recovery, that there is much more you can (and should do) do around mission-critical Azure architecture. This article will focus primarily on the data loss portion of disaster recovery with Azure Backup services.

RequirementAzure Service(s) Used
Specific (S): Backup virtual machines in AzureAzure Backup, Azure Site Recovery (ASR)
Measurable (M):
- Achieve 99% backup success rateAzure Backup, Azure Monitor
- Define and meet RTO (recovery time objective) for critical VMsAzure Backup, Azure Site Recovery (ASR)
- Monitor and optimise storage consumptionAzure Monitor, Microsoft Cost Management
Achievable (A):
- Select and configure Azure-native backup solutionAzure Backup
- Configure Azure permissions and access controlsAzure Role-Based Access Control (RBAC)
- Define backup schedules and retention policiesAzure Backup, Azure Policy
Relevant (R):
- Align with Azure best practicesAzure Well-Architected Framework, Azure Advisor
- Comply with data protection regulationsAzure Compliance Center, Azure Policy
- Support disaster recovery and business continuityAzure Site Recovery (ASR)
Time-bound (T):
- Implement within the next two Azure sprint cyclesAzure DevOps - Boards
- Regular progress reviews during sprint planningAzure DevOps - Boards
Definition of Done (DoD):
1. Select a cost-effective Azure-native backup solutionAzure Backup
2. Configure Azure permissions and access controlsAzure Role-Based Access Control (RBAC)
3. Define backup policies and RTOsAzure Backup, Azure Policy
4. Monitor and meet 99% backup success rateAzure Monitor
5. Optimize backup storage utilisationMicrosoft Cost Management
6. Create backup and recovery documentationMicrosoft Learn documentation
7. Train the team to manage and monitor the backup systemAzure Training
8. Integrate with Azure monitoring and alertingAzure Monitor
9. Conduct disaster recovery testsAzure Site Recovery (ASR)

Note: Azure DevOps - Boards are outside of the scope of this article; the main reflection here is to make sure that your decisions and designs are documented in line with business requirements. There are also some further assumptions we will make, particularly around security and RTO requirements for the organisation of Contoso.

We know to fulfil the requirements, we need to implement the following:

So, let us take our notebooks and look at the Backup sections.

Backup Center

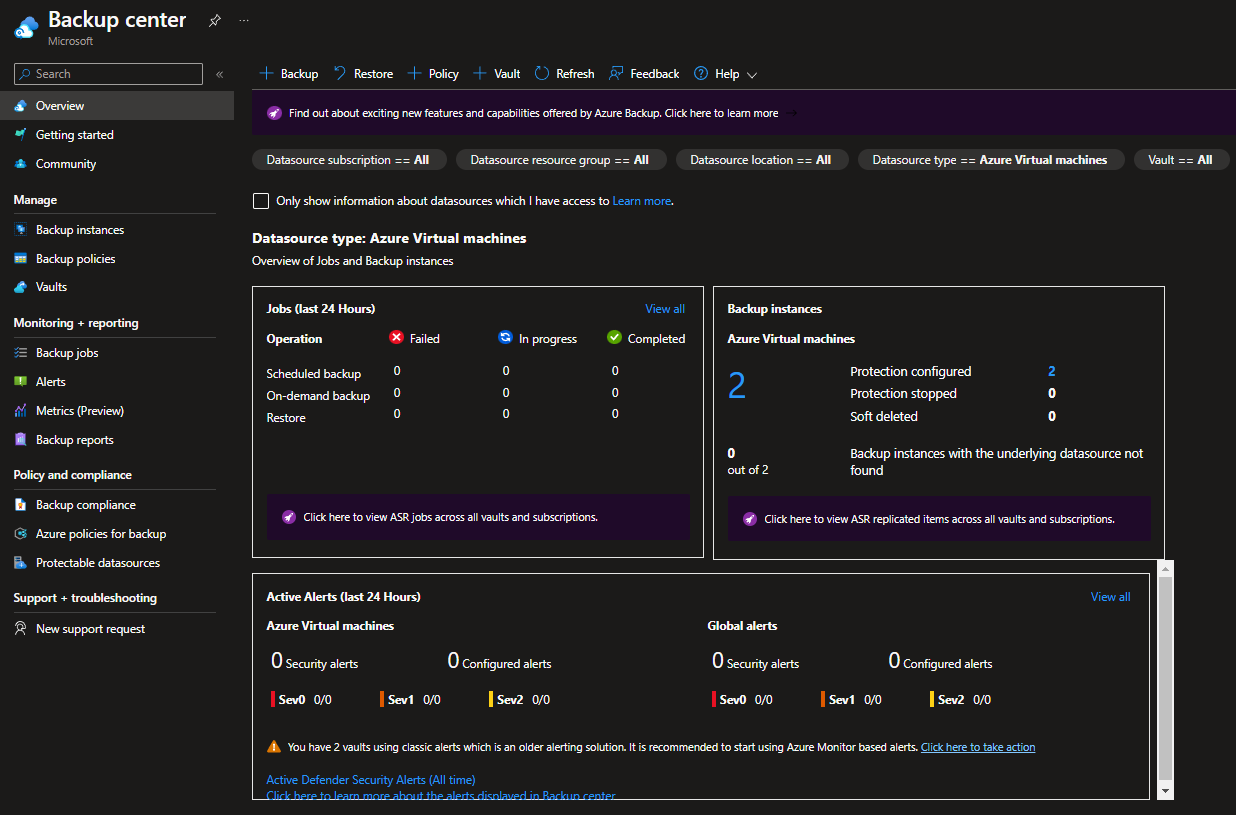
When needing a single control plane for your Backups across multiple tenancies (using Azure Lighthouse), Subscriptions and regions, then Backup Center is the place to start with.

"Backup center provides a single unified management experience in Azure for enterprises to govern, monitor, operate, and analyze backups at scale. It also provides at-scale monitoring and management capabilities for Azure Site Recovery. So, it's consistent with Azure's native management experiences. Backup center is designed to function well across a large and distributed Azure environment. You can use Backup center to efficiently manage backups spanning multiple workload types, vaults, subscriptions, regions, and Azure Lighthouse tenants."

Backup center

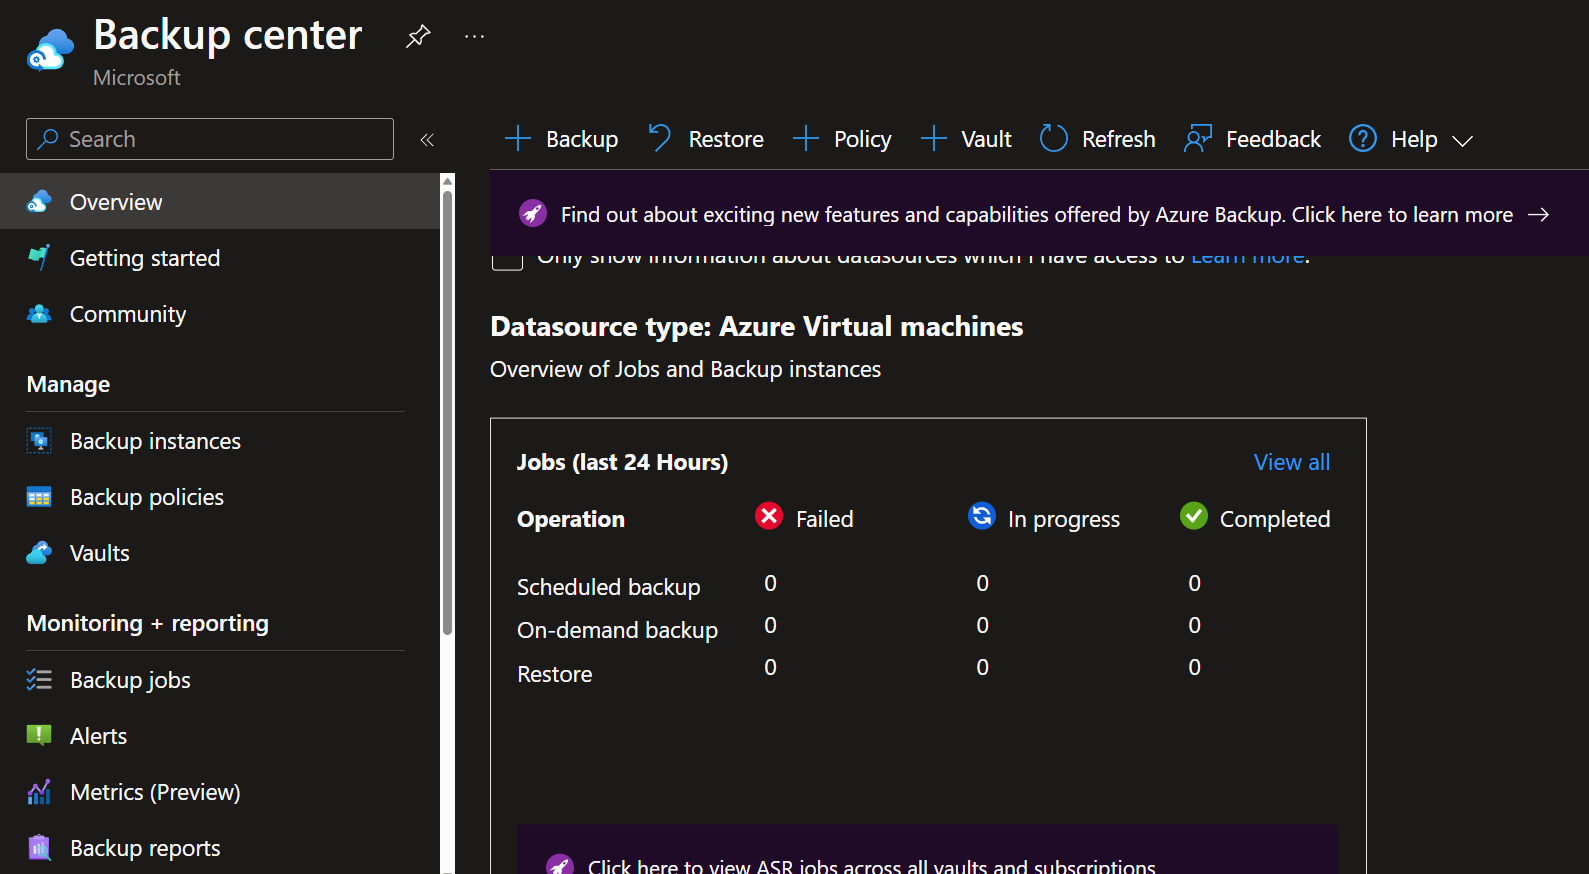
As you can see, Backup center can be used to see manage:

  • Backup instances
  • Backup policies
  • Vaults
  • Monitor and report on backup jobs
  • Compliance (ie Azure Virtual Machines that are not configured for backup)

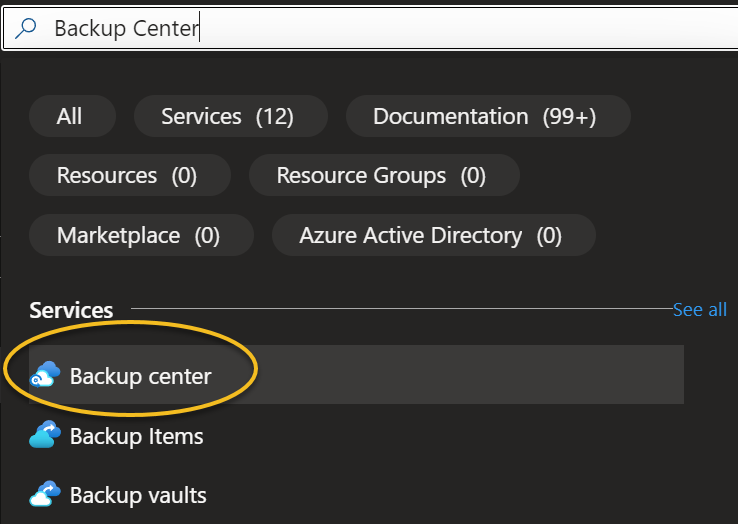
You can find the Backup Center directly in the Azure Portal.

Backup center

We can create and manage these resources by ourselves, but throughout this article, we will refer back to the Backup Center, to take advantage of the single pane of glass and integrate these resources.

Create Vault

In Microsoft Azure, there are two types of Vaults that the Backup center works with. These vaults are:

Backup center

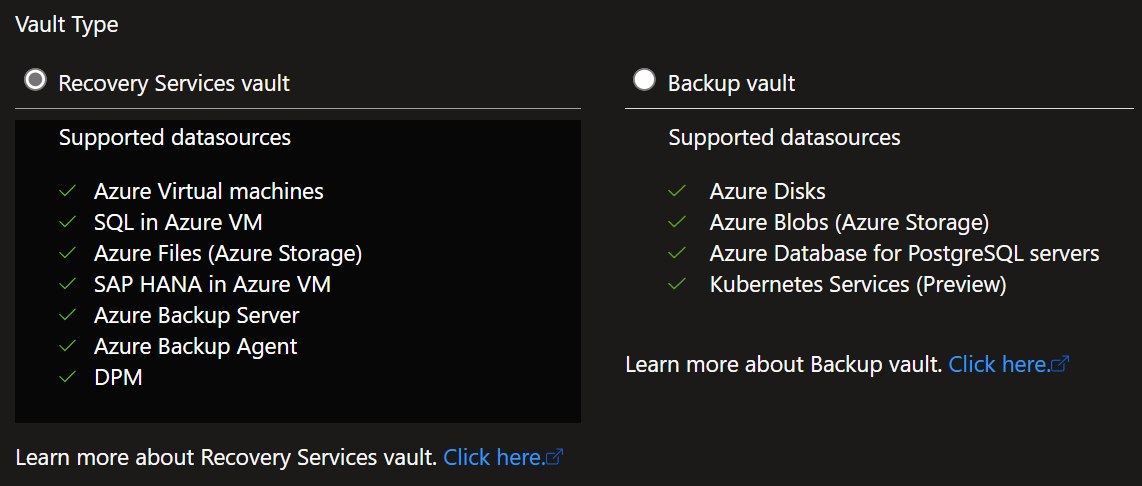
Depending on your requirements depends on which Vault you will need to create (for our purposes, we will need the Recovery Services vault); Backup Center makes it remarkably easy to configure a new vault and select the right vault type by using the wizard.

Please refer to: Support matrix for Azure Backup for further information.

  1. Navigate to Backup Center
  2. Click on Vaults
  3. Click + Vault
  4. Select Recovery Services vault
  5. Select Continue
  6. Specify a location and Resource Group to house your Recovery Services vault
  7. Specify your vault name (abbreviation examples for Azure resources)
  8. Click Next: Vault properties

Immutability: I talked a bit about immutability in another blog article: You Can't Touch This: How to Make Your Azure Backup Immutable and Secure. Essentially an immutable vault, prevents unauthorised changes and restore point deletions, for this article, we will enable it to prevent unintended or malicious data loss (keep in mind with immutable vaults, reducing retention of recovery points is not allowed).

  1. Check enabled immutability, and click Next: Networking.
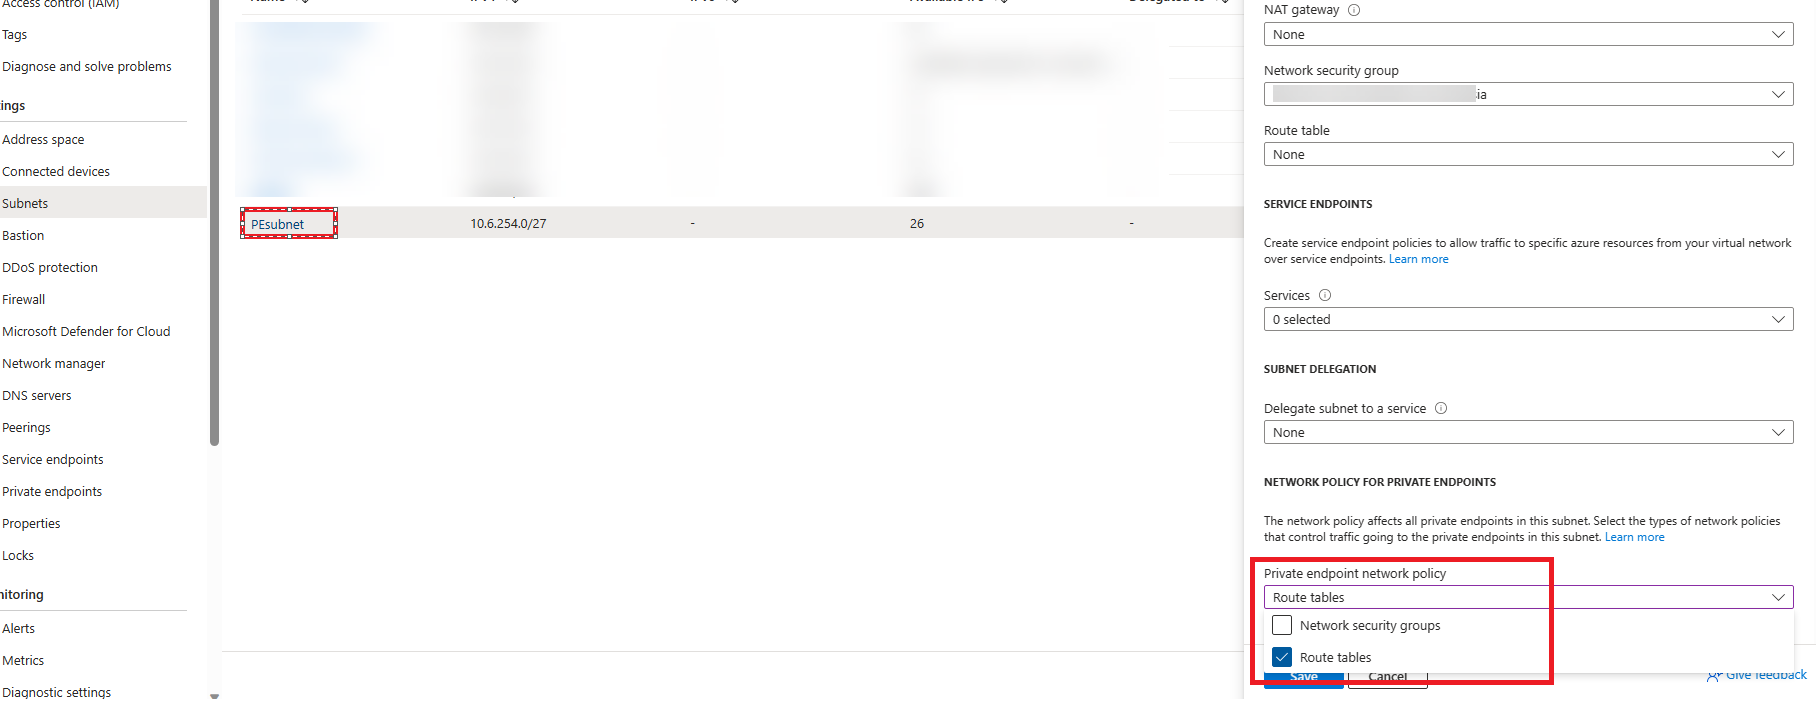
  2. We can join our Recovery Services vault to our private network using private endpoints, forcing Azure Backup and Site Recovery to traverse a private network, for the purposes of this article, we will skip it. Click Next: Tags
  3. Enter in Tags (tags useful for a Recovery Service vault, could be: Application, Support Team, Environment, Cost Center, Criticality)
  4. Click Review + Create

Create Azure Recovery Services Vault

If we navigate back to the Backup Center and then Vaults (under Manage), we will be able to see the newly created vault.

We now have our Backup solution provisioned for the Cloud Administrator to use, but we next need to define the policies for the backup.

Create Backup Policies

Now that we have our Recovery Services vault, we need to create backup policies; these backup policies will help define the frequency of backups, the retention (Daily, weekly, monthly, yearly) and vault tiering, which enables the Recovery Services Vault to move recovery vaults to an archive tier (slower to restore, but can be cheaper overall, for those long retention policies).

Backup policies are very organisation-specific and can depend a lot on operational and industry requirements; some industries have a legal obligation to store their backups for a certain number of years, the Azure compliance center documentation may help, around security and data requirements, make sure your backup policies are understood by the business you are working with.

For Contoso, we have the following requirements:

ResourceDailyWeeklyMonthlyYearlySnapshot Retention (Hot)
Critical Application DB - Prod7 days - Every 4 Hours4 weeks6 months7 years5 days
File Server- Prod7 days - Every 4 Hours6 weeks6 months7 years5 days
Web Application VM - Dev20 days8 weeks12 months2 years2 days
Database Server - Dev30 days8 weeks12 months2 years2 days

There are a few things to call out here:

  • We can see that for Development, items need to be retained for 2 years
  • For Production, its 7 years
  • Snapshots need to be stored for 5 days and 2 days to allow fast restore
  • Production requires a backup to be taken every 4 hours to reduce RTO (Recovery point objective)

Create Azure Recovery Services Vault

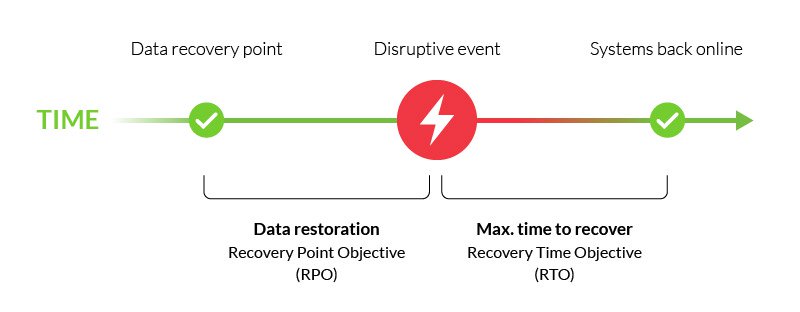
If we take a look at the Snapshot retention, we can leverage Instant restore snapshots, to restore the workloads, quickly from the previous 5 days, reducing our time RTO (recovery time objective), and overall impact of an outage or restore, by storing the snapshots locally (as close to the original disk) without putting it (waiting for it) into archive (slower disk), this will incurr more cost, but dramatically reduces restores time. I recommend always keeping a few Instant restore snapshots available for all production systems.

Snapshot

Let us create the policies (we will only create one policy, but the same process can be used to create the others).

  1. Navigate to Backup Center
  2. Click on Backup policies
  3. Click + Add 1 .Select Azure Virtual Machines
  4. Select the Vault created earlier
  5. Click Continue
  6. As this will be the policy for the Critical Application DB, we will specify: Enhanced (due to the multiple backups, Zone-redundant storage (ZRS) snapshots)
  7. Specify a Policy name, ie Tier-1-Prod-AppDB
  8. Specify Frequency to: Hourly, Schedule to Every 4 Hours, and Duration: 24 Hours
  9. Specify Retain instance recovery snapshots for '5' days
  10. Update Daily Backup point to: 7 days
  11. Configure the Weekly backup point to occur every Sunday and retain for 4 weeks
  12. Configure the Monthly backup point to occur on the first Sunday of the month and retain for 6 months
  13. Configure the yearly backup point to occur on the first Sunday of the year and retain for 7 years
  14. Select enable Tiering, and specify Recommended recovery points
  15. You can also update the Resource Group name used to store the Snapshots.
  16. Click Create

Snapshot

Note: If you want, you can repeat the same process to create any others you need. Remember, with immutable vaults, you cannot reduce the retention (but you can add), so if starting for the first time, keep the retention low until you have a clear direction of what is required. A workload can use the same policy. A Standard (not Enhanced) policy may be all you need for Development workloads.

Add Virtual Machines

Now that we have our Recovery Services Vault and custom backup policies, it's time to add our Virtual Machines to the backup! To do this, we can use the Backup center to view Virtual Machines that are not getting backed up, and then configure the backup.

  1. Navigate to Backup Center
  2. Click on Protectable data sources
  3. Click on the ellipsis of a Virtual Machine you want to backup
  4. Click on Backup
  5. Select the appropriate Backup vault and policy
  6. Click Enable backup

Although cross-region restore is now supported on a Recovery Services vault, the second region is read-only (RA-GRS), so make sure you have a backup recovery vault created in the region (and subscription) of the virtual machines you are trying to protect. Backup center, can see all Recovery services vaults across multiple regions and subscriptions that you have access to.

Add Virtual Machines

Once added, the Virtual Machine will now get backed up according to the specified policy.

Its worth noting that you can backup a Virtual Machine if it is deallocated, but it will Crash-consistent (Only the data that already exists on the disk at the time of backup is captured and backed up, and it triggers a disk check during recovery) compared to Application consistent, which is more application and OS aware, so can prepare to the OS and applications for the backups to make sure that everything is written successfully to the disk ahead of the backup. You can read more about Snapshot consistency.

Monitor Backups

Now that we have our Recovery Services Vault, policies and protected items (backed up Virtual Machines), we need to monitor to make sure that the backups are working. Backup center gives us a complete view of Failed, In Progress, and Completed jobs in the overview pane, which is excellent for a quick view of the status across subscriptions and regions.

Azure BackupCenter

But you may want something a bit more detailed; let us look into some of the options for monitoring your backups.

Alerts

As part of operational checks, you may want assurance or a ticket raised if there's an issue with a backup; one of the ways to achieve this is to set up an email alert that will send an email if a backup fails.

By default, these types of alerts are enabled out-of-the-box on a recovery services vault; examples of alerts can be found here: Azure Monitor alerts for Azure Backup, these can be displayed in the Recovery Services Vault or Backup Center blade, immediately.

If a destructive operation, such as stop protection with deleted data is performed, an alert is raised, and an email is sent to subscription owners, admins, and co-admins even if notifications aren't configured for the Recovery Services vault.

TypeDescriptionExample alert scenariosBenefits
Built-in Azure Monitor alerts (AMP alerts)These are alerts that will be available out-of-the-box for customers without needing additional configuration by the customer.Security scenarios like deleting backup data, soft-delete disabled, vault deleted, etc.Useful for critical scenarios where the customer needs to receive alerts without the possibility of alerts being subverted by a malicious admin. Alerts for destructive operations fall under this category
Metric alertsHere, Azure Backup will surface backup health-related metrics for customers' Recovery Services vaults and Backup vaults. Customers can write alert rules on these metrics.Backup health-related scenarios such as backup success alerts, restore success, schedule missed, RPO missed, etc.Useful for scenarios where customers would like some control over the creation of alert rules but without the overhead of setting up LA or any other custom data store.
Custom Log AlertsCustomers configure their vaults to send data to the Log Analytics workspace and write alert rules on logs.'N' consecutive failed backup jobs, Spike in storage consumed, etc.Useful for scenarios where there is a relatively complex, customer-specific logic needed to generate an alert.

Backup alerts are supported by Azure Monitor, so under Azure Monitor, and Alerts pane you can see all your other alerts, including Azure Backup alerts from a single pane.

Azure BackupCenter

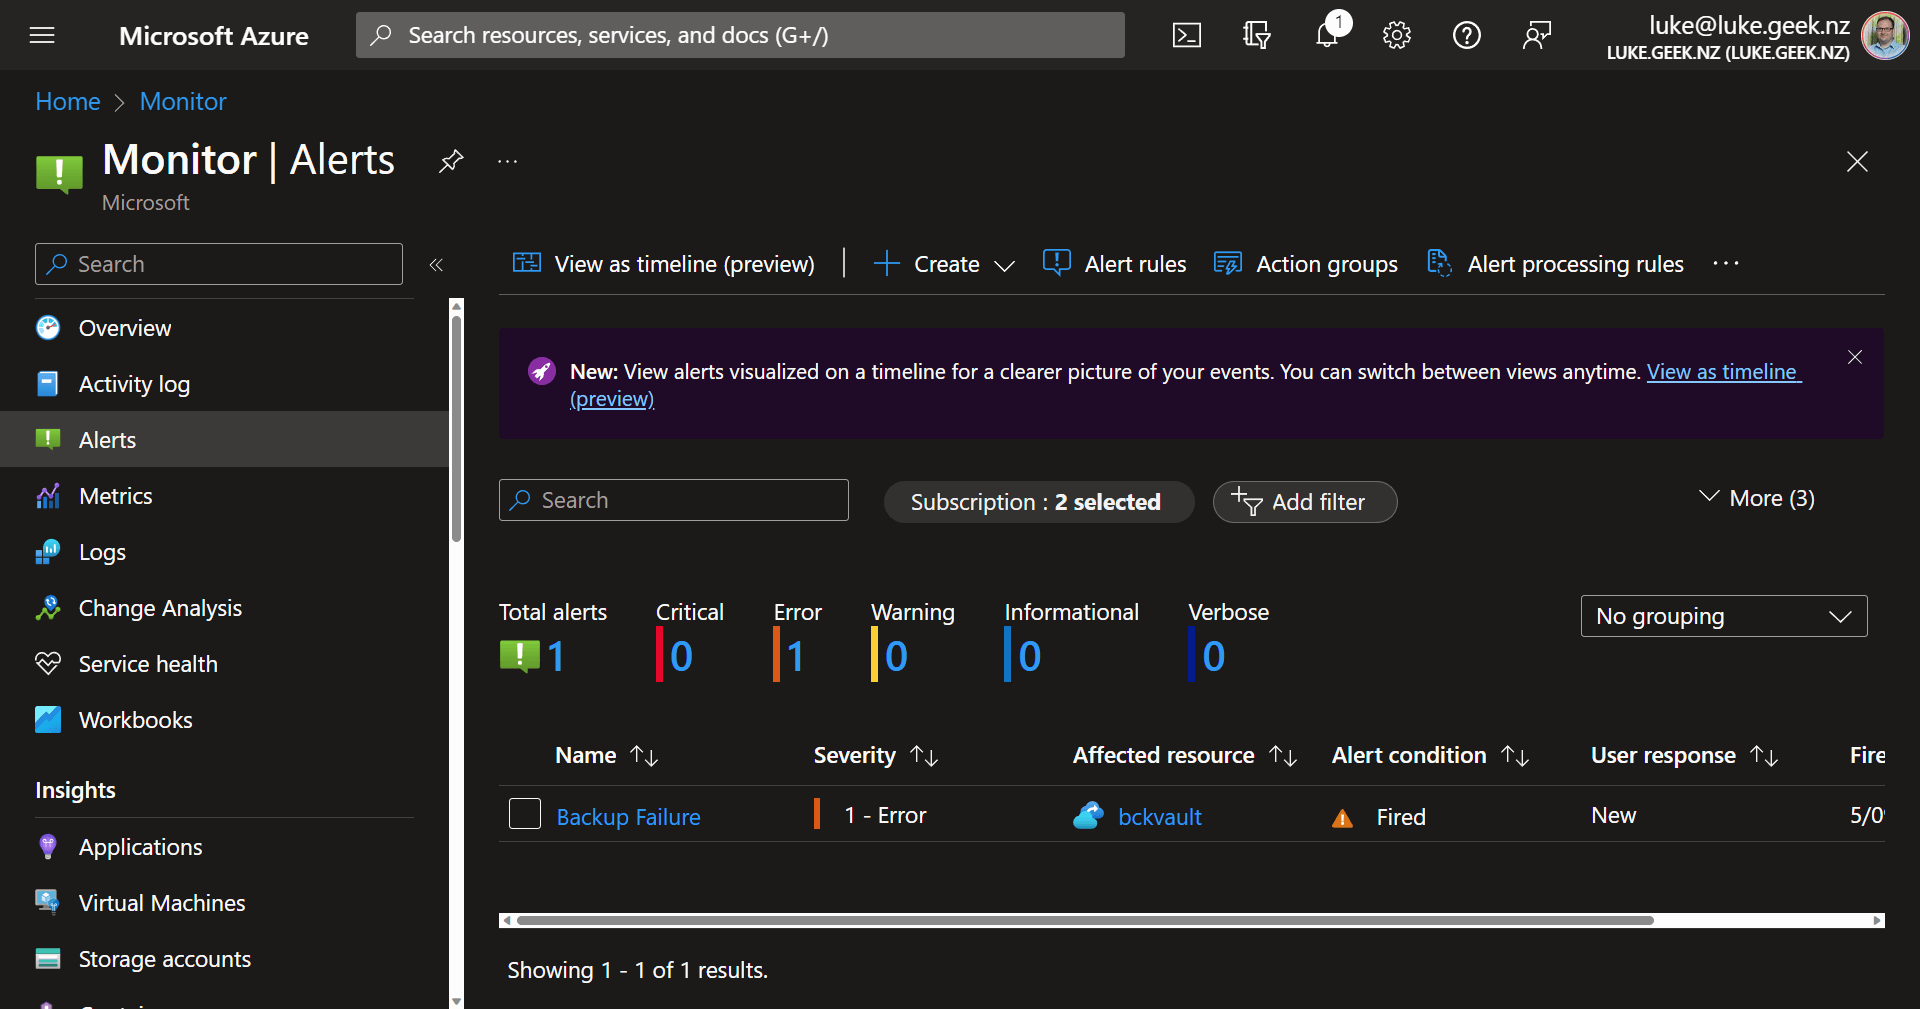
If you want to configure notifications via emails for other types of alerts, such as Backup failures, we can use Azure Monitor Action Groups and Alert processing rules, to let us know, without having to login to the Azure Portal directly, so let us create an email alert.

To do this, we will create an Action Group and Alert Processing rule.

ComponentDescription
Action GroupAn Action Group is a collection of actions or tasks that are executed automatically when an alert that matches specific criteria is triggered. Actions can include sending notifications, running scripts, triggering automation, or escalating the alert. Action Groups help streamline incident response and automate actions based on the nature and severity of an alert.
Alert Processing RuleAn Alert Processing Rule is a set of conditions and criteria used to filter, categorize, or route incoming alerts within a monitoring or alerting system. These rules enable organizations to define how alerts are processed, prioritize them, and determine the appropriate actions to take when specific conditions are met. Alert Processing Rules are crucial for managing and efficiently responding to alerts.
  1. Navigate to Backup Center
  2. Click on Alerts
  3. Click on Alert Processing rule
  4. Click + Select Scope
  5. Click All Resource Types, and Filter by: Recovery Services Vault
  6. Select your Recovery Services vault, you would like to alert on
  7. Click Apply
  8. Click on Filter, and change: Alert condition = Fired.
  9. Click Next: Rule Settings
  10. Click Apply action group
  11. Click + Create action group
  12. Select the Subscription, Resource Group to store your action group (i.e. monitor resource group)
  13. Give the Action Group a name, and give it a Display name
  14. Specify Notification type (ie Email/SMS message/push/voice)
  15. For this article, we will add an Email (but you can have it ring a number, push a notification to the Azure Mobile App)
  16. Enter in your details, then click Next: Actions
  17. In the Actions pane, is where you can trigger automation, such as Azure Logic Apps, Runbooks, ITSM connections, Webhooks etc., to help self-remediate the issues, or better notifications, such as a Logic App that posts in a Teams channel when an alert is fired, or a wehbook that triggers a webpage to update. In this example, we will leave it empty and rely on email notifications and click Next: Tags
  18. Enter any Tags and click Review + create
  19. Make note of Suppress Notifications; this could be handy during scheduled maintenance windows where backups may fail due to approved work.
  20. Once the Action Group has been created, click Next: Scheduling
  21. Select Always
  22. Click Next: Details
  23. Enter in a Resource Group, for the Alert processing rule to be placed
  24. Enter in Rule name, description and click Review + Create

Azure BackupCenter

As you can see Azure Monitor integration into backups, gives you some great options to keep on top of your backups, and integrate with other systems, like your IT Service Management toolsets.

Azure Site Recovery

Azure Site Recovery (ASR) can be used to migrate workloads, across Availability Zones and regions, by replicating the disks of a Virtual Machine to another region (GRS) or zone (ZRS), in fact Azure Resource Mover uses Azure Site Recovery when moving virtual machines between regions. Azure Site Recovery can also help with migrating workloads outside of Azure, to Azure, for disaster recovery.

When looking at migrating workloads, to Azure from the VMWare stack, consider the Azure Site Recovery Deployment Planner for VMware to Azure to assist.

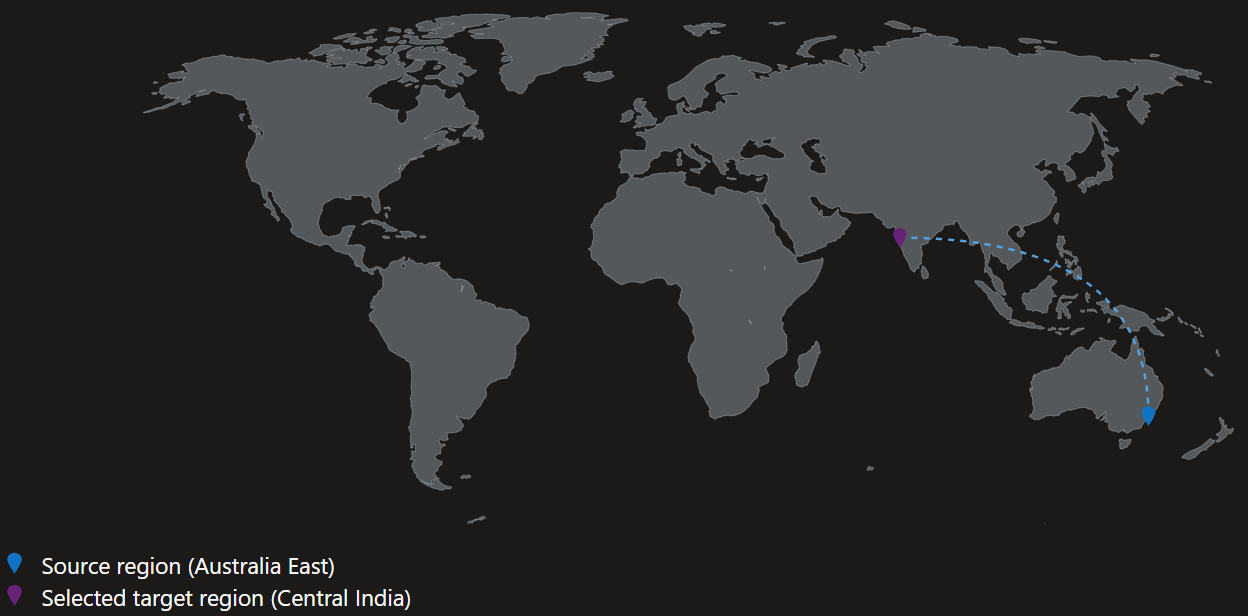
For the purposes of this guide, we will achieve disaster recovery of our virtual machine, by replicating it to another region (i.e. from Australia East to Central India).

Azure Recovery Services contributes to your BCDR strategy: Site Recovery service: Site Recovery helps ensure business continuity by keeping business apps and workloads running during outages. Site Recovery replicates workloads running on physical and virtual machines (VMs) from a primary site to a secondary location. When an outage occurs at your primary site, you fail over to a secondary location, and access apps from there. After the primary location is running again, you can fail back to it. Backup service: The Azure Backup service keeps your data safe and recoverable.

Azure BackupCenter

Just as important (if not more) than the technology to enable this, clear business requirements and preparation is paramount for a successful disaster recovery solution, I highly recommend the Azure Business Continuity Guide. Supplied by the Microsoft Fastrack team, this guide includes resources to prepare for thorough disaster recovery plan.

The key to successful disaster recovery is not only the workloads themselves but supporting services, such as DNS, Firewall rules, connectivity etc., that need to be considered, These are out of the scope of this article but the following Microsoft Azure architecture references are worth a read:

For Azure Site Recovery to work, it relies on a mobility service running within the Virtual Machine to replicate changes, the source virtual machine needs to be on to replicate the changes.

When you enable replication for a VM to set up disaster recovery, the Site Recovery Mobility service extension installs on the VM and registers it with Azure Site Recovery. During replication, VM disk writes are sent to a cache storage account in the source region. Data is sent from there to the target region, and recovery points are generated from the data.

Azure Site Recovery, does not currently support virtual machines protected with Trusted Launch.

Enable Azure Site Recovery

For now, we have 'VM1' a Ubuntu workload, running in Australia East, with a Public IP, that we will failover to Central India. The source Virtual Machine can be backed up normally by a vault in the source region, and replicated to another vault in the destination region.

Azure Site Recovery has a specific Operating System and Linux kernel support. Make sure you confirm that your workloads are supported.

  1. Navigate to Backup Center
  2. Click on Vaults
  3. Create a new Recovery Services vault in your DR (Disaster Recovery region - ie Central India)
  4. Click on Site Recovery
  5. Under Azure Virtual Machines, click on: Enable replication
  6. Specify the source Virtual Machine, you wish to migrate
  7. Click Next
  8. Select your source Virtual Machine
  9. Click Next
  10. Select the target location (i.e. Central India)
  11. Select the target Resource Group
  12. Select the Target Virtual Network (create one if it doesn't exist)
  13. Select the target subnet
  14. Under the Storage, you can consider changing the replica disk to Standard, to reduce cost (this can be changed later).
  15. Select a cache storage account (The cache storage account is a storage account used for transferring the replication data before its written to the destination disk)
  16. You can then adjust the availability zone of the destination virtual machine
  17. Click Next
  18. Here we can define a Replication Policy (a replication policy in Azure Site Recovery is a set of rules and configurations that determine how data is replicated from the source environment to the target environment (Azure) in case of a disaster or planned failover, such as retention, ie you can restore a point within the retention period) we will leave the default 24-hour retention policy.
  19. We can specify a Replication Group, An example of a replication group is application servers that need to be consistent with each other, in terms of data ( replication policy in Azure Site Recovery is a set of rules and configurations that determine how data is replicated from the source environment to the target environment (Azure) in case of a disaster or planned failover.).
  20. Specify an automation account to manage the mobility service, and we will leave the update extension to be ASR (Azure Site Recovery) managed.
  21. Click Next
  22. Click Enable replication
  23. At the Recovery Services Vault, under Site Recovery Jobs you can monitor the registration, registration and initial replication can take 30-60 minutes to install the agent and start the replication.

Azure BackupCenter

Failover to the secondary region using Azure Site Recovery

Once your virtual machine has been replicated in the secondary region. you can do a Failover, or Test failover. A Test failover is recommended, in your DR testing, and application testing.

Azure BackupCenter

AspectFailoverTest Failover
PurposeTo switch to a secondary site during a disaster or planned maintenance event.To validate your disaster recovery plan without impacting production.
Impact on ProductionDisrupts production services as the primary site becomes unavailable during the failover process.No impact on production services; the primary site remains operational.
Data ReplicationReplicates data from primary to secondary site, making it the active site during the failover.Uses the same replicated data but doesn't make the secondary site the active site; it's for testing purposes only.
Recovery TimeLonger recovery time, as it involves setting up and activating the secondary site.Faster recovery time, as it doesn't require making the secondary site the active site.
Data ConsistencyEnsures data consistency and integrity during the failover process.Ensures data consistency for testing but doesn't make the secondary site the primary site.
CostMay incur additional costs due to the resources activated at the secondary site.Typically incurs minimal additional costs as it's for testing purposes.
Use CasesActual disaster recovery scenarios or planned maintenance events.Testing and validating disaster recovery procedures, training, and compliance.
Post-OperationThe secondary site becomes the new primary site until failback is initiated.No change to the primary site; the secondary site remains inactive.
Rollback OptionFailback operation is required to return to the primary site once it's available.No need for a rollback; the primary site remains unaffected.
  1. Navigate to your destination Recovery Services Vault
  2. Click on REplicated Items
  3. Select the Virtual Machine you wish to recover in your second region
  4. Select Test Failover (or Failover, depending on your requirements)
  5. Select your Recovery point and destination Virtual network
  6. Select Failover
  7. If it is a test failover, you can then Clean up your Test failover (deleted replicated item) after you have tested

Azure BackupCenter

Azure Policies

Automatically, mapping of Virtual Machines, to backup policies can be done using Azure Policy.

Azure policies such as:

  • Azure Backup should be enabled for Virtual Machines
  • Configure backup on virtual machines without a given tag to an existing recovery services vault in the same location
  • Disable Cross Subscription Restore for Backup Vaults
  • Soft delete should be enabled for Backup Vaults

More, are built-in to the Azure policy engine and can be easily assigned, across subscriptions and management groups, found in the Backup Center.

  1. Navigate to Backup Center
  2. Click on Azure policies for backup
  3. Click on a policy and click Assign

You can find a list of custom and built-in policies at the AzPolicyAdvertizerPro website.

Azure AutoManage

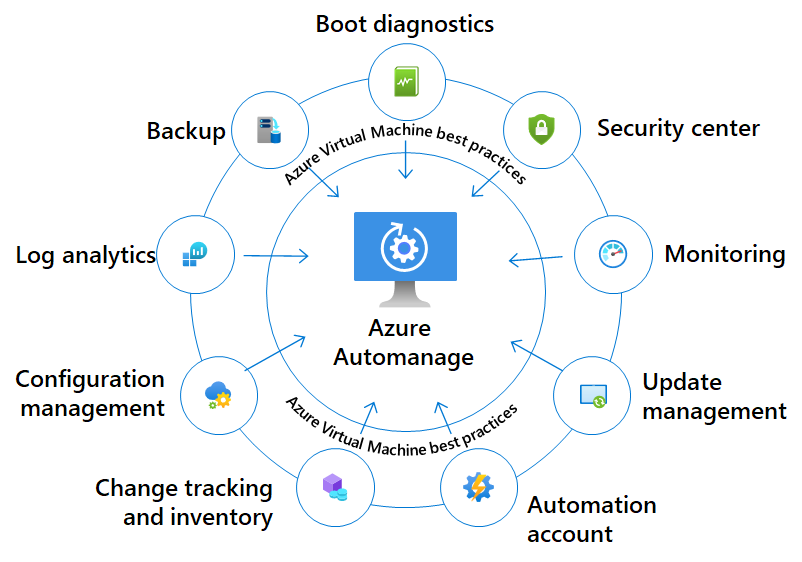
Azure Automanage can be used alongside Azure policy, to onboard Virtual Machines, into backup, patching etc automatically, with reduced manual intervention, and although not directly part of this article, what you have learned can be used to develop your automanage profiles.

Get Ahead with Self-Hosted Agents and Container Apps Jobs

· 23 min read

When considering build agents to use in Azure DevOps (or GitHub), there are 2 main options to consider:

Agent typeDescription
Microsoft-hosted agentsAgents hosted and managed by Microsoft
Self-hosted agentsAgents that you configure and manage, hosted on your VMs

Microsoft-hosted agents, can be used for most things, but there are times where you may need to talk to internal company resources, or security is a concern, which is when you would consider self-hosting the agent yourself.

Azure Bicep Deployment with Deployment Stacks

· 14 min read

Deployment Stacks! What is it? insert confused look

Maybe you have been browsing the Microsoft Azure Portal and noticed a new section in the management blade called: Deployment stacks and wondered what it was, and how you can use it.

Let us take a look!

Before we get started its worth noting that as of the time of this article, this feature is under Public Preview. Features or ways of working with Deployment Stacks may change, when it becomes generally available. If you run into issues, make sure you have a look at the current known issues.

Automate your Azure Bicep deployment with ease using Deployment Stacks

Overview

Azure Deployment Stacks are a type of Azure resource that allows you to manage a group of Azure resources as an atomic unit.

When you submit a Bicep file or an ARM template to a deployment stack, it defines the resources that are managed by the stack.

You can create and update deployment stacks using Azure CLI, Azure PowerShell, or the Azure portal along with Bicep files. These Bicep files are transpiled into ARM JSON templates, which are then deployed as a deployment object by the stack.

Deployment stacks offer additional capabilities beyond regular deployment resources, such as simplified provisioning and management of resources, preventing undesired modifications to managed resources, efficient environment cleanup, and the ability to utilize standard templates like Bicep, ARM templates, or Template specs.

When planning your deployment and determining which resource groups should be part of the same stack, it's important to consider the management lifecycle of those resources, which includes creation, updating, and deletion. For instance, suppose you need to provision some test VMs for various application teams across different resource group scopes.

Comparisons

Before we dig into it further, it may help to give you a comparison between the different products and where Deployment Stacks, could be used, lets us take a look at a comparison, between similar products, that may come to mind, such as:

  • Azure Blueprints
  • Bicep (on its own)
  • Template Specs
  • Terraform
FeatureDeployment StacksAzure BlueprintsUsing BicepTemplate SpecsTerraform
Management of ResourcesManages a group of Azure resources as an atomic unit.Defines and deploys a repeatable set of Azure resources that adhere to organizational standards.Defines and deploys Azure resources using a declarative language.Defines and deploys reusable infrastructure code using template specs.Defines and provisions infrastructure resources across various cloud providers using a declarative language.
Resource DefinitionBicep files or ARM JSON templates are used to define the resources managed by the stack.Blueprint artifacts, including ARM templates, policy assignments, role assignments, and resource groups, are used to define the blueprint.Bicep files are used to define the Azure resources.Template specs are used to define reusable infrastructure code.Terraform configuration files are used to define the infrastructure resources.
Access ControlAccess to the deployment stack can be restricted using Azure role-based access control (Azure RBAC).Access to blueprints is managed through Azure role-based access control (Azure RBAC).Access to Azure resources is managed through Azure role-based access control (Azure RBAC).Access to template specs is managed through Azure role-based access control (Azure RBAC).Access to cloud resources is managed through provider-specific authentication mechanisms.
BenefitsSimplified provisioning and management of resources as a cohesive entity. Preventing undesired modifications to managed resources.*Efficient environment cleanup.*Utilizing standard templates such as Bicep, ARM templates, or Template specs for your deployment stacks.Rapidly build and start up new environments with organizational compliance. Built-in components for speeding up development and delivery.*Easier management and deployment of Azure resources.*Improved readability and understanding of resource configurations.* Publish libraries of reusable infrastructure code.* Infrastructure-as-Code approach for provisioning resources across multiple cloud providers.
DeprecationN/AAzure Blueprints (Preview) will be deprecated.N/AN/AN/A

It is always recommended to refer to the official documentation for the most up-to-date and comprehensive information. The comparison table above, was created with the help of AI.

It is hard to do a complete comparison, as always 'it depends' on your use cases and requirements, but hopefully this makes it clear where Deployment Stacks come into play (and it does not replace Bicep but works with it for better governance), with out-of-the-box benefits such as:

  • Simplified provisioning and management of resources across different scopes as a cohesive entity.
  • Preventing undesired modifications to managed resources through deny settings.
  • Efficient environment cleanup by employing delete flags during deployment stack updates.
  • Utilizing standard templates such as Bicep, ARM templates, or Template specs for your deployment stacks.

The key here is that Azure Deployment Stacks, is a native way to treat your infrastructure components as an atmonic unit or stack, so you manage the lifecycle of the resources as a whole vs every resource separately.

Using Deployment Stacks

Deployment stacks requires Azure PowerShell (version 10.1.0 or later) or Azure CLI (version 2.50.0 or later).

For the purposes of this article, I will be using PowerShell.

PowerShell

Once you have the latest Azure PowerShell modules, its time to take a look at the cmdlets, that are offered to us for Deployment Stacks.

Open your PowerShell terminal and type in:

Get-Command -Name *DeploymentStack*

Get-Command -Name DeploymentStack As you can see, there are a range of cmdlets we have to work with.

For the purpose of this article, I will be using a Bicep file, I already have on hand (unmodified for Deployment Stacks). This bicep file will create:

  • 2 Virtual Networks
  • 4 Subnets (2 subnets in each Virtual Network)
  • 4 NSGs (and assign to each subnet, with Deny All rules)
  • Then finally, peer the virtual networks.

This is the Bicep file:

main.bicep
@description('Name of the virtual network.')
param vnetName string = 'myVnet'

@description('Name of the first subnet.')
param subnet1Name string = 'subnet1'

@description('Name of the second subnet.')
param subnet2Name string = 'subnet2'

@description('Name of the first network security group.')
param nsg1Name string = 'nsg1'

@description('Name of the second network security group.')
param nsg2Name string = 'nsg2'

@description('Name of the second virtual network.')
param vnet2Name string = 'myVnet2'

@description('Name of the third subnet.')
param subnet3Name string = 'subnet3'

@description('Name of the fourth subnet.')
param subnet4Name string = 'subnet4'

@description('Name of the third network security group.')
param nsg3Name string = 'nsg3'

@description('Name of the fourth network security group.')
param nsg4Name string = 'nsg4'

@description('Location for all resources.')
param location string = resourceGroup().location

resource vnet 'Microsoft.Network/virtualNetworks@2023-04-01' = {
name: vnetName
location: location
properties: {
addressSpace: {
addressPrefixes: [
'10.0.0.0/16'
]
}
}
}

resource subnet1 'Microsoft.Network/virtualNetworks/subnets@2023-04-01' = {
parent: vnet
name: subnet1Name
properties: {
addressPrefix: '10.0.1.0/24'
networkSecurityGroup: {
id: resourceId('Microsoft.Network/networkSecurityGroups', nsg1Name)
}
}
}

resource subnet2 'Microsoft.Network/virtualNetworks/subnets@2023-04-01' = {
parent: vnet
name: subnet2Name
properties: {
addressPrefix: '10.0.2.0/24'
networkSecurityGroup: {
id: resourceId('Microsoft.Network/networkSecurityGroups', nsg2Name)
}
}
}

resource nsg1 'Microsoft.Network/networkSecurityGroups@2023-04-01' = {
name: nsg1Name
location: location
properties: {
flushConnection: false
securityRules: [

{
name: 'Deny-All-Inbound'
properties: {
priority: 4096
access: 'Deny'
direction: 'Inbound'
destinationPortRange: '*'
protocol: 'Tcp'
sourcePortRange: '*'
destinationAddressPrefix: '*'
sourceAddressPrefix: '*'
}
}
]
}
}

resource nsg2 'Microsoft.Network/networkSecurityGroups@2023-04-01' = {
name: nsg2Name
location: location
properties: {
flushConnection: false
securityRules: [

{
name: 'Deny-All-Inbound'
properties: {
priority: 4096
access: 'Deny'
direction: 'Inbound'
destinationPortRange: '*'
protocol: 'Tcp'
sourcePortRange: '*'
destinationAddressPrefix: '*'
sourceAddressPrefix: '*'
}
}
]
}
}

resource vnet2 'Microsoft.Network/virtualNetworks@2023-04-01' = {
name: vnet2Name
location: location
properties: {
addressSpace: {
addressPrefixes: [
'10.1.0.0/16'
]
}
}
}

resource subnet3 'Microsoft.Network/virtualNetworks/subnets@2023-04-01' = {
parent: vnet2
name: subnet3Name
properties: {
addressPrefix: '10.1.1.0/24'
networkSecurityGroup: {
id: resourceId('Microsoft.Network/networkSecurityGroups', nsg3Name)
}
}
}

resource subnet4 'Microsoft.Network/virtualNetworks/subnets@2023-04-01' = {
parent: vnet2
name: subnet4Name
properties: {
addressPrefix: '10.1.2.0/24'
networkSecurityGroup: {
id: resourceId('Microsoft.Network/networkSecurityGroups', nsg4Name)
}
}
}

resource nsg3 'Microsoft.Network/networkSecurityGroups@2023-04-01' = {
name: nsg3Name
location: location
properties: {
flushConnection: false
securityRules: [

{
name: 'Deny-All-Inbound'
properties: {
priority: 4096
access: 'Deny'
direction: 'Inbound'
destinationPortRange: '*'
protocol: 'Tcp'
sourcePortRange: '*'
destinationAddressPrefix: '*'
sourceAddressPrefix: '*'
}
}
]
}
}

resource nsg4 'Microsoft.Network/networkSecurityGroups@2023-04-01' = {
name: nsg4Name
location: location
properties: {
flushConnection: false
securityRules: [

{
name: 'Deny-All-Inbound'
properties: {
priority: 4096
access: 'Deny'
direction: 'Inbound'
destinationPortRange: '*'
protocol: 'Tcp'
sourcePortRange: '*'
destinationAddressPrefix: '*'
sourceAddressPrefix: '*'
}
}
]
}
}

resource vnetPeering 'Microsoft.Network/virtualNetworks/virtualNetworkPeerings@2023-04-01' = {
parent: vnet
name: vnet2Name
properties: {
remoteVirtualNetwork: {
id: vnet2.id
}
allowVirtualNetworkAccess: true
allowForwardedTraffic: false
allowGatewayTransit: false
useRemoteGateways: false
}
dependsOn: [
subnet1
subnet3
]
}

resource vnetPeering2 'Microsoft.Network/virtualNetworks/virtualNetworkPeerings@2023-04-01' = {
parent: vnet2
name: vnetName
properties: {
remoteVirtualNetwork: {
id: vnet.id
}
allowVirtualNetworkAccess: true
allowForwardedTraffic: false
allowGatewayTransit: false
useRemoteGateways: false
}
dependsOn: [
subnet2
subnet4
vnetPeering
]
}

I have already deployed a new Resource Group to deploy our virtual network into:

New-AzResourceGroup -Name 'rg-network' -Location 'Australia East'

So let us create our first Deployment Stack!

New-AzResourceGroupDeploymentStack

The 'New-AzResourceGroupDeploymentStack' cmdlet is the first one we will look into.

Let us look at the most common syntax that you may use:

New-AzResourceGroupDeploymentStack -Name "<deployment-stack-name>" -TemplateFile "<bicep-file-name>" -DeploymentResourceGroupName "<resource-group-name>" -DenySettingsMode "none"
ParameterDescription
-NameSpecifies the name of the deployment stack.
-LocationSpecifies the Azure region where the deployment stack will be created. This is valid for Subscription based DeploymentStacks.
-TemplateFileSpecifies the Bicep file that defines the resources to be managed by the deployment stack.
-DeploymentResourceGroupNameSpecifies the name of the resource group where the managed resources will be stored.
-DenySettingsModeSpecifies the operations that are prohibited on the managed resources to safeguard against unauthorized deletion or updates. Possible values include "none", "DenyDelete", "DenyWriteAndDelete".
-DeleteResourcesDeletes the managed resources associated with the deployment stack.
-DeleteAllDeletes all deployment stacks and their associated resources.
-DeleteResourceGroupsDeletes the resource groups associated with the deployment stacks.

These parameters allow you to customize the creation and management of deployment stacks.

The DenySettingsMode parameter is used in Azure Deployment Stacks to assign specific permissions to managed resources, preventing their deletion by unauthorized security principals, this is a key differentiator to some of the other solutions mentioned earlier, but it does mean you need to think about how your resources will be managed, let us take a look at the DenySettingsMode a bit deeper.

The DenySettingsMode parameter accepts different values to define the level of deny settings. Some of the possible values include:

  • "none": No deny settings are applied, allowing all operations on the managed resources.
  • "DenyDelete": Denies the delete operation on the managed resources, preventing their deletion.
  • "DenyWriteAndDelete": Denies all operations on the managed resources, preventing any modifications or deletions.

By specifying the appropriate DenySettingsMode value, you can control the level of permissions and restrictions on the managed resources within the deployment stack.

For our testing, we will deploy our Azure Virtual Networks, NSGs to a new Deployment Stack, using the DenyDelete DenySettingMode.

$RGName = 'rg-network'
$DenySettings = 'DenyDelete'
$BicepFileName = 'main.bicep'
$DeploymentStackName = 'NetworkProd'

New-AzResourceGroupDeploymentStack -Name $DeploymentStackName -TemplateFile $BicepFileName -ResourceGroupName $RGName -DenySettingsMode $DenySettings -DenySettingsApplyToChildScopes

New-AzResourceGroupDeploymentStack

As you can see, creating a new Azure Deployment Stack is easy, with no adjustments to the underlying Bicep configuration needed.

Note: If you get an error, that the cmdlet is missing -Name parameter, make sure that the -ResourceGroupName parameter has been added.

If we navigate to the Azure Portal, we can see the Deployment Stack natively, including the Stack properties, such as what are the actions if resources are removed, what the denyDelete mode is.

New-AzResourceGroupDeploymentStack

Testing Deny-Assignment

As we deployed our virtual networks, using the denyDelete assignment, lets take a look and attempt to delete a Network Security Group, before we do that we need to dissociate it from the subnet.

Note: Its worth noting my permissions are: Owner.

When I attempted to delete a Network Security Group I get the error below:

Failed to delete network security group 'nsg1'. Error: The client '************' with object id 'cb059544-e63c-4543-930f-4b6e6b7aece1' has permission to perform action 'Microsoft.Network/networkSecurityGroups/delete' on scope 'rg-network/providers/Microsoft.Network/networkSecurityGroups/nsg1'>nsg1'; however, the access is denied because of the deny assignment with name 'Deny assignment '55ebfe82-255d-584a-8579-0e0c9f0219ff' created by Deployment Stack '/subscriptions/f0ee3c31-ff51-4d47-beb2-b1204a511f63'.

Azure Deployment Stack - Delete Resource Test

To delete the resource, I would need to, do one of the following:

  • Delete the Deployment Stack (and detach the resources and delete it manually)
  • Delete the Deployment Stack (and delete all the resources)
  • Remove from the bicep code and update deployment stack.

Note: In our testing, we were able to disassociate the Network Security Group, from the Subnet, because when the deployment stack was deployed - it was with the: denyDelete assignment, not the:'DenyWriteAndDelete'.

Redeploy - Deployment Stack (Portal)

Using the Azure Portal, we can Edit and re-deploy our existing Deployment stack, if you have changes or resources that you may want to roll back:

Azure Deployment Stack - Delete Resource Test

Redeploy - Deployment Stack (Bicep)

What if we want to make further changes, such as removing resources from our Deployment Stack?

In this example, we will modify our bicep code to remove the second Virtual network, subnets and associated NSGs (Network Security Groups), and remove the resources from Azure completely (we can unattach them, which will remove them from being managed by the deployment stack), but I want my Virtual Network resources to be managed completely by Bicep.

We could use the: Save-AzResourceGroupDeploymentStackTemplate, to save the Deployment Stack to an ARM template, if we wanted to deploy it later.

Note: In the bicep code example supplied earlier I removed everything after NSG2.

We will run the Set-AzResourceGroupDeploymentStack, pointing to the modified bicep code:

$RGName = 'rg-network'
$DenySettings = 'DenyWriteAndDelete'
$BicepFileName = 'main.bicep'
$DeploymentStackName = 'NetworkProd'

Set-AzResourceGroupDeploymentStack -Name $DeploymentStackName -ResourceGroupName $RGName -TemplateFile $BicepFileName -DenySettingsMode $DenySettings -DeleteResources -Verbose -DenySettingsApplyToChildScopes

In this example, we tell Deployment Stacks to Delete Resources that are no longer part of the stack, and this time we will add the Verbose flag, so we can see what it is doing.

Azure Deployment Stack - Delete Resource Test

Note: I cut the gif, thats why the timestamps don't match, or you could be spending 10 minutes staring at the verbose output.

If we navigate to the Azure Portal, we can see the deleted resources listed in the Deployment stack history (only displays the last Deployment stack changes vs keeping a history of everything), and the Resource un-managed state has changed to: delete.

Azure Deployment Stack - Delete Resource Test

Note: A manually created Virtual Network in the same Resource Group (but not part of the deployment stack) remained untouched.

I forgot to update, the DenySettings variable, so once I re-deployed with the 'DenyWriteAndDelete' instead of: 'DenyDelete'. I was unable to disassociate my Network Security Group.

Azure Deployment Stack - Delete Resource Test

Permissions

I have 'Owner' rights over my own demo subscriptions, so a bit more flexibility than I would have in a Production environment.

You can add exclusions to your Deployment Stack, allowing certain principals or actions to be completed.

You could also create custom role (Microsoft.Resources/deploymentStacks) to be able to Read, Update or delete deployment stacks, giving you the flexibility to allow people to modify their own stacks and redeploy, without accessing to other tooling required and self-service functionality, such as being able to give someone a deployment stack, that the users can then delete the resources and redeploy later straight from the Azure Portal when required for testing.

Azure Bicep - Deploy Pane

· 2 min read

Working with Azure Bicep using Visual Studio Code, is as native as an experience as you can get, made even better by the Bicep Visual Studio Code extension.

The Bicep Visual Studio Code extension keeps evolving, with a recent (Experimental) feature being added called the Deploy Pane.

The Deployment Pane is a UI panel in VSCode that allows you to connect to your Azure subscription and execute validate, deploy & whatif operations and get instant feedback without leaving the editor.

Azure Bicep - Deploy Pane

The Deploy Pane, brings together some key actions:

  • Deploy
  • Validate
  • What-If

The Deploy step, will deploy the Bicep file using the Subscription Scope and ID specified in the pane. The validate step, will validate that the Bicep syntax is correct for the Azure Resource Manager to process the template. The What-If step, will let you know what it will deploy and what changes will be made, without having to deploy or touch any resources.

To enable the new Experimental Feature, make sure you are running the latest version of both Bicep, and the Bicep Visual Studio Code extension.

  1. Click on Settings
  2. Expand Extensions
  3. Navigate to: Bicep
  4. Check the box labelled: Experimental: Deploy Pane

Azure Bicep - Deploy Pane

Once enabled, you will see the new Deploy Pane, appear in the top right of your Visual Studio code interface, next to Bicep Visualizer, once you have a Bicep file loaded.

Azure Bicep - Deploy Pane

If you have any feedback regarding this extension, make sure to add your feedback to the azure/bicep issues