IPv6 in Microsoft Azure
With more support for IPv6 being added to native Azure products, its time to take a closer look into IPv6 and its use within Azure.
The deployment of IPv6, the latest version of the Internet Protocol (IP), has been in progress since the mid-2000s. IPv6 was designed as the successor protocol for IPv4 with an expanded addressing space. IPv4, which has been in use since 1982, is in the final stages of exhausting its unallocated address space but still carries most Internet traffic.
Overview
Most recently, Gateway Load Balancer and Application Gateway has had IPv6 support announced, allowing these services to handle both IPv6 along with IPv4, from client and server. IPv6 or Internet Protocol Version 6 is an upgrade of IPv4. A network layer protocol allows data communications to pass packets over a network. IPv6 uses 128-bit addressing and supports over 340 trillion trillion devices, a significant improvement over IPv4’s 32-bit addressing scheme that supports over 4.3 billion devices.
| IPv4 | IPv6 | |
|---|---|---|
| No. of bits on IP Address | 32 | 128 |
| Format | decimal | hexadecimal |
| Capable of Addresses | 4.3 billion | infinite number |
| How to ping | ping XXX.XXX.XXX | ping6 |
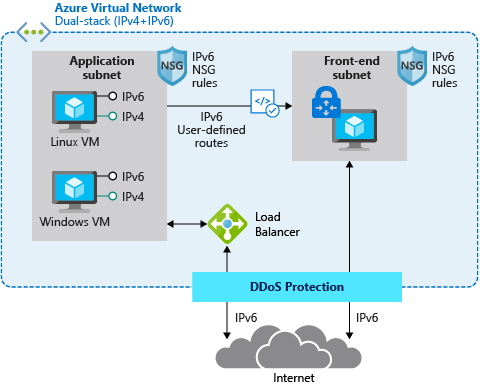
Azure Virtual Network enables you to host applications in Azure with IPv6 and IPv4 connectivity within a virtual network and to and from the Internet. Due to the exhaustion of public IPv4 addresses, new networks for mobility and the Internet of Things (IoT) are often built on IPv6. IPv6 provides a larger address space, improved security, and better performance than IPv4. Azure Virtual Network enables you to host applications in Azure with IPv6 and IPv4 connectivity both within a virtual network and to and from the Internet, which is beneficial for expanding the reach of your Azure-hosted applications into the growing mobile and Internet of Things markets
IPv6 for Azure virtual network is much more full-featured - enabling full IPv6 solution architectures to be deployed in Azure.
There are some current limitations to be aware of, such as:
- VPN gateways currently support IPv4 traffic only, but they can still be deployed in a dual-stacked virtual network using Azure PowerShell and Azure CLI commands only.
- IPv6-only Virtual Machines or Virtual Machines Scale Sets aren't supported; each NIC must include at least one IPv4 IP configuration.
- ICMPv6 isn't currently supported in Network Security Groups.
- Azure Firewall doesn't currently support IPv6. It can operate in a dual-stack virtual network using only IPv4, but the firewall subnet must be IPv4-only.
Although still in a transitory period with some services, Microsoft has come some way to enabling IPv6 dual stack (IPv4 and IPv6) services, with Entra ID even supporting running on IPv6, and with US Government mandates like below:
On November 19, 2020, the United States Office of Management and Budget (OMB) issued the latest U. S. federal government IPv6-only policy in its memorandum (M-21-07) directing all federal government agencies to complete at least 80% of the transition from IPv4 to the single stack of IPv6 by 2025.
This will be an ever-increasing functionality.
As the world becomes increasingly interconnected, the need for robust and scalable networking solutions has never been greater. IPv6 is the latest version of the Internet Protocol, offering a range of benefits over its predecessor, IPv4.
There are several benefits of using IPv6 over IPv4, including:
- Larger Address Space: IPv6 uses 128-bit addresses, which provides a much larger address space than IPv4's 32-bit addresses. This means that there are more available addresses, an estimated 340 undecillion addresses, which is essential as the number of devices connected to the internet continues to grow. It was intended to replace IPv4. (The primary reason for IPv4 address exhaustion is insufficient capacity to design the original Internet infrastructure. The original designers of the network did not anticipate the rapid growth of the internet and the increasing demand for IP addresses. This depletion is one of the reasons for the development and deployment of its successor protocol, IPv6)
- Improved Security: IPv6 includes built-in security features such as IPsec, which provides end-to-end encryption and authentication. This helps to ensure that data transmitted over the network is secure and protected from unauthorized access. Since IPv4 was already defined, IPsec is bolted on (IPSec packets are payload), but IPv6 was still being determined, and IPsec is an integral part of IPv6. From the beginning, IPv6 has had the AH and ESP extension headers, something not possible with IPv4.
- Better Quality of Service: IPv6 includes features that allow for better quality of service (QoS), such as flow labelling and traffic classification. This helps ensure that critical applications receive the bandwidth and priority they need to function properly. This is especially important for real-time applications like video conferencing and online gaming.
- Future-Proofing: IPv6 supports future technologies and applications, such as the Internet of Things (IoT), smart homes/farms and cloud computing. By adopting IPv6, organizations can ensure their networks are ready to support these emerging technologies and applications.
There is no charge to use Public IPv6 addresses or prefixes, in Microsoft Azure, resources and bandwidth on Azure are charged at the same rates as for IPv4.
In addition, Azure provides tools and services for monitoring and managing IPv6 traffic, such as Azure Network Watcher and Azure Traffic Manager. These tools allow you to monitor network traffic with IP flow verification, for example, that checks if packets from IPv6 are allowed or denied and also tells you what security rule allowed or denied the traffic, diagnose issues, and optimize performance, ensuring that your IPv6-enabled applications and services are running smoothly.
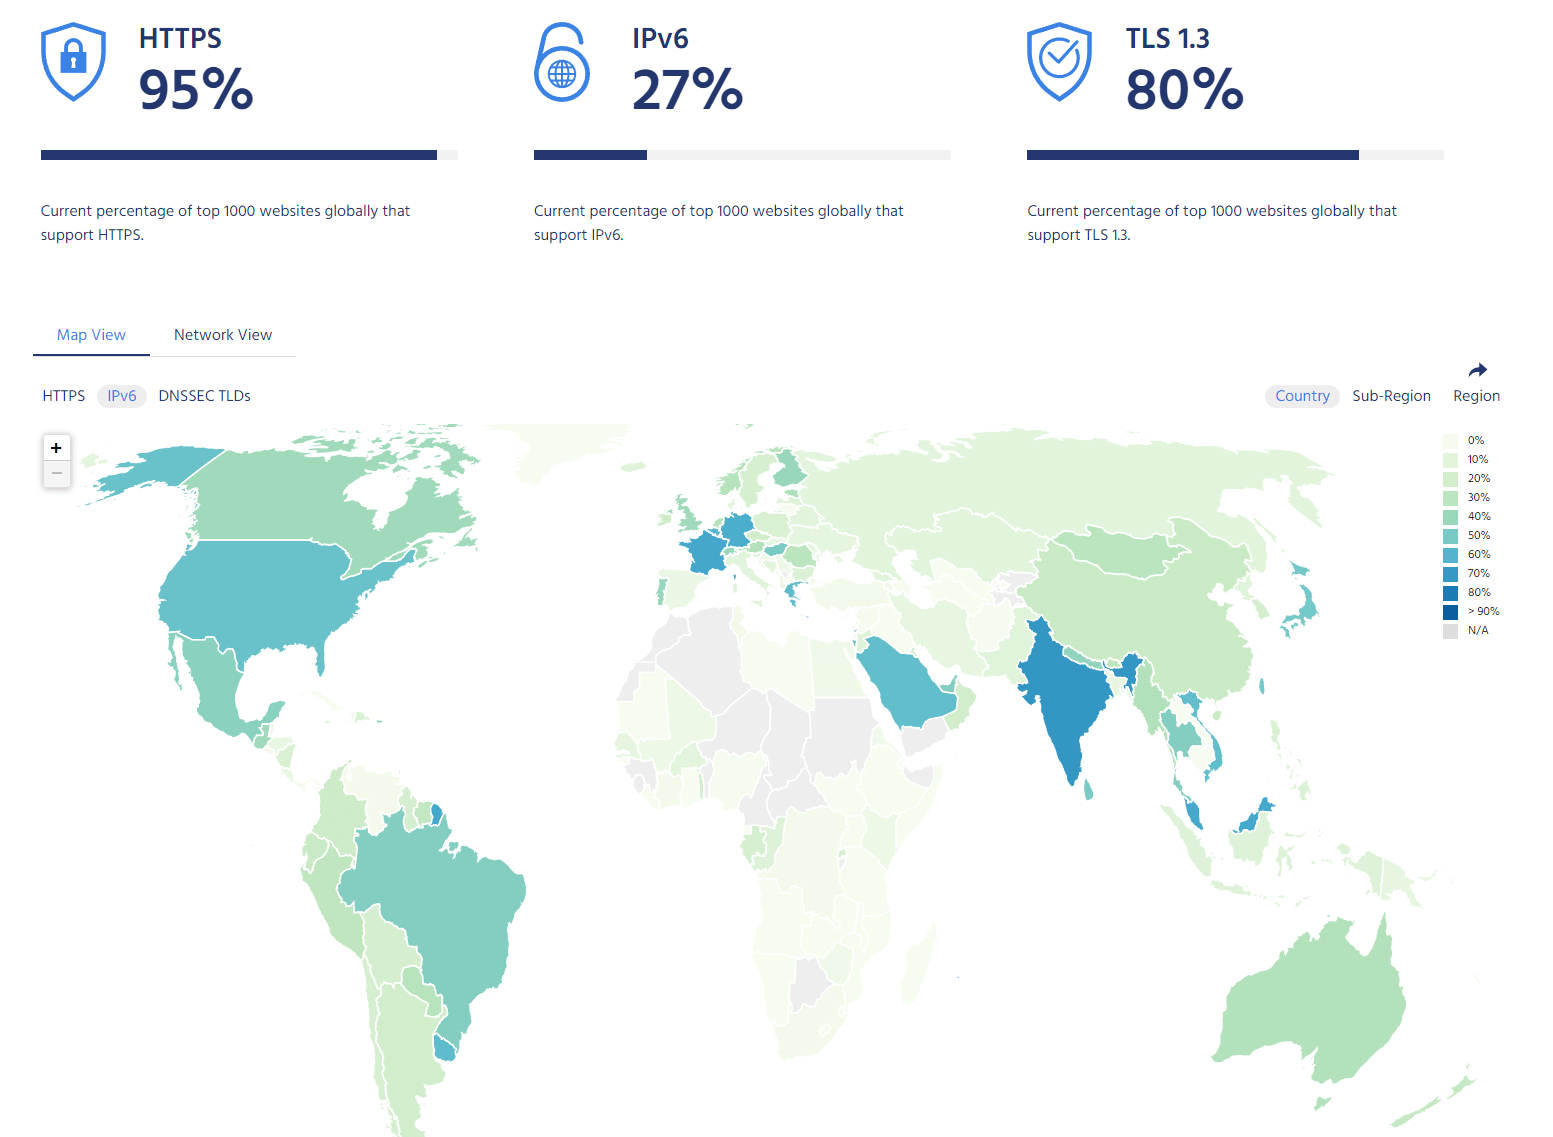
If we look at the Internet Society pulse (current as of this article), 27% of the top 1000 websites globally support IPv6, growing every day.
The transition to IPv6 will take time. While many services and platforms already support IPv6, many still need to, and as more and more devices are connected to the internet, the need for IPv6 will only grow. So, we need to be prepared and start preparation and implementation of IPv6 solutions as soon as possible.
So, when you hear IPv6, always consider the following:
- Availability: There is no risk of IPv6 IP exhaustion.
- Cost: IPv6 IPs cost Azure zero dollars. This could be a trigger for customers to choose Azure.
- Compliance: IPv6 mandates are helping governments start their journeys to the cloud.
- Network Performance: NATing (Network Address Translation) adds network latency. IPv6 does not require NATing for cross-region traffic.
Getting Started with IPv6 in Azure
Azure Virtual WAN currently supports IPv4 traffic only.
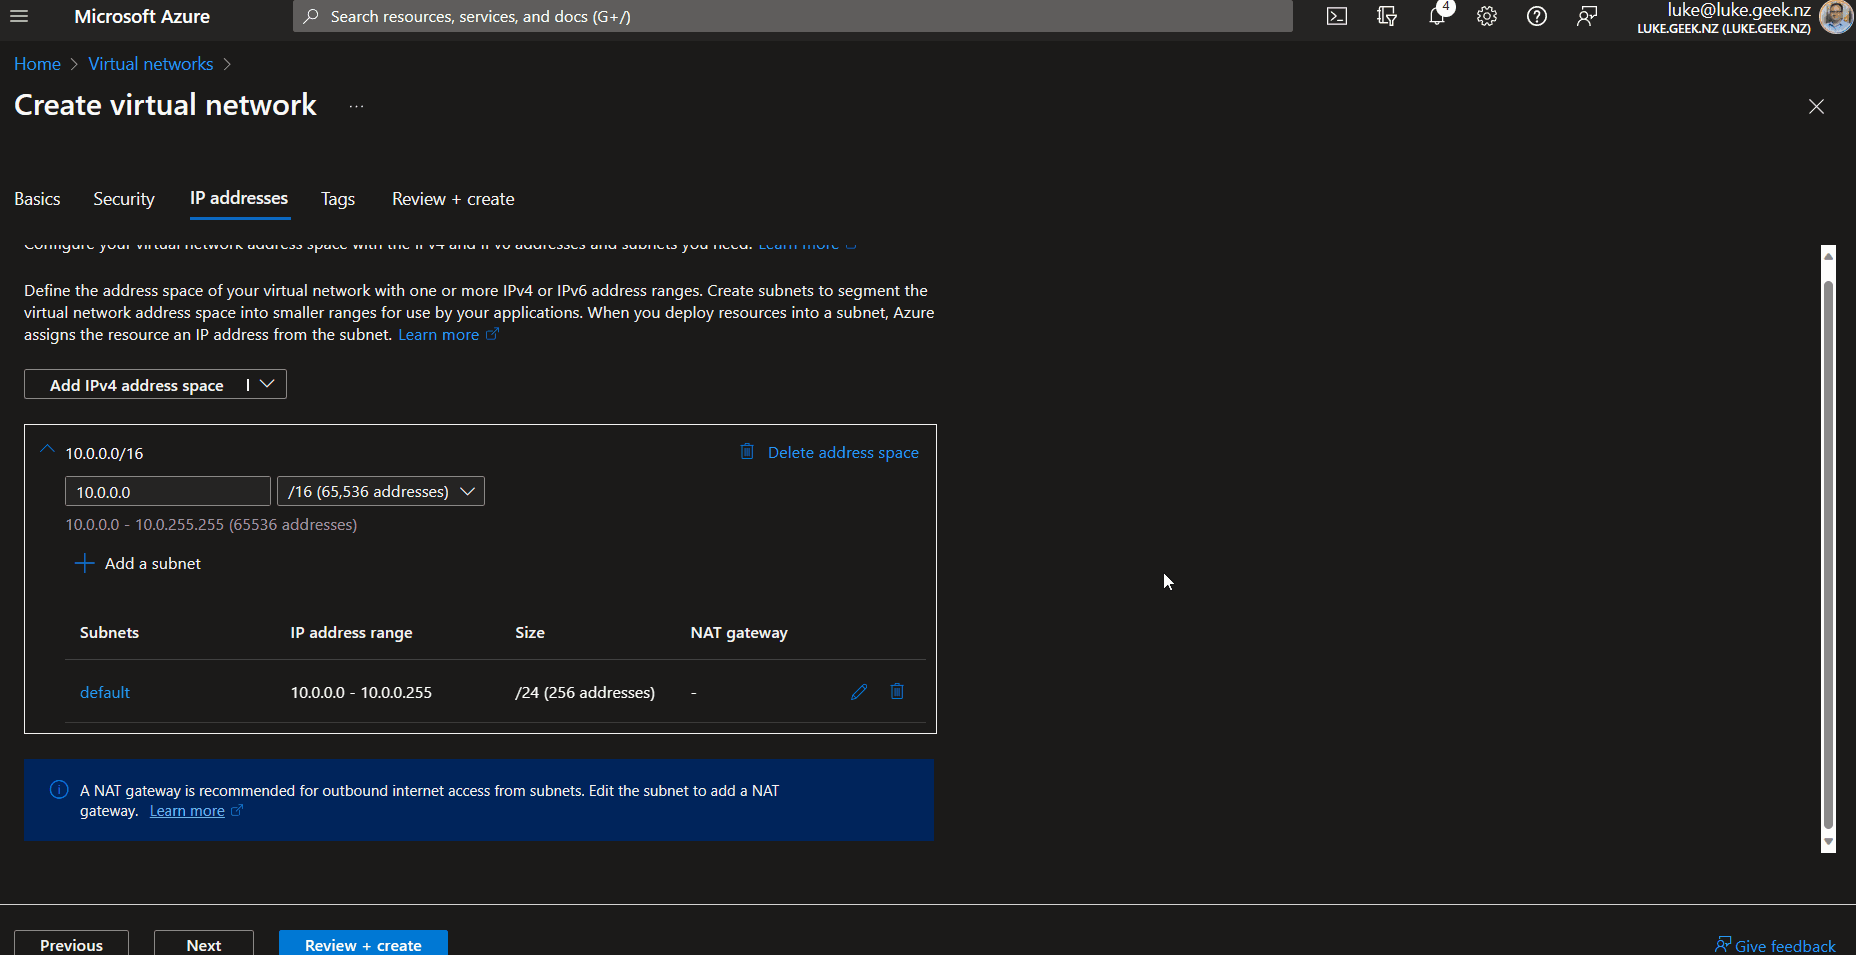
Add IPv6 address space to an existing Virtual Network
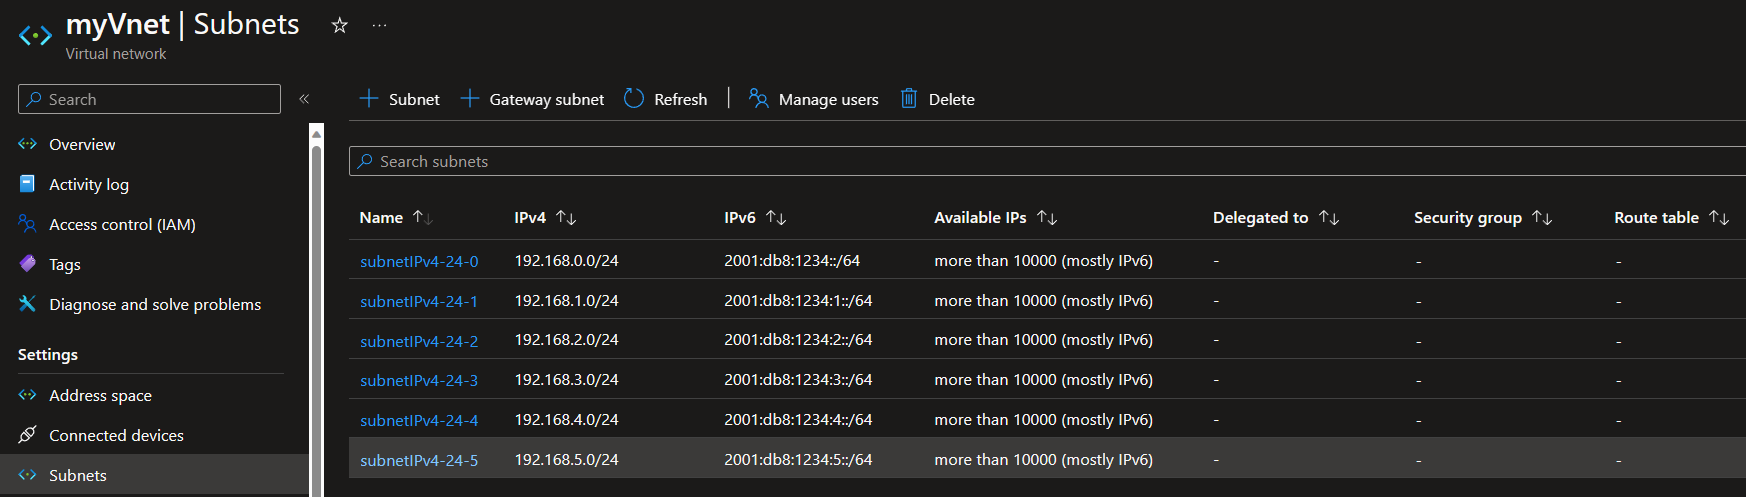
We can add IPV6 ranges to an existing Azure Virtual Network by adding an IPV6 address range and then dual stacking both IPV4 and IPV6 ranges.
The subnets for IPv6 must be exactly /64 in size. This ensures future compatibility should you decide to enable subnet routing to an on-premises network since some routers can only accept /64 IPv6 routes. To add IPv6 to existing IPv4 deployments, you can't add IPv6 ranges to a virtual network with existing resource navigation links.
In my demo, I have a Virtual Network with an IPV4 address space of 10.0.0.0/16 (65,536 addresses)
For my demo purposes, I will add in an IPV6 address space of: 2001:db8🔢:/48 (1208925819614629174706176 addresses)
With two subnets of:
- 2001:db8🔢:/64 (18446744073709551616 addresses)
- 2001:db8🔢1::/64 (18446744073709551616)
Reference: IPV6 Calculator
- Navigate to the Azure Portal
- Navigate to Virtual Networks
- Navigate to the Virtual Network you want to add an IPV6 address range into.
- Add in the IPV6 address space, click Save
- Once completed, you can add your subnets.
Add IPv6 address space to a new existing Virtual Network
Adding an IPV6 range to a New Virtual Network is reasonably easy using the Portal interface.
The subnets for IPv6 must be exactly /64 in size. This ensures future compatibility should you decide to enable subnet routing to an on-premises network since some routers can only accept /64 IPv6 routes.
- Navigate to the Azure Portal
- Navigate to Virtual Networks
- Click on New Virtual Network
- Select a name for your Virtual Network
- Select the Region and Resource Group, click Next
- Skip the Security pane (unless needed) and click Next
- Select the dropdown for Add Ipv4 address space, and select Add IPv6 address space
Azure provides automatic IPv6 address allocation for resources in a Virtual Network. When you enable IPv6 for a Virtual Network, Azure assigns IPv6 addresses to resources like virtual machines and load balancers. Linux and Windows Virtual Machines can all use IPv6 for Azure Virtual Network.
If your Virtual Network is peered, sync the connections so that your peered networks can see the IPv6 resources.
Create a Virtual Machine in a IPV6 subnet
- Navigate to the Azure Portal
- Navigate to Virtual Machines
- Click Create Azure Virtual machine
- Go through the Create Virtual Machine wizard until you hit Networking and select the Virtual Network and Subnet with the IPV6 addresses. Your Network Interface needs to sit in the subnet that has IPV6 address ranges.
You can also also create a separate NIC (Network Interface Card), assign it to the IPv6 subnet, and have this as a secondary NIC.
Creating dual-stack network with Azure Bicep
// This function parses the CIDR notation and returns an object with the network address, subnet mask, and other details.
output v6addressspace object = parseCidr('2001:db8:1234::/48')

// This function generates an array of subnets within the specified CIDR block. The subnet size is 64, and the index calculates the subnet.
// The 'range(0, 5)' function generates an array of numbers from 0 to 4. The 'for' loop iterates over these numbers.
// For each number 'i', the 'cidrSubnet' function calculates a subnet within the '2001:db8:1234::/48' CIDR block.
// The subnet size is 64, and 'i' is used as the index. The resulting array contains the calculated subnets.
output v6subnets array = [for i in range(0, 5): cidrSubnet('2001:db8:1234::/48', 64, i)]

// This function generates an array of host addresses within the specified CIDR block. The index is used to calculate the host address.
// Similar to the 'v6subnets' array, the 'range(0, 5)' function generates an array of numbers from 0 to 4.
// For each number 'i', the 'cidrHost' function calculates a host address within the '2001:db8:1234::/48' CIDR block.
// The resulting array contains the calculated host addresses.
output v6hosts array = [for i in range(0, 5): cidrHost('2001:db8:1234::/48', i)]

// This function generates a string within the specified CIDR block. The host index is always 3 (Azure Reserved).
// The 'cidrHost' function calculates a host address within the '2001:db8:1234::/48' CIDR block.
// The host index is '0 + 3', which is 3. This is because the first three addresses in a subnet are reserved in Azure.
output v6hostsazure string = cidrHost('2001:db8:1234::/48', 0 + 3)

// This Bicep file creates an Azure Virtual Network with IPv4 and IPv6 subnets.

// Set the default location to the location of the resource group
param location string = resourceGroup().location

// Set the number of subnets to be created
param subnetnumber int = 6

// Define the network address for the virtual network
var vnetAddress = '2001:db8:1234::'

// Define the network size for the virtual network
var vnetSize = 48

// Combine the network address and size into a CIDR block for the IPv6 virtual network
var vnetCidrIPv6 = '${vnetAddress}/${vnetSize}'

// Define the network address for the IPv4 virtual network
var vnetAddressIPv4 = '192.168.0.0'

// Define the network size for the IPv4 virtual network
var vnetSizeIPv4 = 16

// Combine the network address and size into a CIDR block for the IPv4 virtual network
var vnetCidrIPv4 = '${vnetAddressIPv4}/${vnetSizeIPv4}'

// Define the subnet sizes for IPv4 and IPv6
var subnetSizeIPv4 = 24
var subnetSizeIPv6 = 64

// Generate the IPv4 subnets
// This loop will create a number of subnets equal to 'subnetnumber'
// Each subnet will have a unique name and address prefix
var subnetsIPv4 = [for i in range(0, subnetnumber): {
  name: 'subnetIPv4-${subnetSizeIPv4}-${i}'
  properties: {
    addressPrefix: cidrSubnet(vnetCidrIPv4, subnetSizeIPv4, i)
  }
}]

// Create the virtual network with IPv4 subnets
// This resource includes both IPv4 and IPv6 address spaces
// But only the IPv4 subnets are created at this point
resource vnet 'Microsoft.Network/virtualNetworks@2023-04-01' = {
  name: 'myVnet'
  location: location
  properties: {
    addressSpace: {
      // Add the IPv4 and IPv6 CIDR blocks to the address prefixes
      addressPrefixes: [ vnetCidrIPv4, vnetCidrIPv6 ]
    }
    subnets: subnetsIPv4
  }
}

// Update the IPv4 subnets to add the IPv6 address prefixes
// Bicep does not currently support dual stack, so the subnets must be updated after the virtual network is created and the IPv6 address space is added. Bicep will attempt to create both the IPv4 and IPv6 subnets at the same time, leading to Retry and failed errors. Redeploy if required.
resource subnetsIPv6 'Microsoft.Network/virtualNetworks/subnets@2023-04-01' = [for i in range(0, subnetnumber): {
  name: 'subnetIPv4-${subnetSizeIPv4}-${i}'
  parent: vnet
  properties: {
    addressPrefixes: [ subnetsIPv4[i].properties.addressPrefix, cidrSubnet(vnetCidrIPv6, subnetSizeIPv6, i) ]
  }

}]
Reference: Add "wait" and "retry" deployment options #1013

Configure Virtual Machine with a private IPv6 address
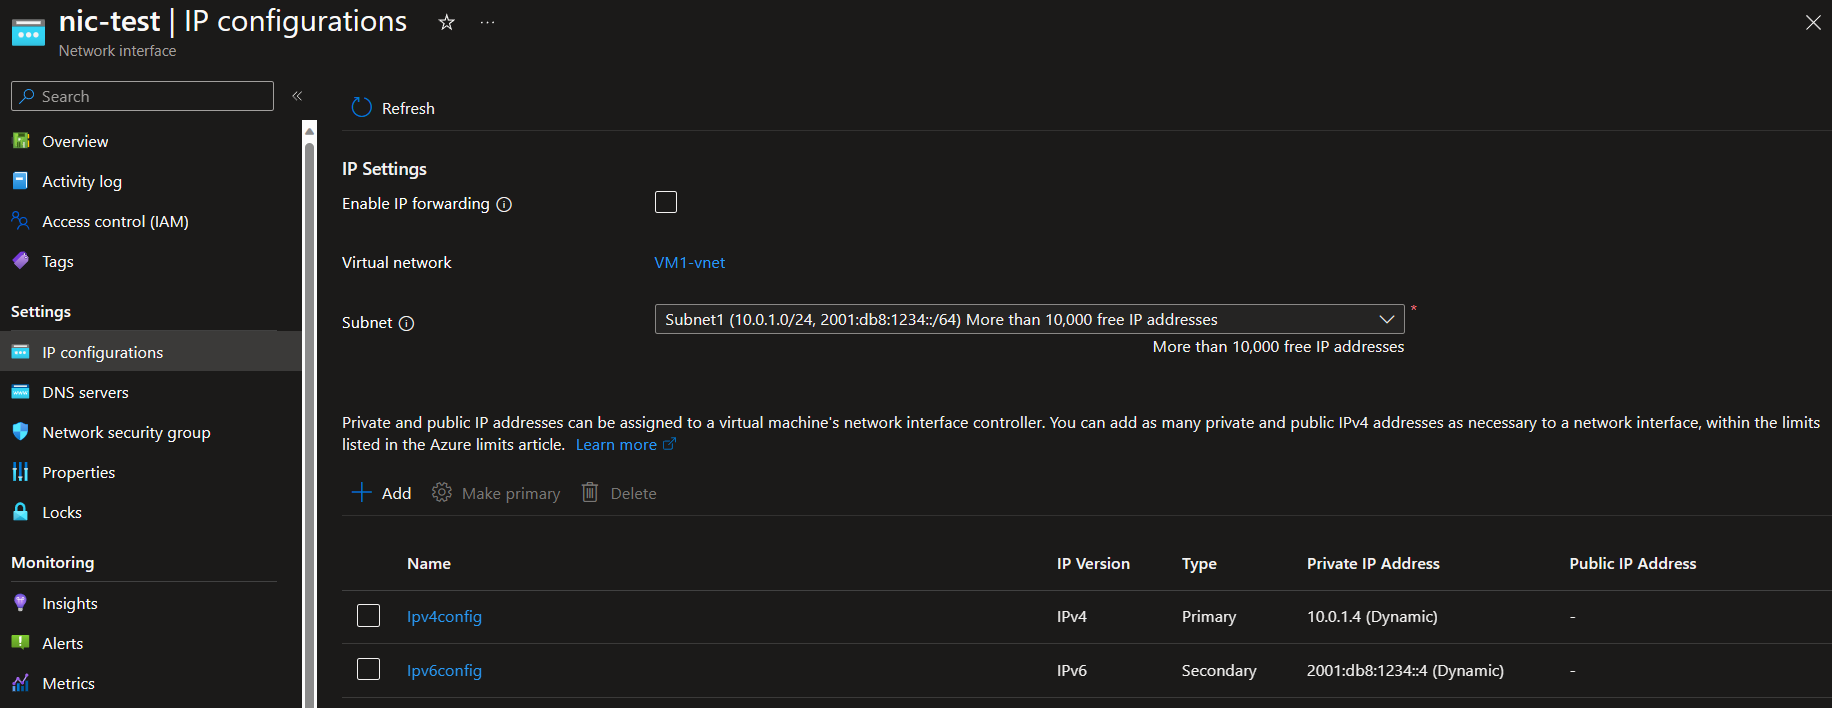
Now that we have IPv6 addresses in our Virtual Network, I have a Windows Server 2022 Azure Virtual Machine created in a dual-stacked subnet; we can add an IPv6 IP configuration by navigating to the NIC of the VM and adding ipconfiguration.
Configure Virtual Machine with a public IPv6 address
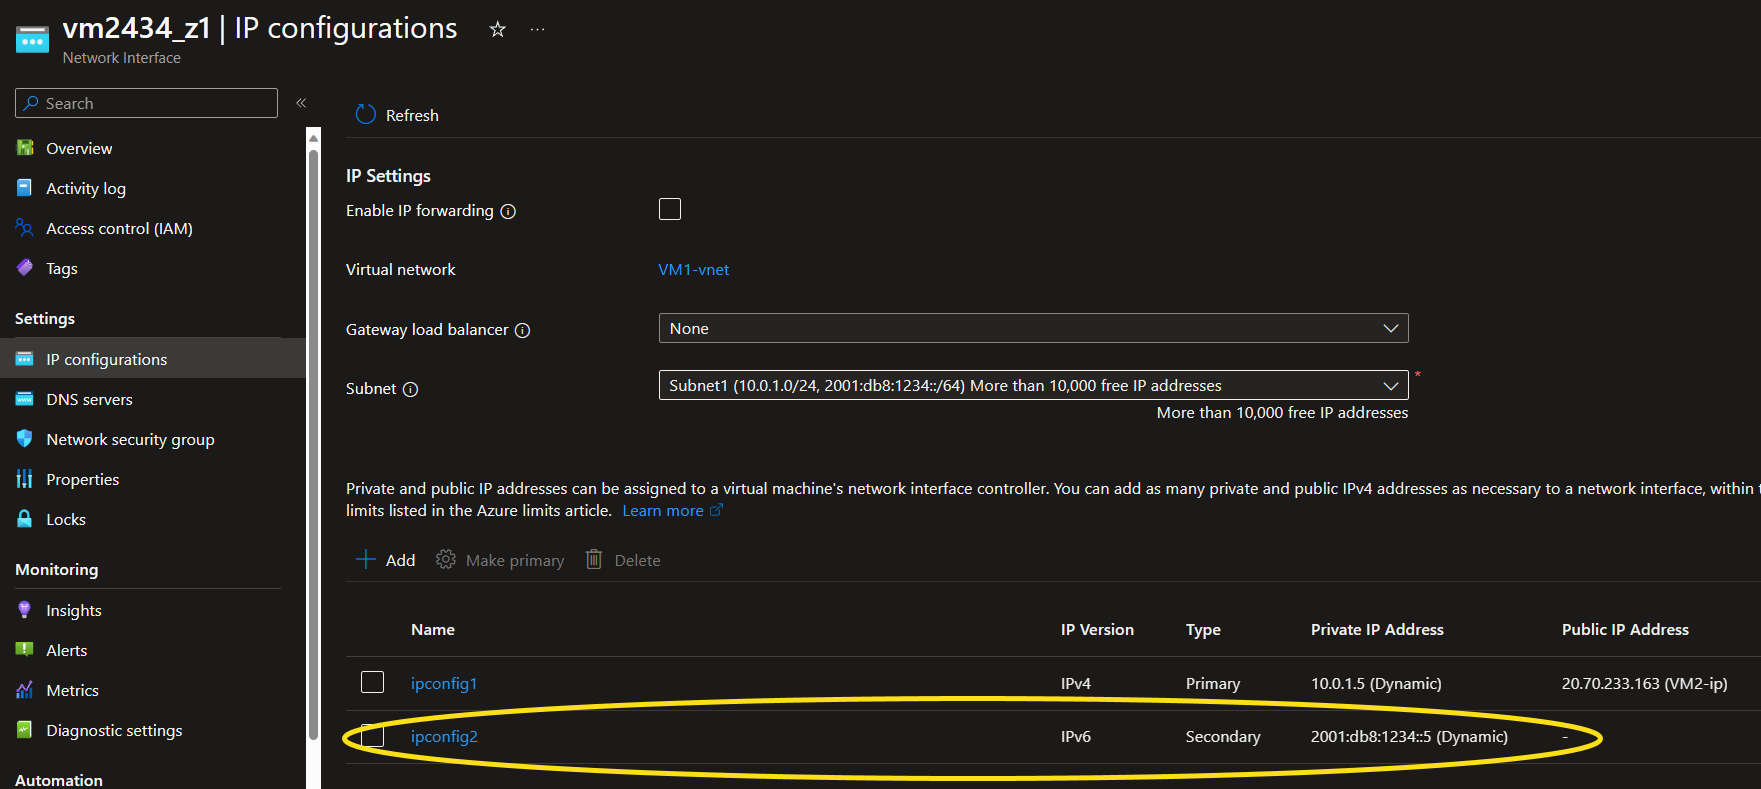
You can add a public IPv6 address to a virtual machine similar to the private IPv6 address, but first, we must create our public IP.
- Navigate to the Azure Portal
- Navigate to Public IP addresses
- Click + Create
- Select your Subscription/Resource Group and Region
- Enter a name for your Public IP and select IP Version as: Ipv6
- Click Review + Create
- Click Create
- Once created, shutdown the Virtual Machine you want to attach the public IP to
- Navigate to Networking on the Virtual Machine blade
- Click Attach network interface, and select your Ipv6 Public IP
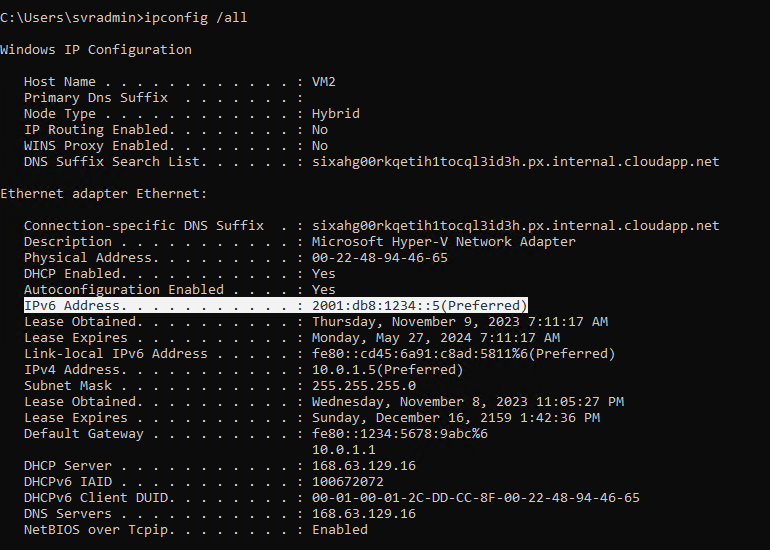
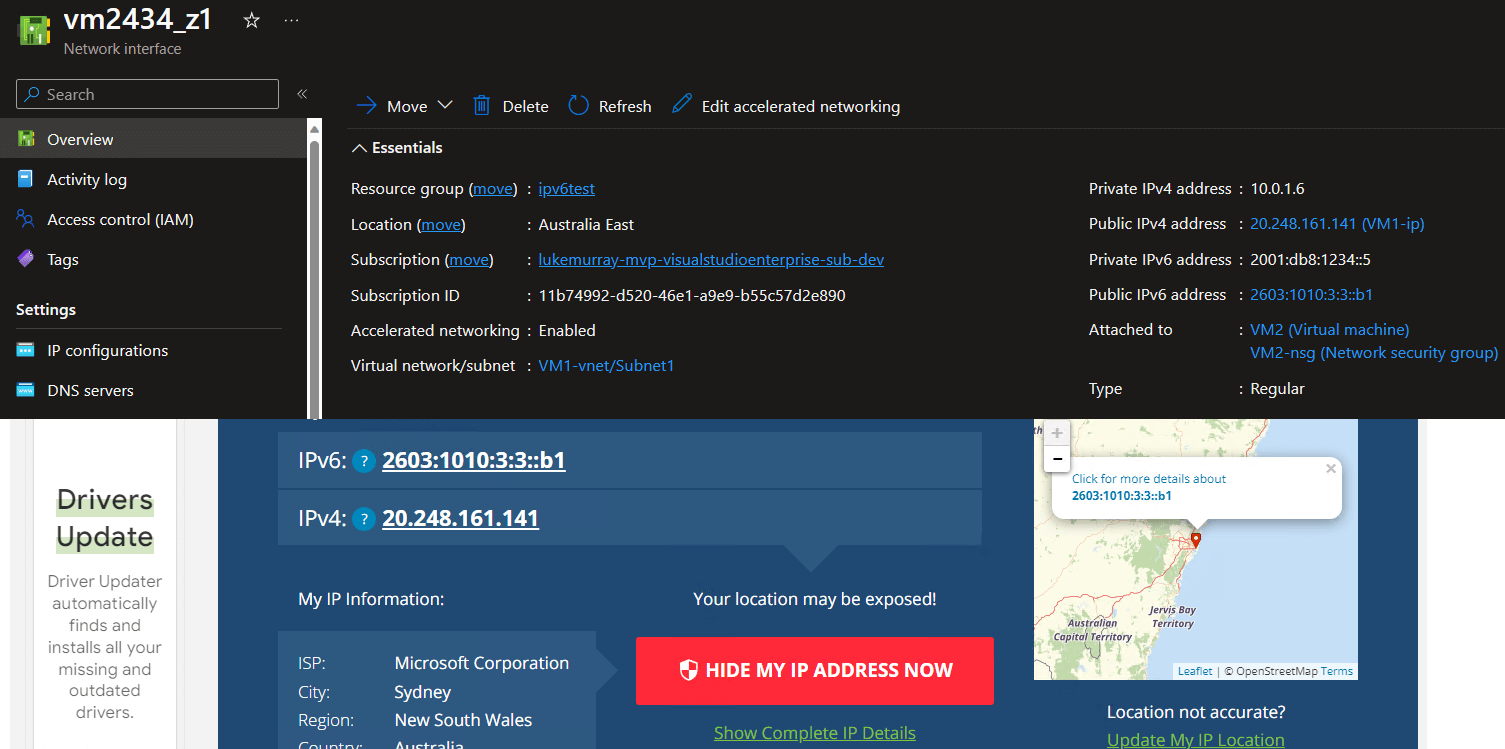
- Start your Virtual Machine and navigate to https://whatismyipaddress.com/; your ipv6 public IP address should now match your newly added address.
You can test connectivity to your newly published IPv6 address now.
Any issues, make sure you checkout https://test-ipv6.com/ and http://www.ipv6scanner.com, from your client.